Foundation Passport Review 2024: A True FOSS Hardware Wallet
The Foundation Passport, a premium Bitcoin-only hardware wallet, guarantees security through full airgapping. In this review, we delve into its user-friendliness, assessing its ease of use for secure Bitcoin storage.

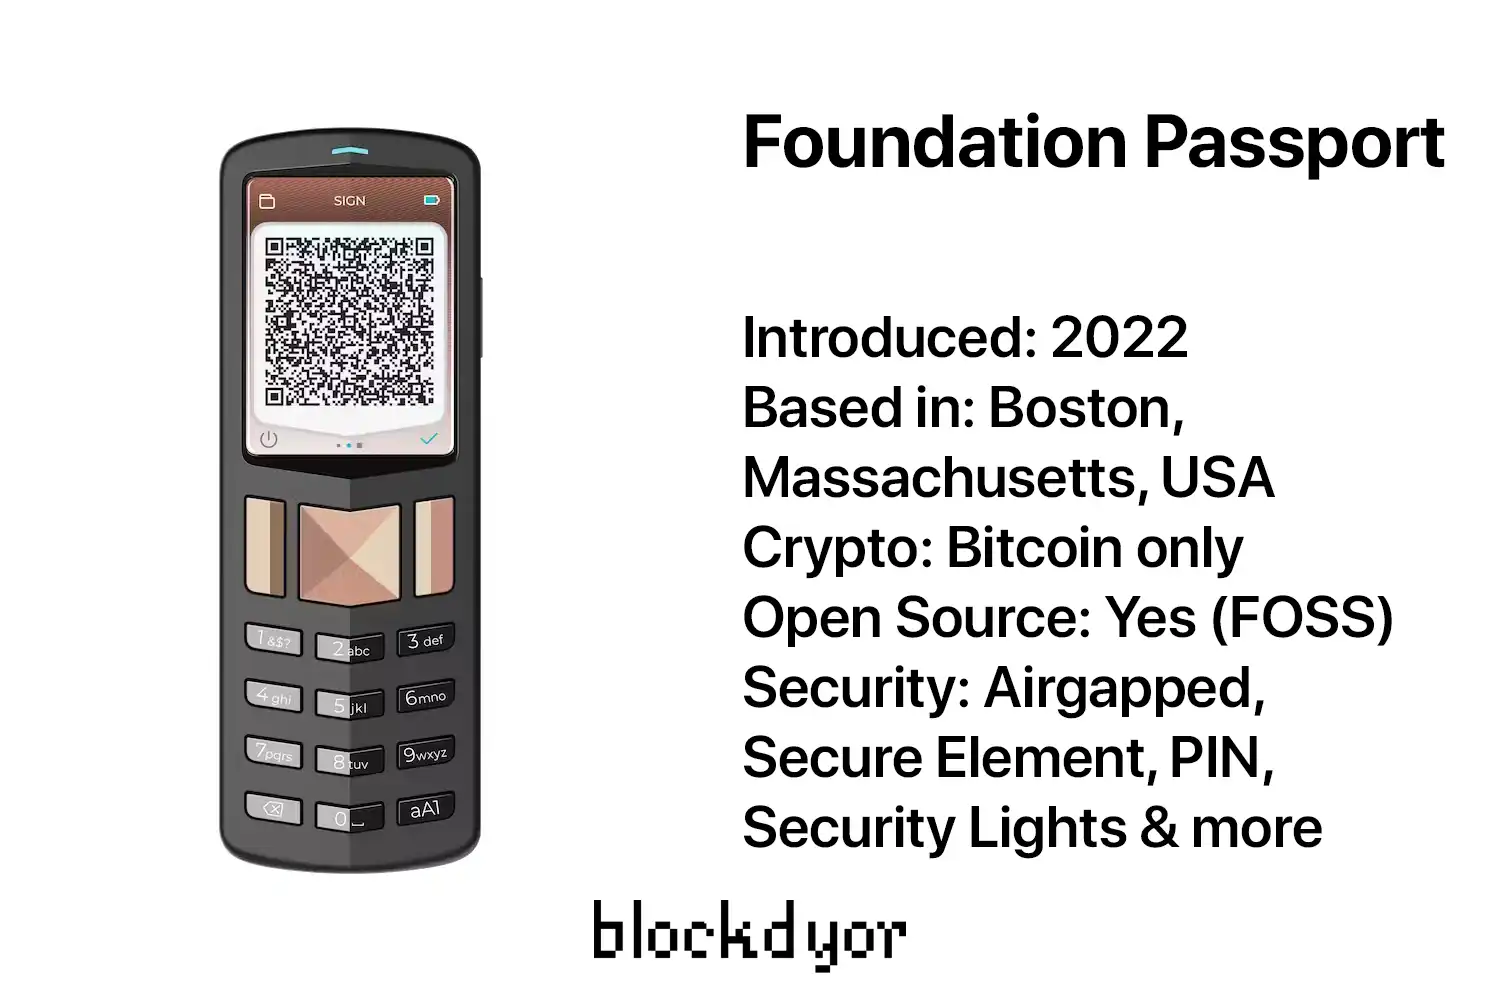
Foundation is a pioneering company specializing in the creation of the Passport, a hardware wallet exclusively designed for Bitcoin. The emphasis of this wallet is on airgapped technology, ensuring there is no direct connection to the external world, thereby achieving true cold storage.
The Passport emerged in 2022 as Foundation Devices' second-generation Bitcoin hardware wallet, succeeding the 2020 "Passport Founders Edition". Assembled in the USA, it maintains air-gapped security and open-source design. Upgrades from the Founders Edition encompass a slightly increased size accompanied by a sensible reduction in thickness, a USB-C charging port, color IPS display, rectangular keypad keys, an enhanced lithium-ion battery.
In this comprehensive Foundation Passport review, we will thoroughly examine and analyze the Foundation Passport, providing insights into its features and ultimately determining whether it could be the ideal choice for your bitcoin cold storage needs.
| DESCRIPTION | DETAILS |
|---|---|
| 💻 Name | Foundation Passport |
| 🌐 Website | foundationdevices.com |
| 🗓 Release year | 2022 |
| 💰 Coins Supported | Bitcoin (BTC) |
| 💸 Price | €199.00 ($199.00) |
| 🔒 Security Features | Airgap, Secure Element Chip, PIN, Passphrase, Anti-Tampering Packaging, Multisig, Security Lights, Anti-phishing Words |
| 💻 Compatibility | iOS, Android, macOS, Windows, Linux, and ChromeOS |
| 🖥 Display | 2.00" high-resolution, color IPS display bounded to ultra strong glass |
| 🔄 Connectivity | USB-C cable (Power Only, Included) |
| 📏 Dimensions | 39mm x 110.8mm x 19.2mm (86.61 cm³), equivalent to 1.54 inches x 4.36 inches x 0.76 inches (5.29 in³) |
| ⚖️ Weight | Weight: 128 g (4.52 oz) |
| 🔋 Battery Capacity | 1200 mAh Lithium Ion |
| 🛡️ Warranty | 1 Year |
| 📖 Open Source | Yes (FOSS) |
| 🔄 Firmware Reproducible | Yes |
Foundation Passport Main Features
The Passport seamlessly incorporates every feature desired by privacy-conscious Bitcoin users, presenting an unprecedented level of user-friendly functionality.
Airgap Security
The Passport ensures high security by maintaining an airgapped environment, completely isolated from the outside world. Communication relies on a camera and QR codes, offering a robust defense against potential threats.
Triple Source Of Entropy
To generate entropy for the seedphrase, the Passport uses the microcontroller MCU’s built-in random number generator and another True Random Number Generator (TRNG) located in the secure element. TRNGs derive randomness from physical processes, making the generated numbers highly unpredictable and resistant to manipulation. This is a key factor in ensuring the security of cryptographic operations, as any predictability in the generation of keys could potentially be exploited by malicious actors.
In addition to the TRNG, the Passport incorporates an open-source Avalanche Noise Source as part of its entropy sources. Avalanche noise is a type of electronic noise generated using common parts like resistors/capacitors. By utilizing these physical processes, Passport enhances the randomness of the data used in cryptographic operations, adding an extra layer of security to the device.
Rechargeable Battery
Equipped with a 1200 mAh Lithium Ion battery in a user-removable Nokia BL-5C form factor, and the battery life is long enough for many sessions. The inclusion of a power-only USB-C port ensures efficient charging without compromising the airgapped security model.
Stunning Glass Display
The Passport boasts a high-resolution color IPS display bonded to ultra-strong glass. This vibrant display not only facilitates easy QR scanning but also provides durability against scratches and damage.
FOSS
The Passport's software is released under the GNU General Public License version 3 (GPLv3). This license ensures that the freedoms of users are protected. It includes the freedom to run, study, share, and modify the software. By adhering to the principles of GPLv3, the Passport aligns itself with the broader free software movement.
The hardware is also available as open source, with all design files, both mechanical and electrical, falling under the CERN-OHL-S license. Specifically, the hardware within the Passport, covered by CERN-OHL-S v2, is a viral, copyleft, open source license tailored for hardware projects. This license shares similar goals with GPLv3 but is specifically crafted for hardware initiatives.
Wide compatibility
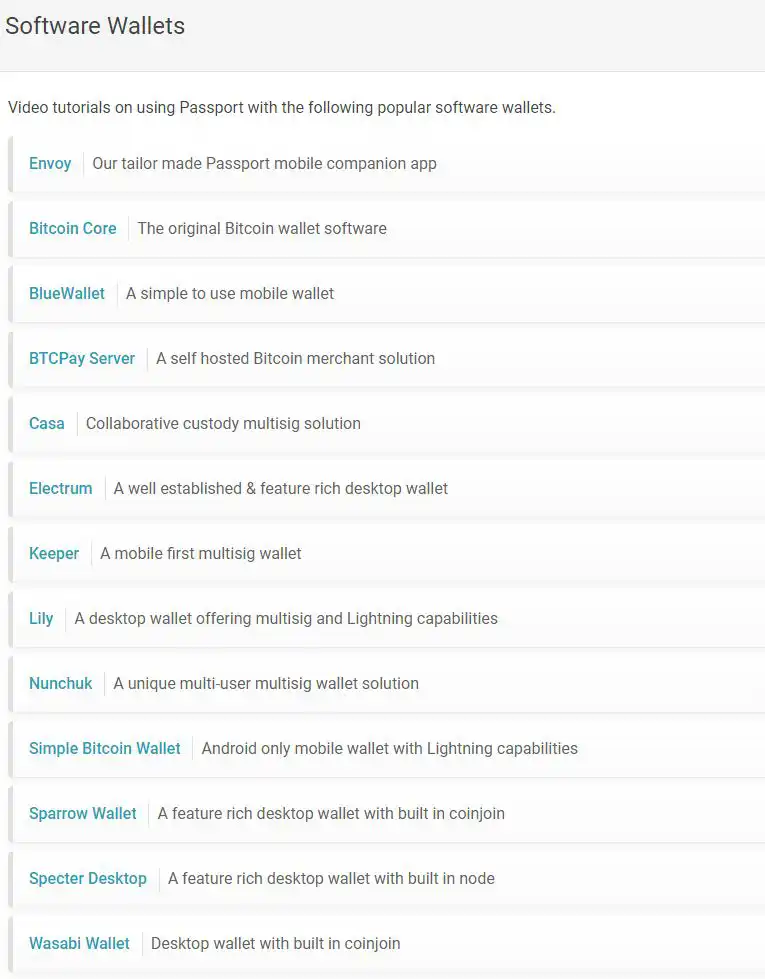
Compatibility extends to various software wallets, including Bitcoin Core, BlueWallet, BTCPay, Casa, Electrum, Sparrow Wallet and others.
What’s In The Box?
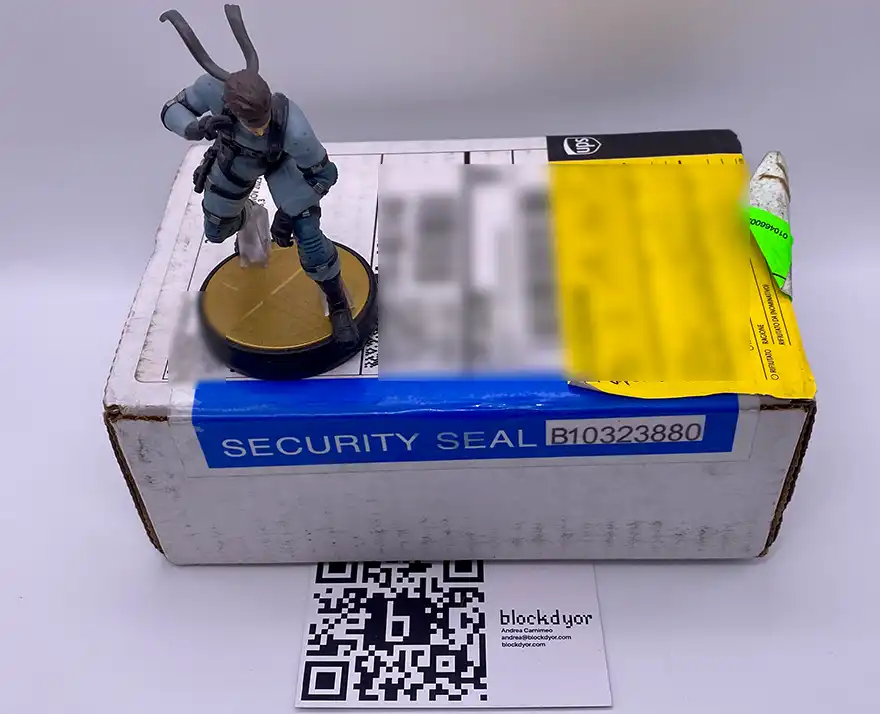
The package is sent by Foundation from the U.S. If you're outside the U.S., there might be import taxes. It's a small box without any mention of bitcoin. It has a tamper-evident seal that says "VOID OPENED" if opened, along with a serial number. Before opening, check that everything is in order.
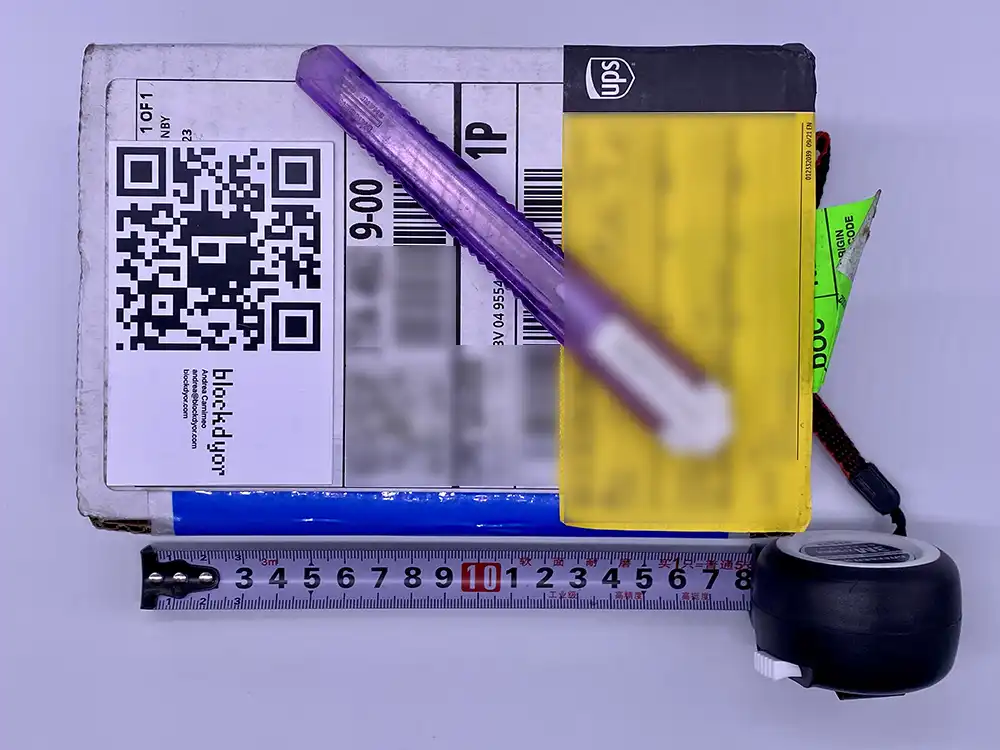
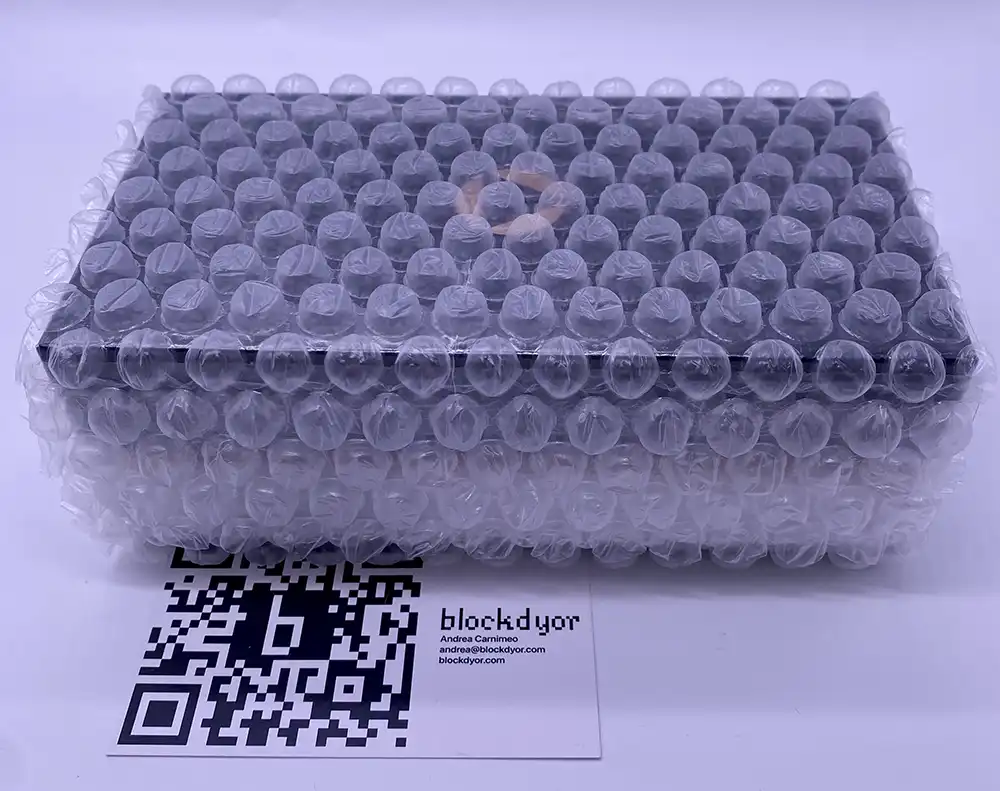
The box is shielded with bubble wrap for shipping safety. I'll now unwrap it.
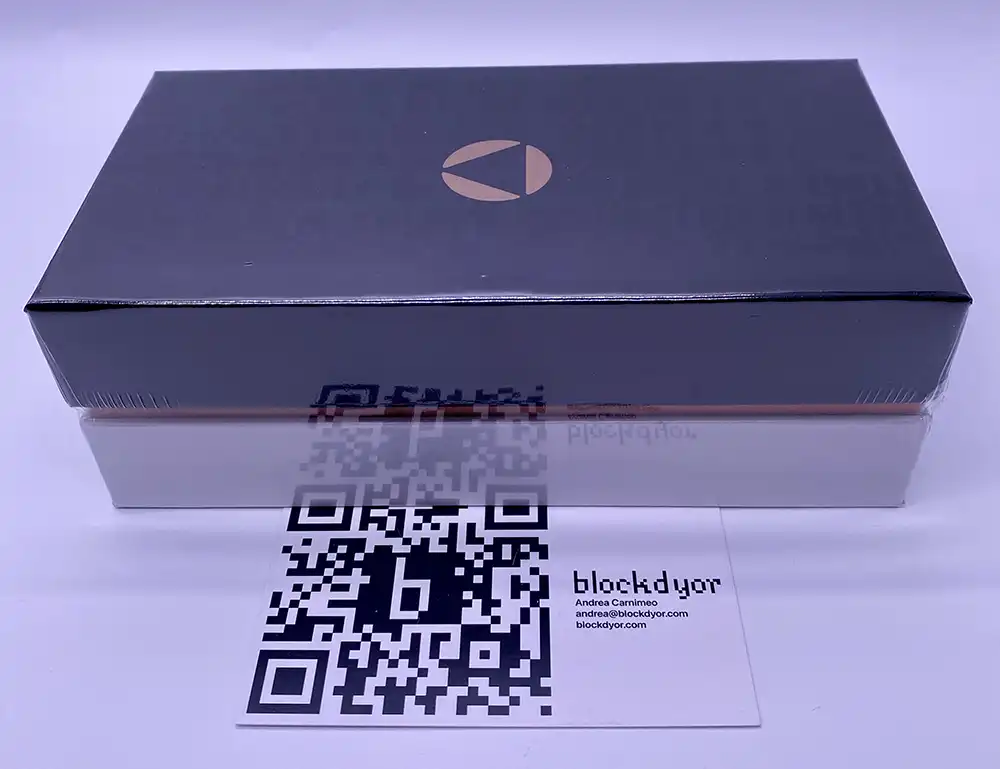
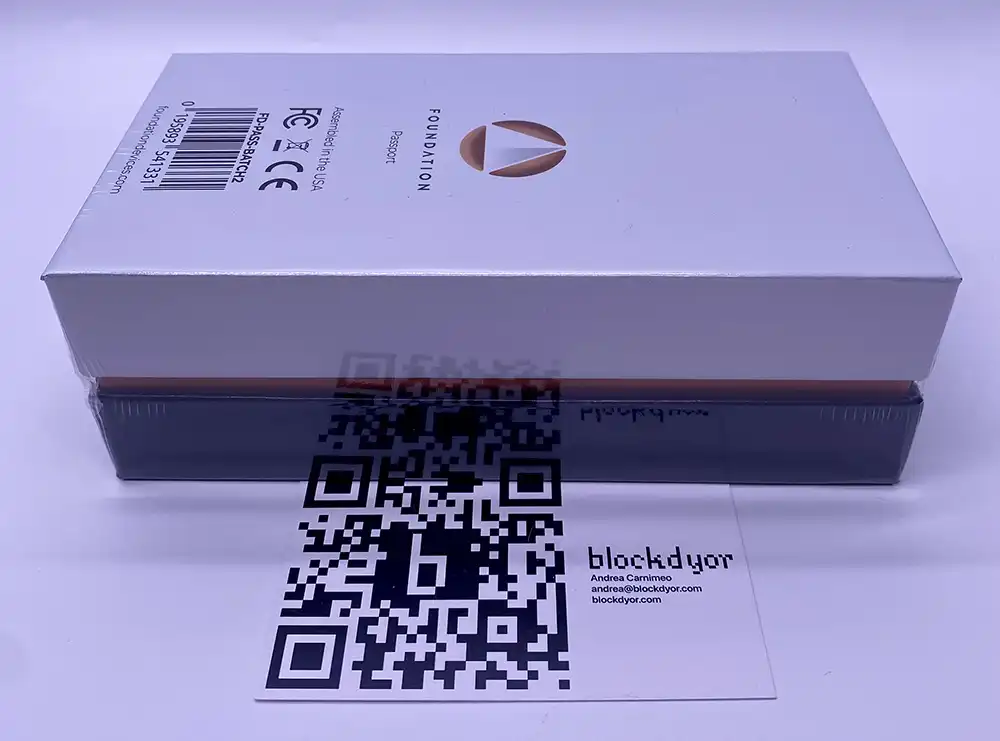
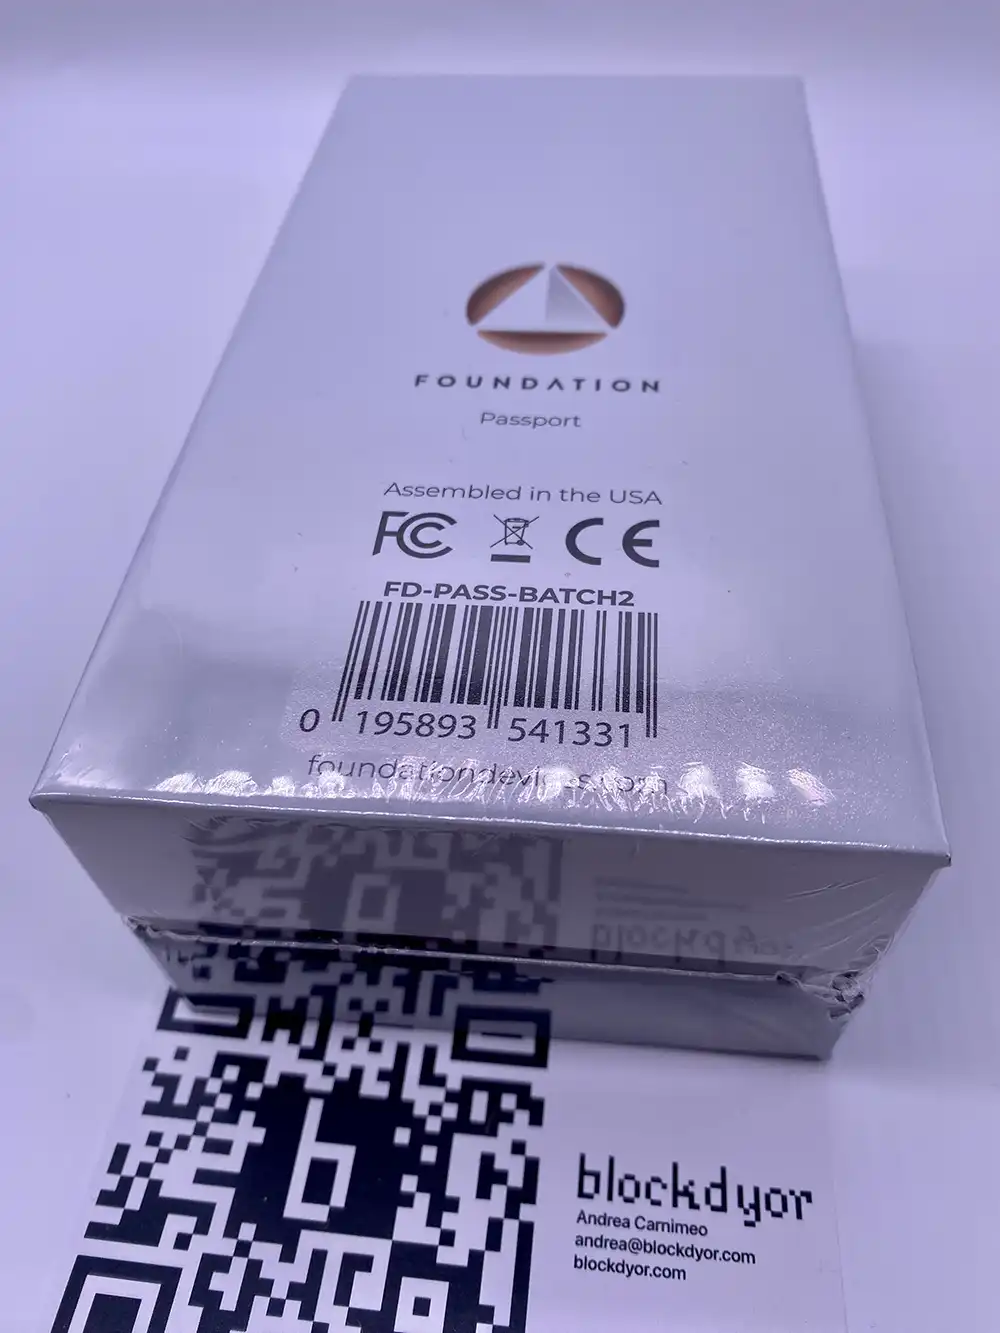
The box inside proudly showcases multiple Foundation logos and the "Assembled in USA" label. However, it lacks any anti-tampering measures and is simply wrapped in plastic.
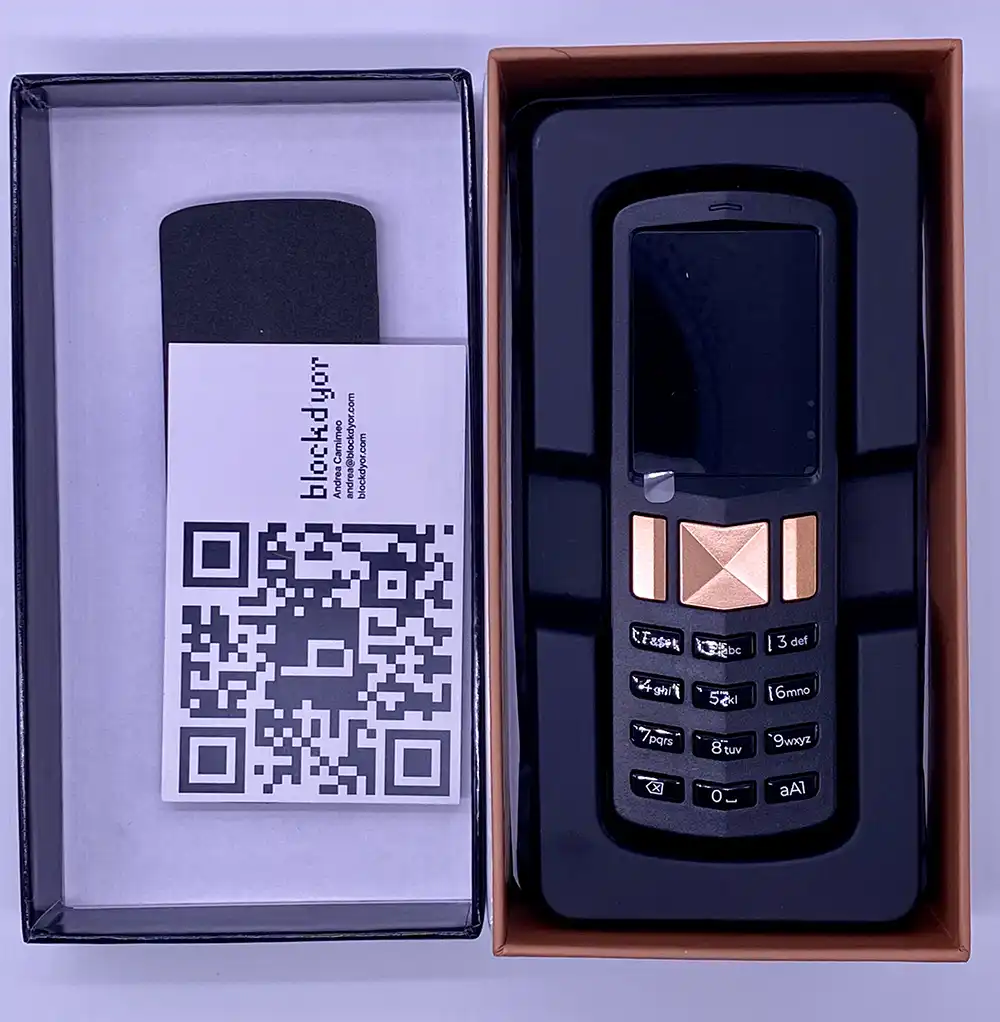
Once you've taken off the wrap, you can go ahead and open the box. The Passport will be prominently visible. Lift the housing, and you'll discover the other items inside the box.
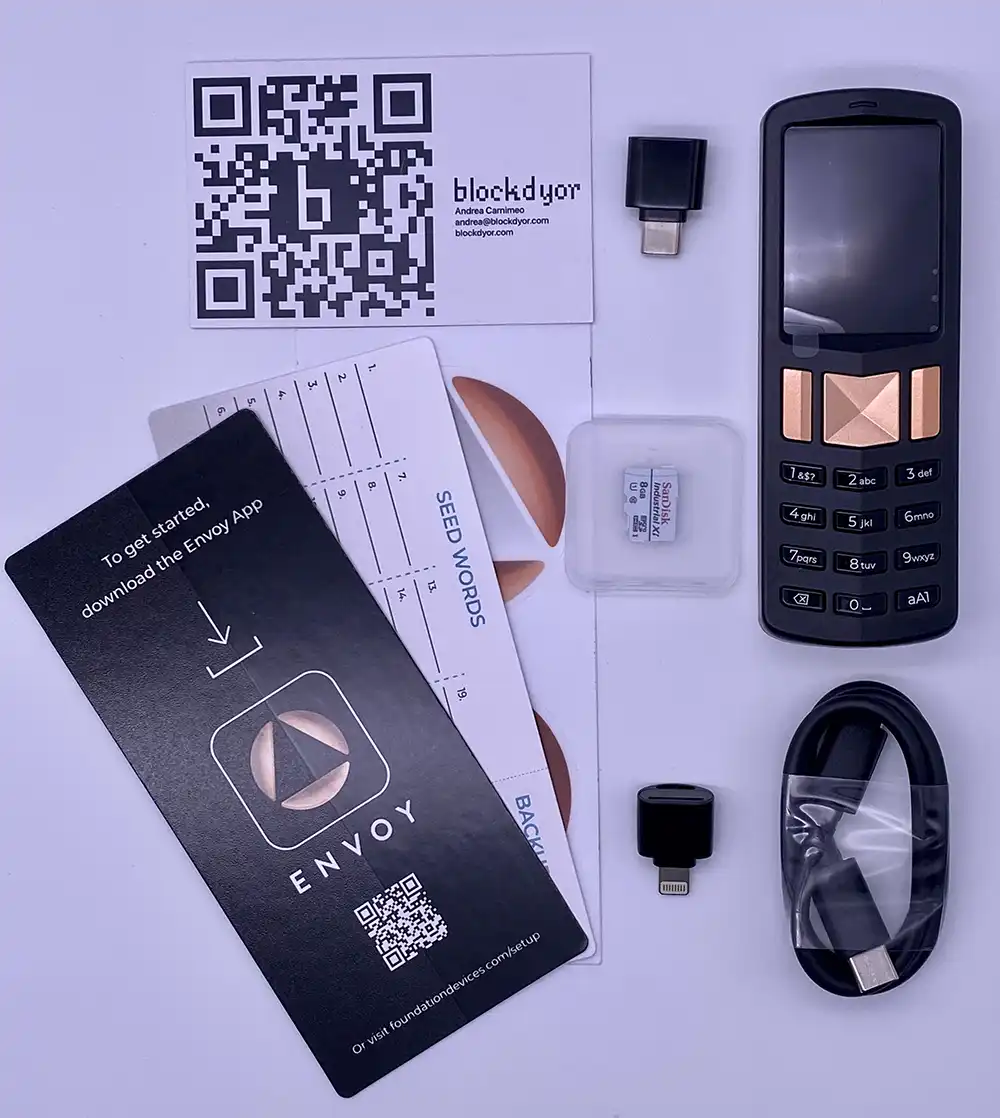
Inside the box, you'll find the following:
- x1 Passport
- x2 MicroSD Adapters for iOS/Android devices
- x1 USB Type C cable (Power Only)
- x1 8GB Micro SD Card (SanDisk Industrial X1)
- x2 Stickers
- x1 Get Started guide
Everything you need to kickstart your experience is included, and Foundation goes the extra mile by providing adaptors, although not always essential due to the prevalence of USB Type C in modern Androids and iPhones.
Foundation Passport Quick Review
This review might be lengthy for some, so if you're short on time, you can check out the summary table below. It includes the blockdyor Score, which reflects our evaluation of key aspects related to the privacy, security, and features of the Passport.
| Category | Feature | Score |
|---|---|---|
| 🔐 Privacy & Security (47/50) | ||
| 📄 Open Source Compliance | Source code is publicly available and Open Source | 10/10 |
| 🔄 Firmware Integrity | Firmware can be built from source and binaries match | 10/10 |
| 🔐 Secure Element | The secret is encrypted on the processor and stored in the secure element | 4/5 |
| 🌱 Seed Generation | Uses multiple (3) unpredictable physical processes, doesn't support Dice Roll generation (import only) | 4/5 |
| 💾 Seed Storage | Stores the seed on the Secure Element chip, MicroSD, SeedQR or paper/steel | 5/5 |
| 💼 Software Wallet | You can choose between Envoy (Vendor Client) or 3rd party wallets | 5/5 |
| 💰 Purchase Procedure | Shipping address data is destroyed after 60 days, can pay with BTC | 5/5 |
| 📦 Packaging Safety | Double boxed, anti-tampering | 4/5 |
| 🚀 Features (50/50) | ||
| 🖥️ User-Friendly UX | Easy to read and use thanks to bright IPS display buttons | 5/5 |
| 🎨 Design & Build Quality | Plastic and copper plated zinc alloy chassis | 5/5 |
| 📡 Air Gap / PSBT / SeedQR | Supports PSBT, Airgap, SeedQR and can sign transactions without a computer | 5/5 |
| 💾 MicroSD Backup | Can be backed up & restored on microSD | 5/5 |
| 🤝 Multisignature Support | Supports Multisig wallets | 5/5 |
| 🔐 Passphrase (BIP39) | Supports BIP39 Passphrases (13th or 25th word) | 5/5 |
| 🔌 Connection | Uses the latest USB-C port, charging only, no Bluetooth or Wi-Fi because 100% airgapped | 5/5 |
| 📦 Ready-to-Use Package | Comes with everything needed to start immediately | 5/5 |
| 📚 Documentation | Detailed user guides available online | 5/5 |
| 🛠️ Customer Support | Company offers customer support | 5/5 |
| 🧱blockdyor Score (97/100) |
How Does The Passport Work?
The Passport lets you receive, send and store bitcoin. It works as a hardware wallet designed to provide users with secure control over their Bitcoin assets. Positioned within the broader context of digital finance, the Passport aligns with the fundamental principle in the Bitcoin community that emphasizes the importance of self-sovereignty: "not your keys, not your coins."
Opting for the Passport over traditional exchanges grants users exclusive ownership of their financial resources, minimizing exposure to the vulnerabilities inherent in centralized platforms. The Passport's security architecture is based on the Coldcard (when it was open source), a reputable hardware wallet, featuring an open-source hardware and firmware combination with a secure element for private key storage. The Foundation team has invested significant effort independently, enhancing it through measures such as security checks, including supply chain validation. This open-source approach allows for thorough scrutiny by security researchers, contributing to a transparent and resilient hardware ecosystem.
Distinguished among hardware wallets, the Passport blends advanced security features with a user-friendly design. Notable elements include a larger display, alphanumeric keypad, and an intuitive navigation pad, all contributing to a seamless user experience. The integration of a camera and microSD slot facilitates airgapped operations, a pivotal security measure. Additionally, the Passport introduces rechargeable and removable lithium-ion batteries, eliminating the need for constant connectivity to a power source. This combination of security measures and user-centric design positions the Passport as a practical choice for users with different levels of expertise.
In terms of functionality, the Passport integrates with the Envoy mobile companion app, enhancing user experience by simplifying setup, firmware updates, and overall wallet management. The Passport, from an impartial standpoint, serves as a hardware wallet solution that embodies a commitment to financial autonomy, security, and pragmatic innovation within the evolving landscape of digital asset management.
Using the Passport does not necessitate the installation of the Envoy app on your phone/tablet, as the hardware wallet is compatible with a variety of third-party software wallets, as mentioned earlier.
Setting Up the Passport
In this section, I'll turn on the Passport, download the Envoy app and establish an airgapped connection (ensuring the hardware wallet remains offline and never connects to a computer or the internet). This process involves creating a PIN to secure the device, and within Envoy, we'll set up a wallet for receiving, storing, and signing transactions (sending funds). The private key will never leave the hardware wallet.
I won't use any other apps, just the official one called "Envoy" made by Foundation. I'll download it on my iPhone. You can use different apps like Sparrow or BlueWallet, but I want to check out all the features using the official app for now.
To get the Envoy app, you can scan the QR code printed in a paper you can find in the Passport box or click on the link on the Foundation Official website (foundationdevices.com). It's important to do this to avoid the risk of downloading the wrong or, even worse, a fake app, like with anything else online.
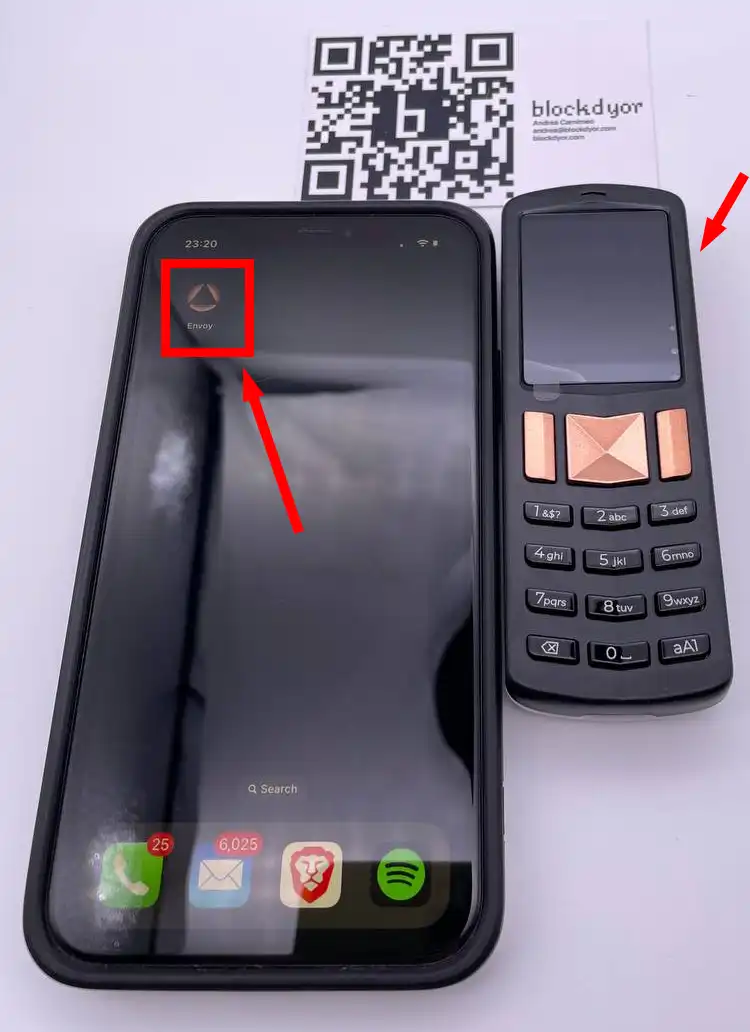
Turn on the Passport by long pressing the button on the right side of the device. You can also open the Envoy app on your phone/tablet, as we'll use it a bit later.

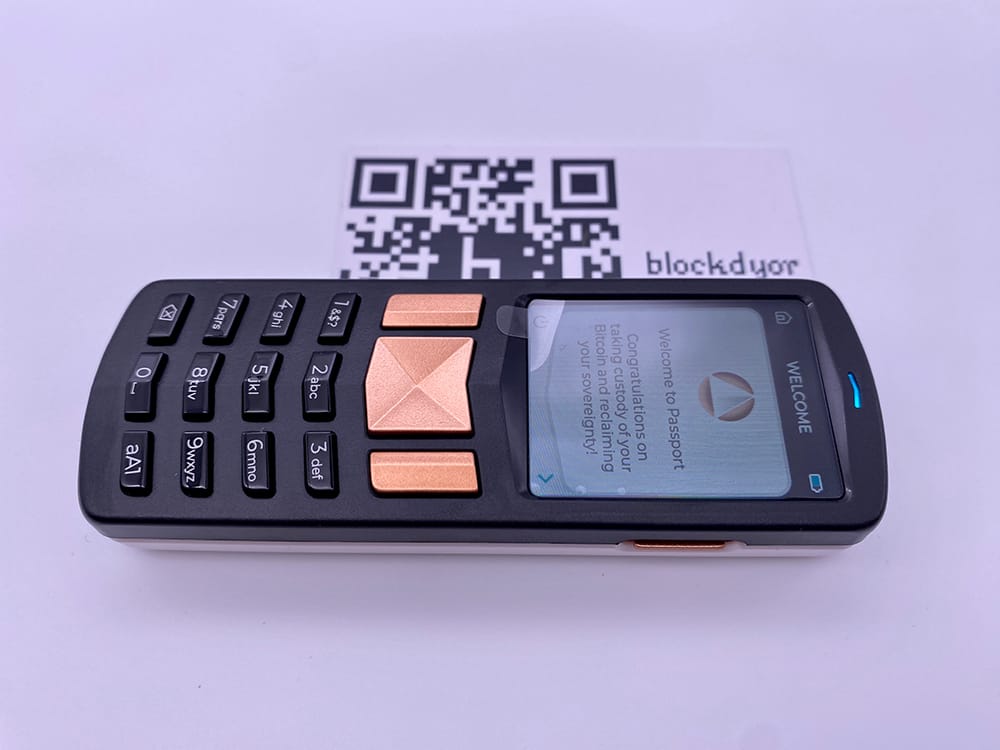
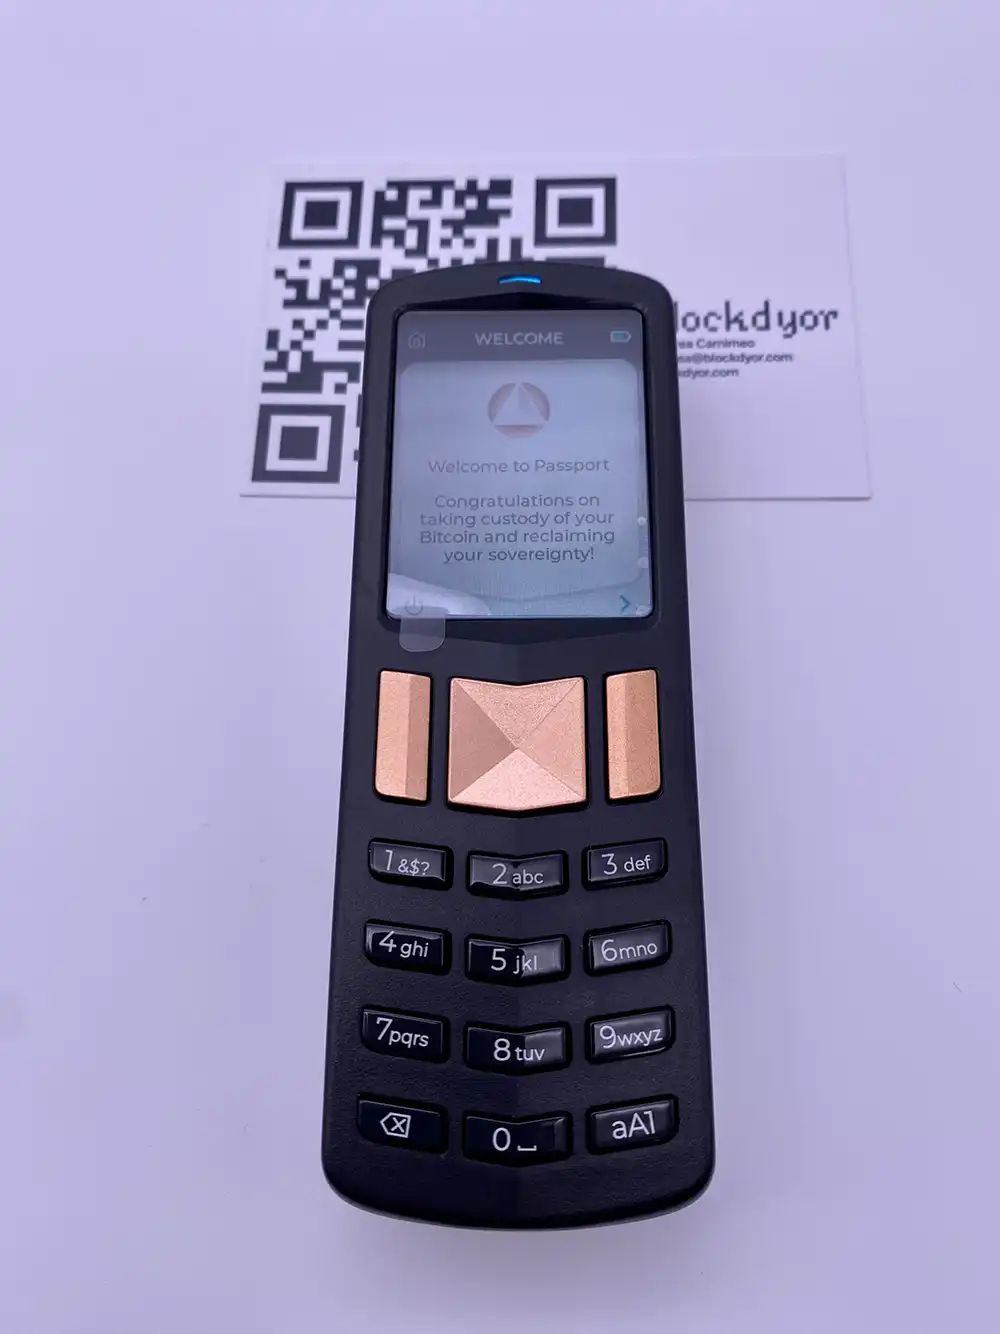
The Passport will show a Welcome message. You can press the button on the top right in the keypad to go forward to the next step.
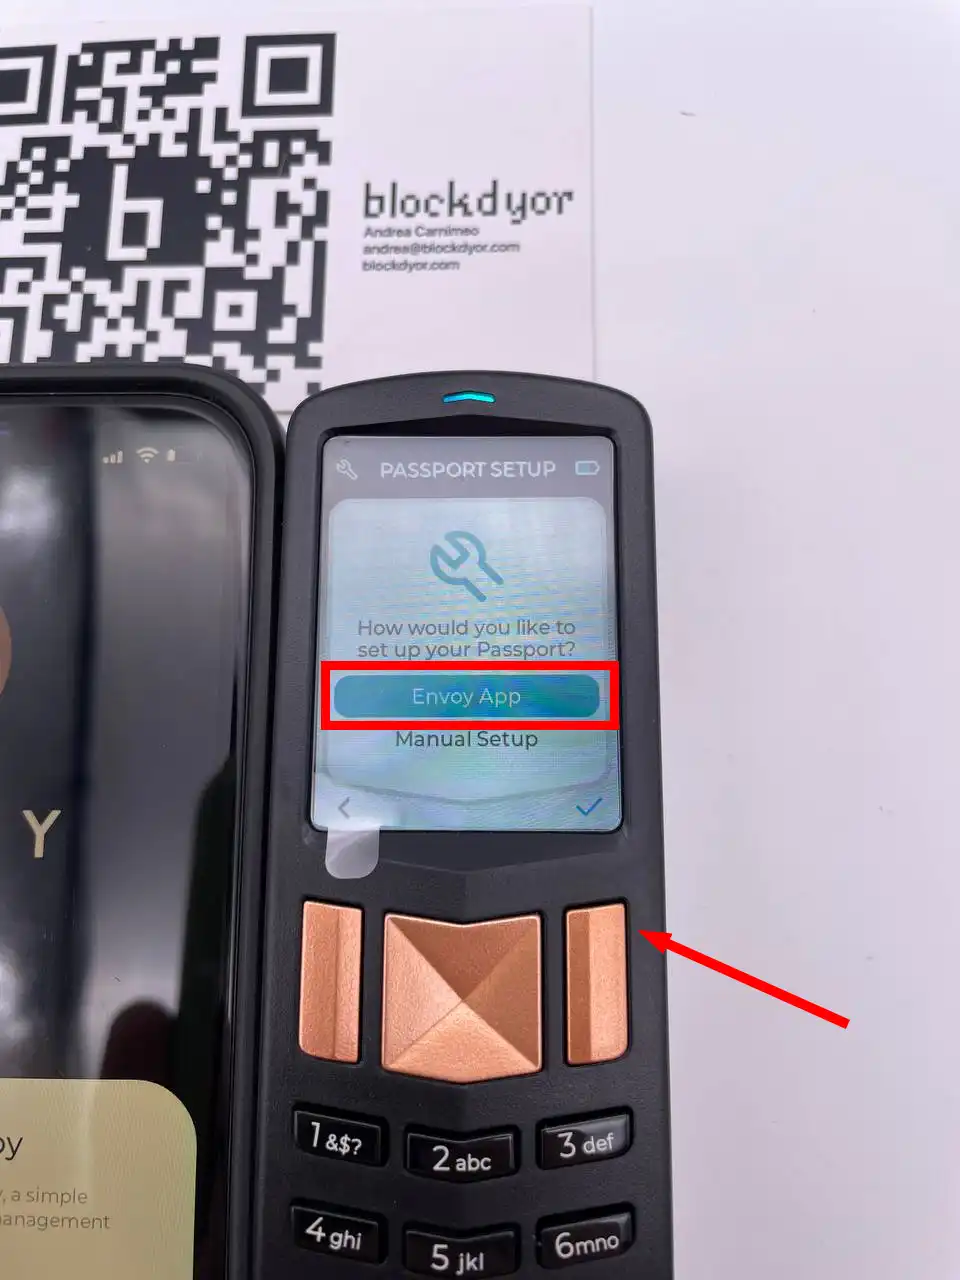
You'll be prompted to choose between configuring the Passport with the Envoy App or opting for Manual Setup. The first option sets up the hardware wallet to work with the official software wallet, so select "Envoy App" and confirm it by clicking on the top right button in the keypad. If you prefer using third-party apps, you can choose manual setup.
In this guide, I'll use the Envoy app for simplicity, but for more advanced users, I suggest considering the separation of Signer (the hardware wallet) and Wallet (the app), similar to the distinction between Church and State.
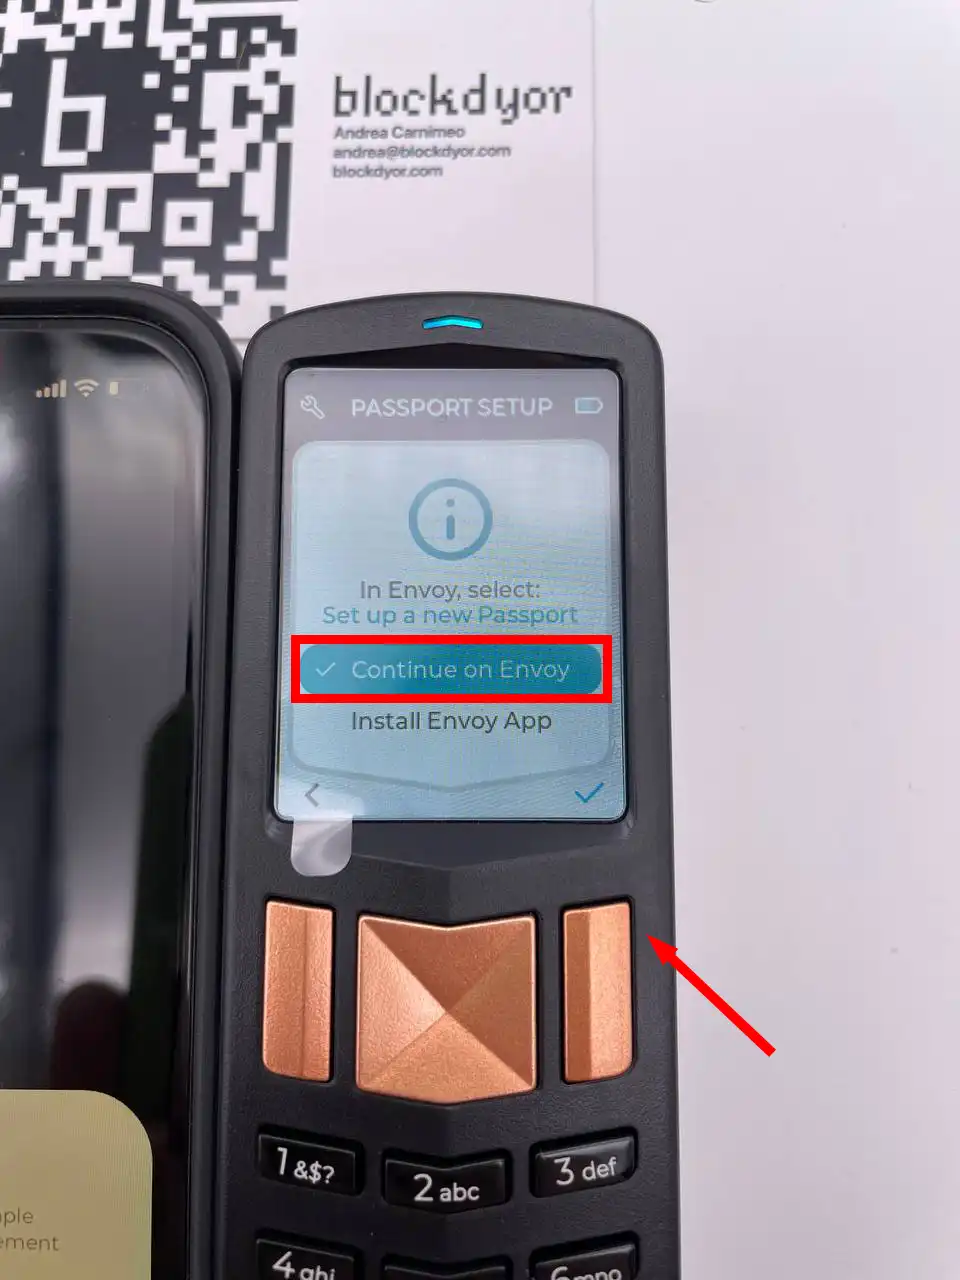
Tap on "Continue on Envoy." Now, open the Envoy app on your phone.
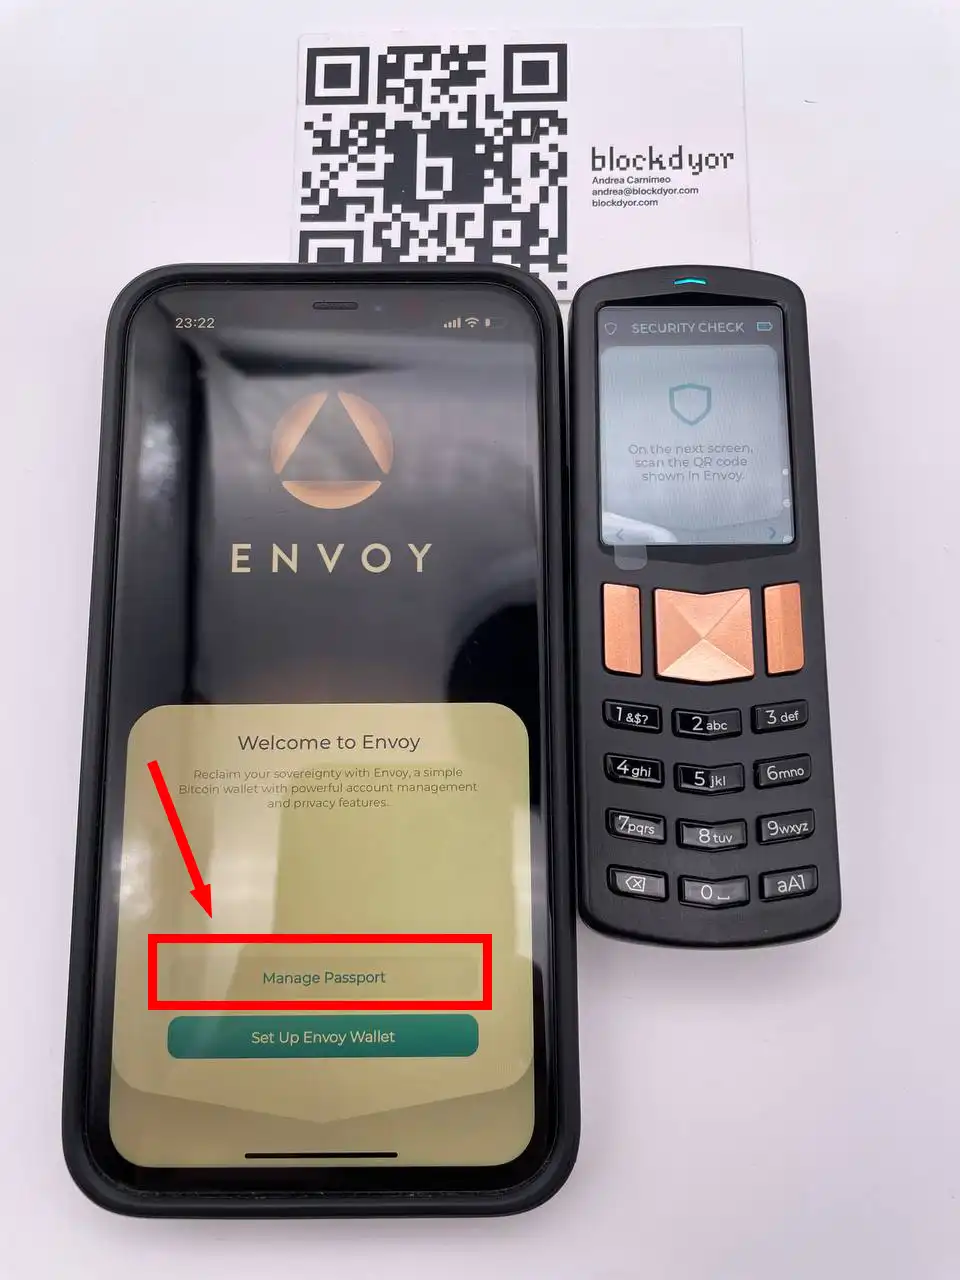
As I intend to use the app for handling the Passport hardware wallet, I'll select "Manage Passport" in the Envoy app.
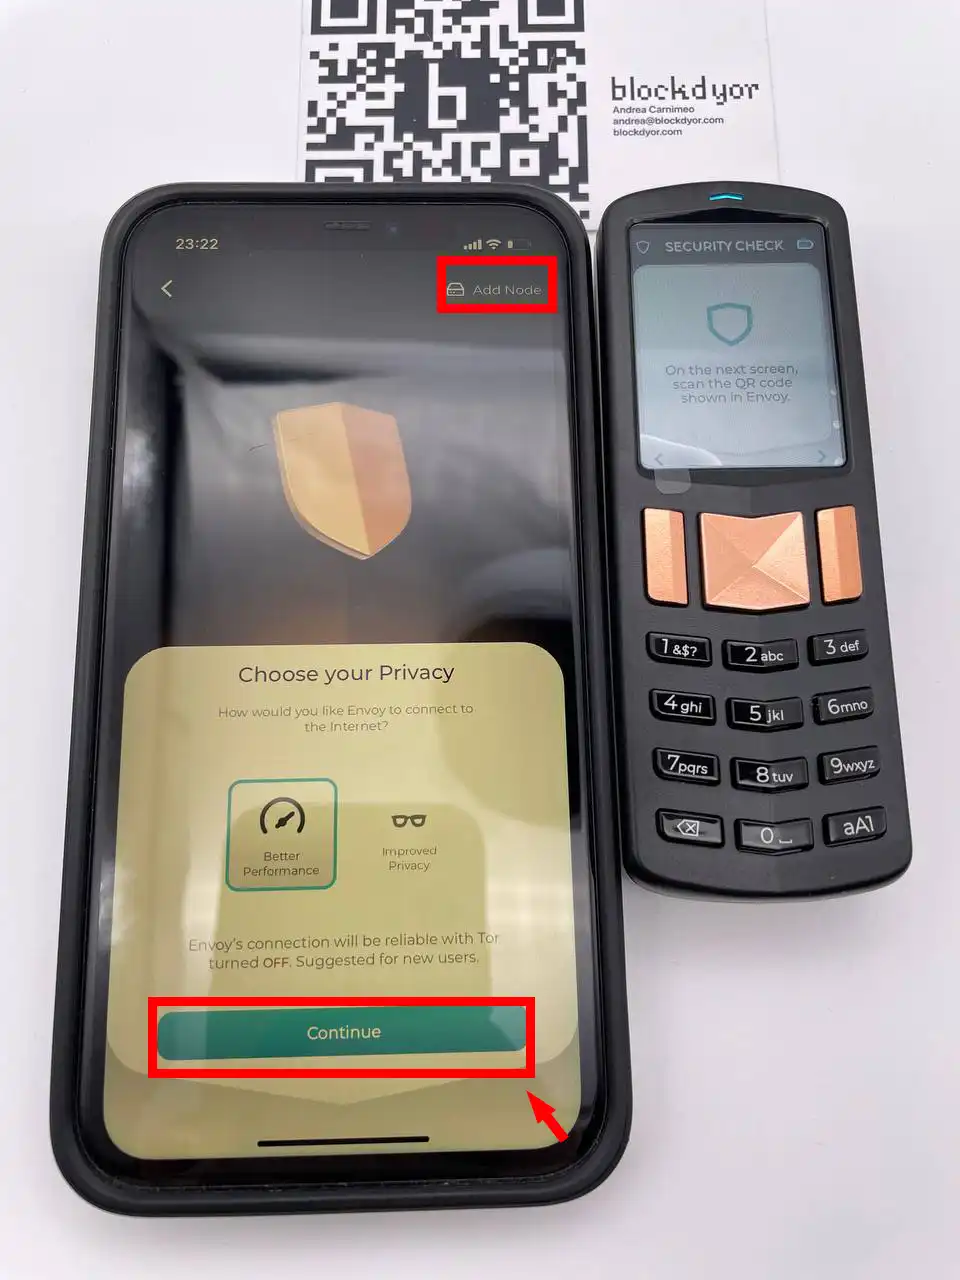
Following that, you'll need to choose the privacy settings for the app on your iPhone. You have the option to connect Envoy to your Bitcoin node (a highly recommended choice).
Additionally, you can decide on the method of Envoy's internet connection: Tor for heightened security or Clearnet for the traditional internet. Make your selection and proceed by clicking on "Continue."
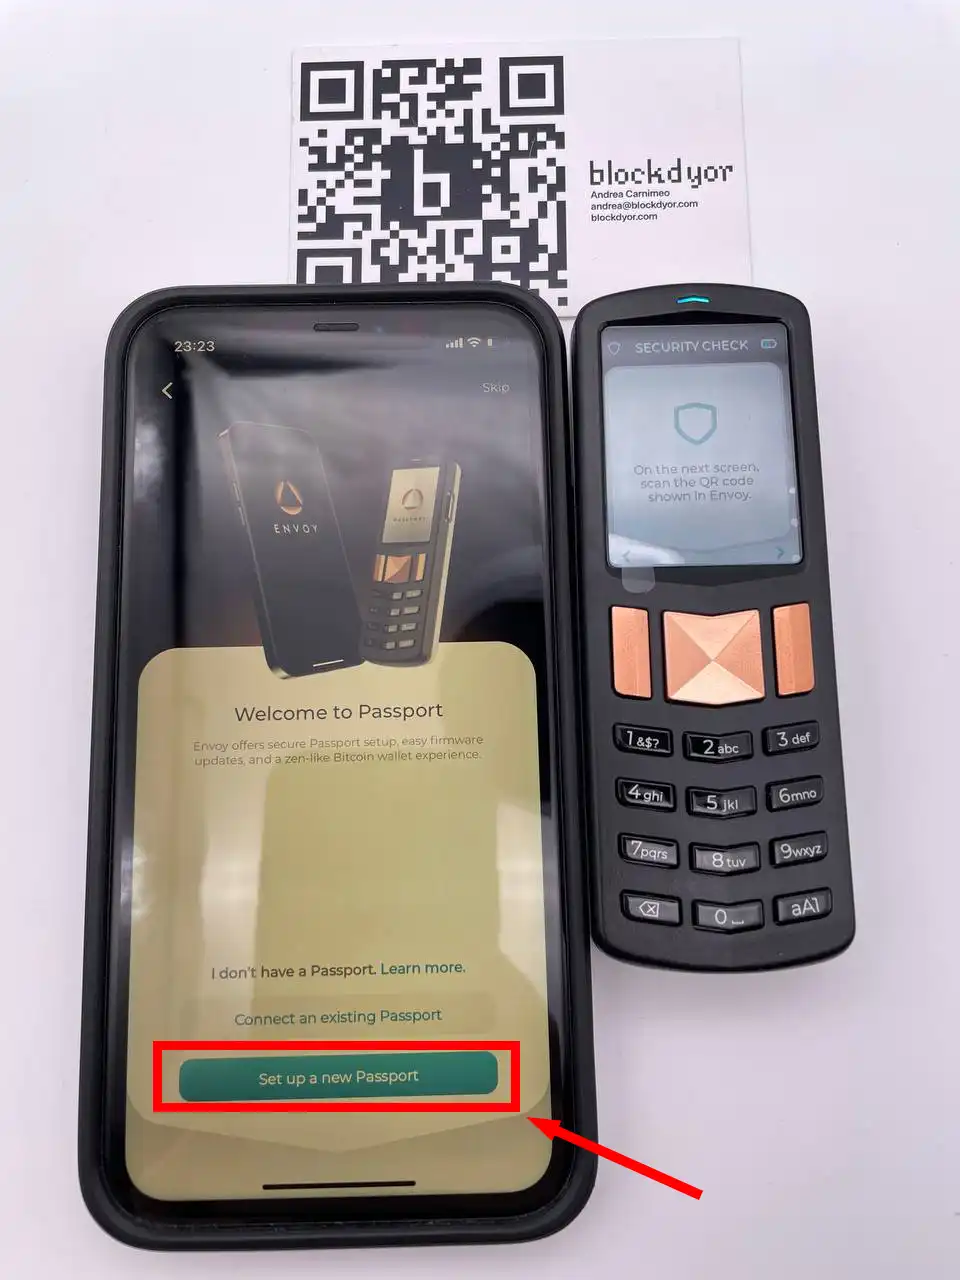
Continue by tapping on "Set up a new Passport".

To use the Passport app you have to accept the Passport Terms of Use. Accept them by tapping on the "I Accept" button.
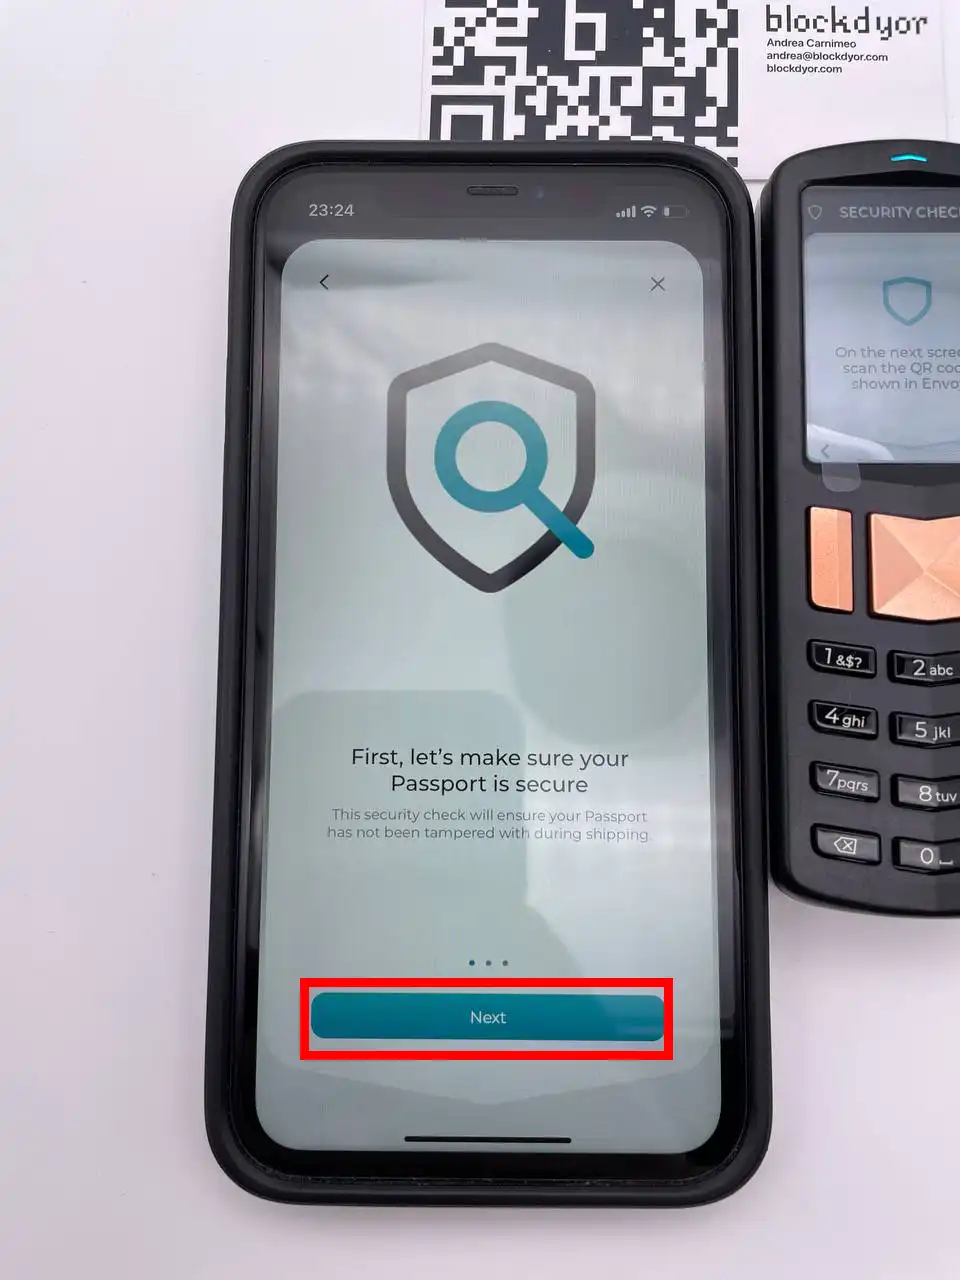
Now, the app will initiate a procedure to ensure the security of the Passport. Tap on the "Next" button to proceed.

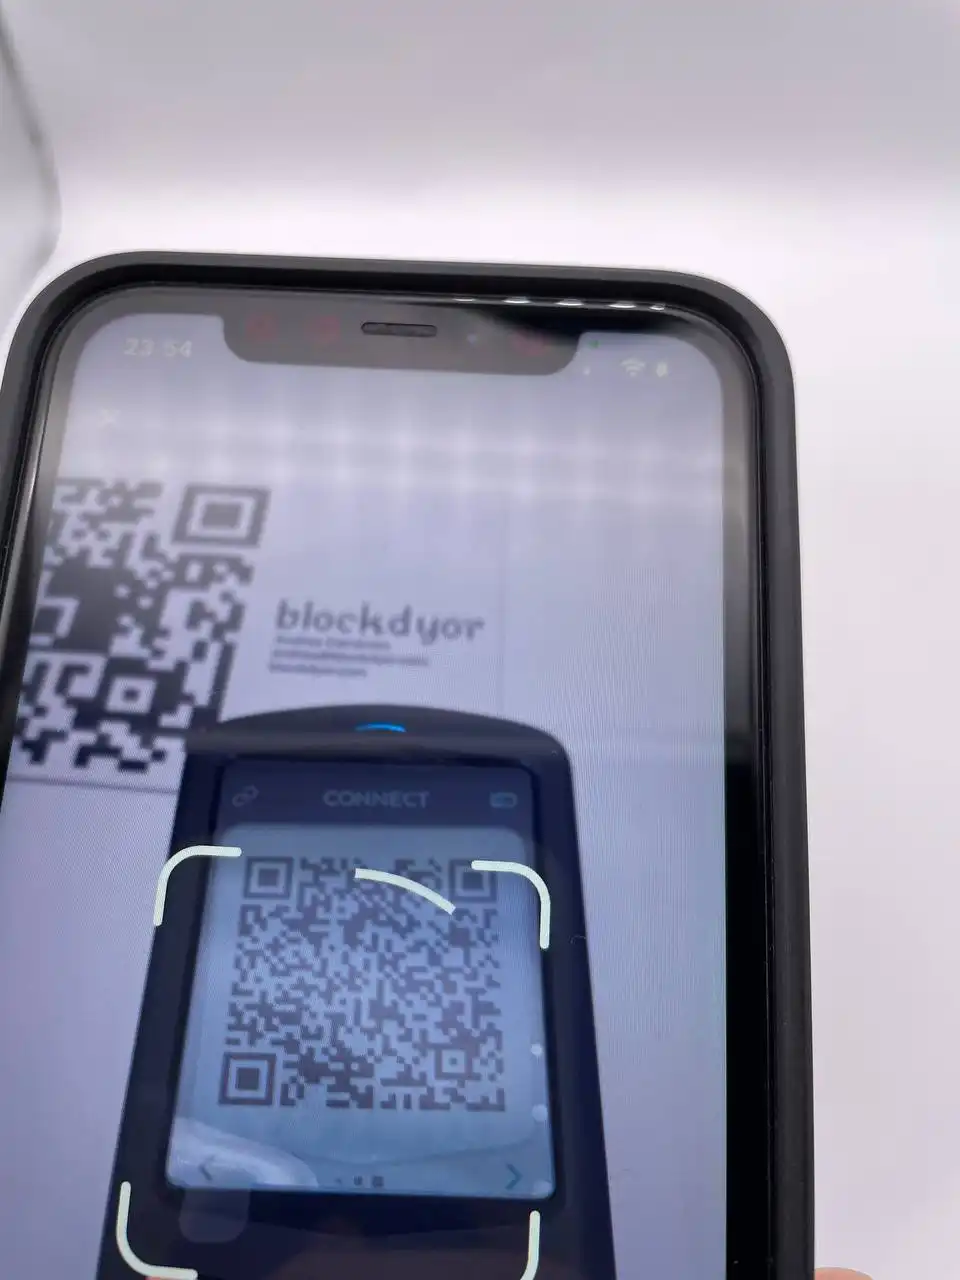
On the Passport, press the top right button on the keypad to activate the scanner. Simultaneously, on Envoy, tap on "Next" to display a QR code.
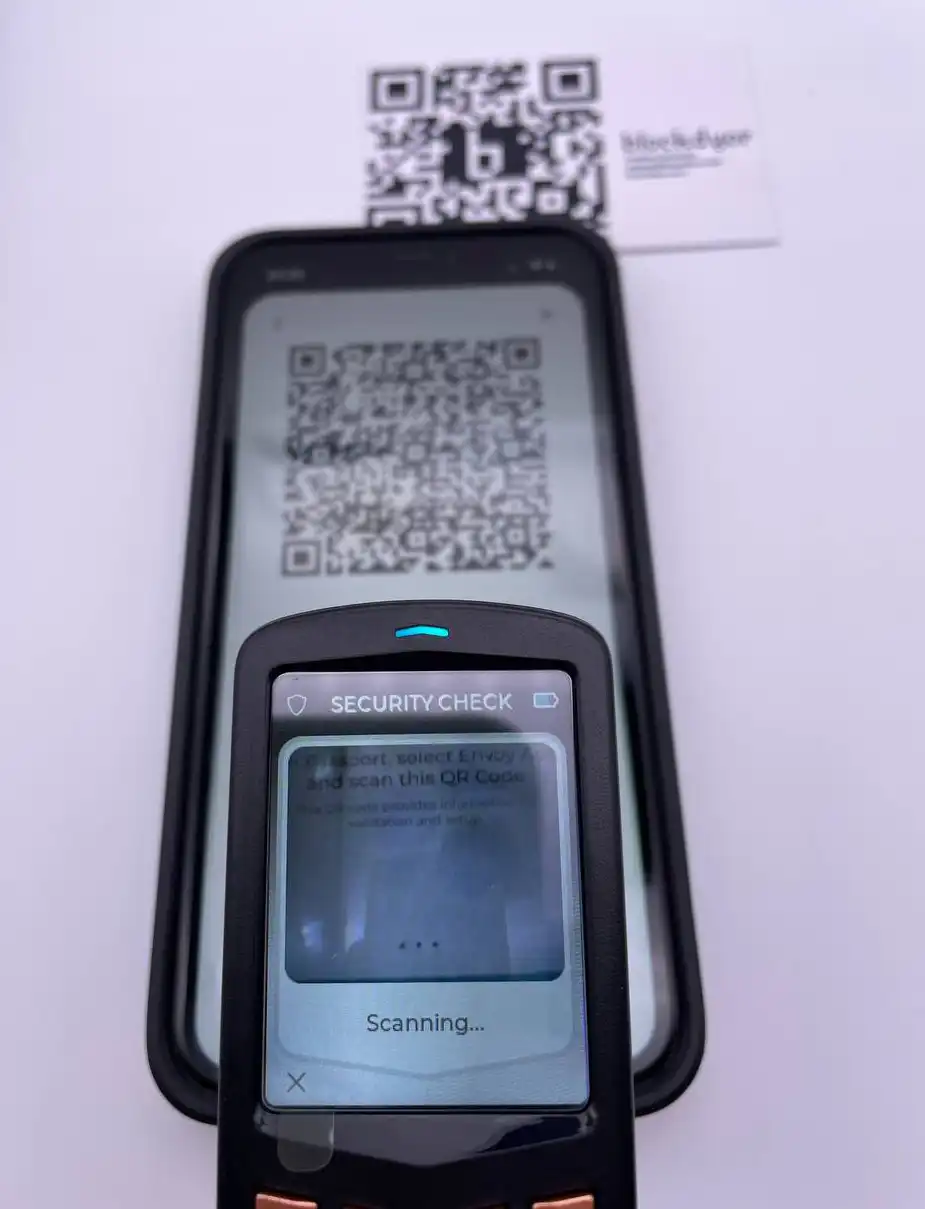
Using the Passport, scan the QR Code displayed on Envoy.
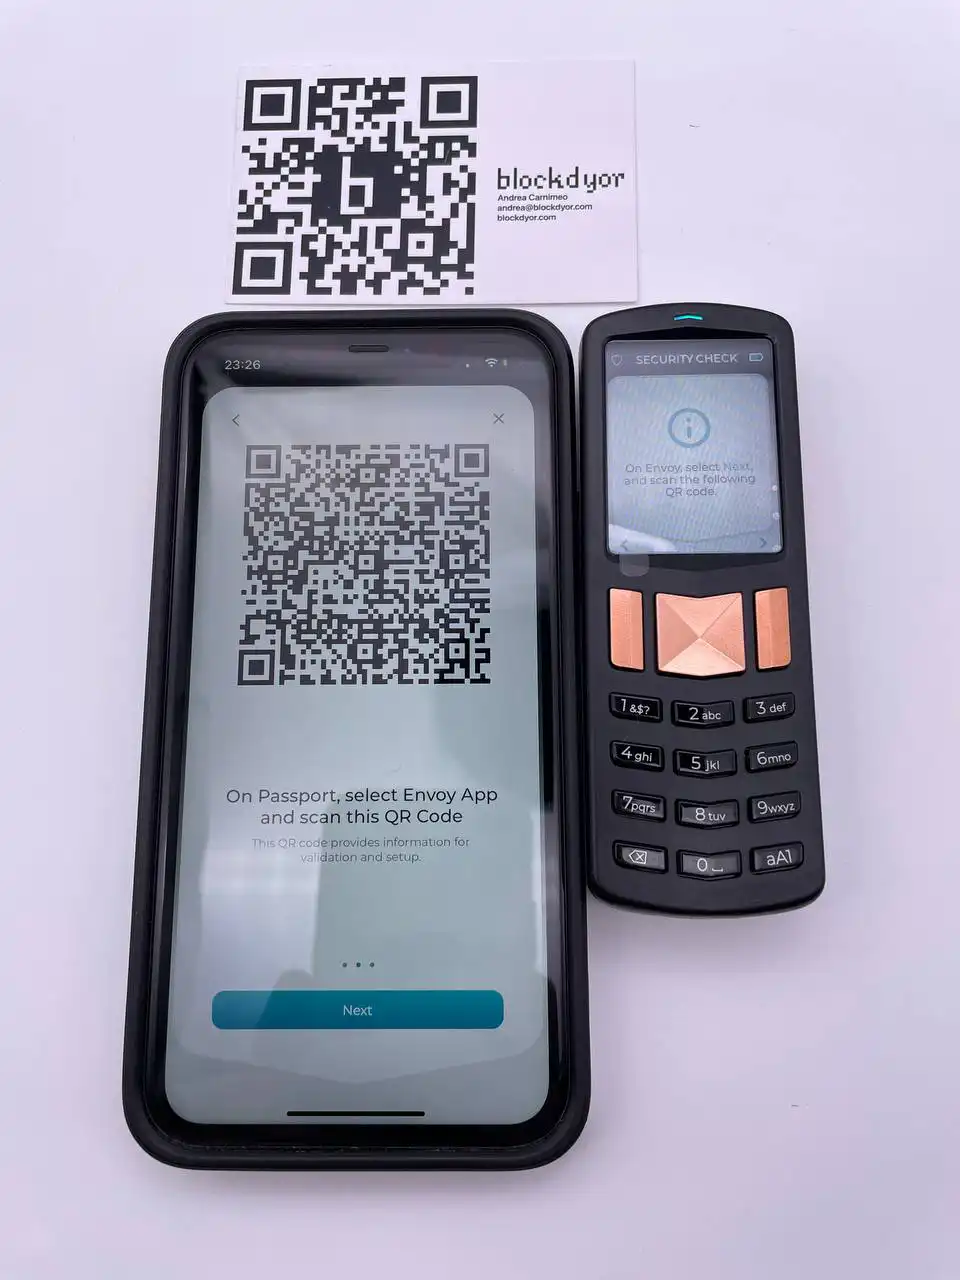
Now, perform the same action from Envoy. Tap on "Next" in the Envoy app.
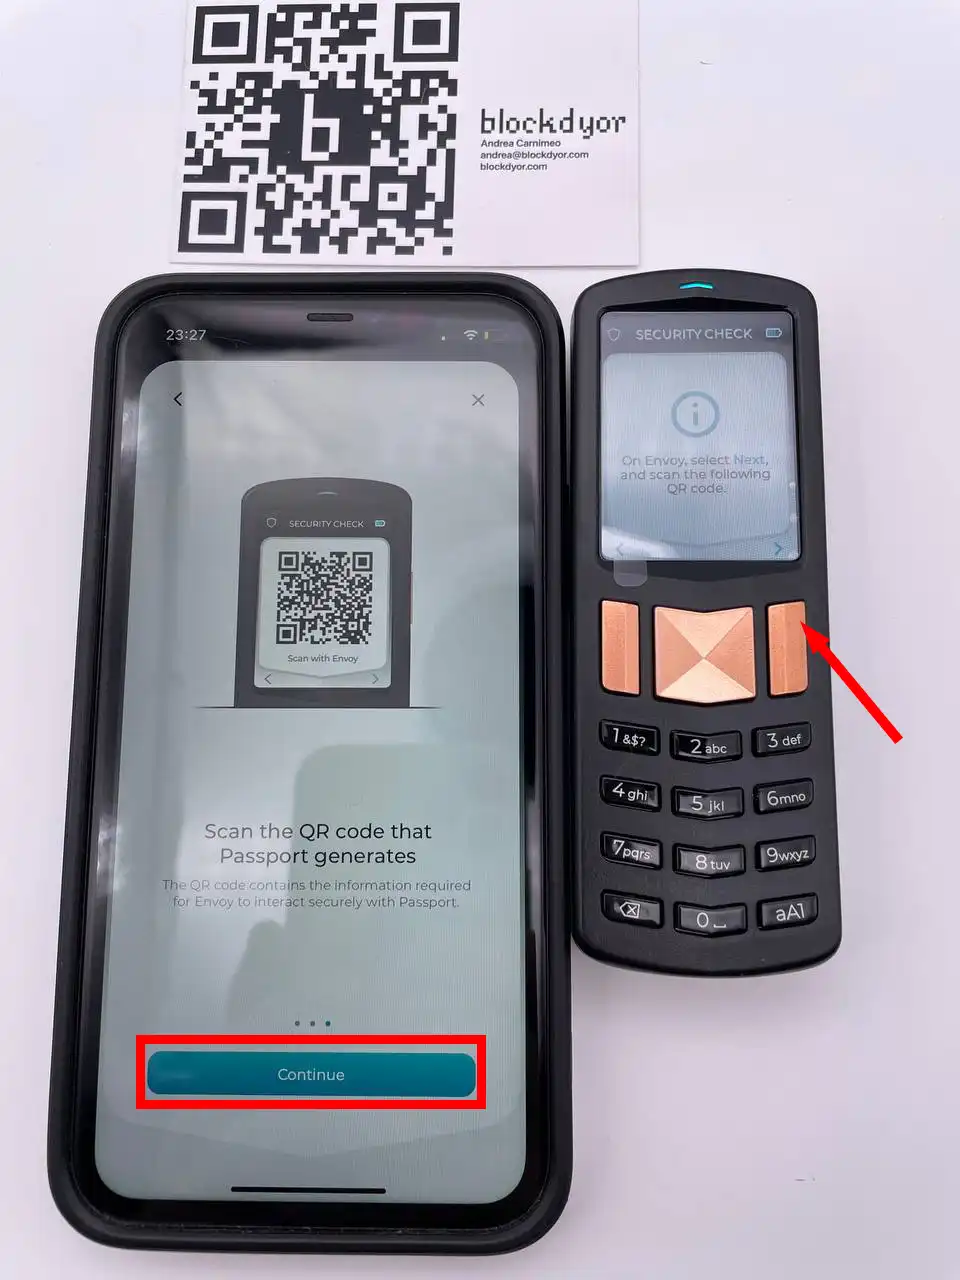
Tap "Continue" on Envoy. On the Passport, press the top right button to reveal the QR Code.
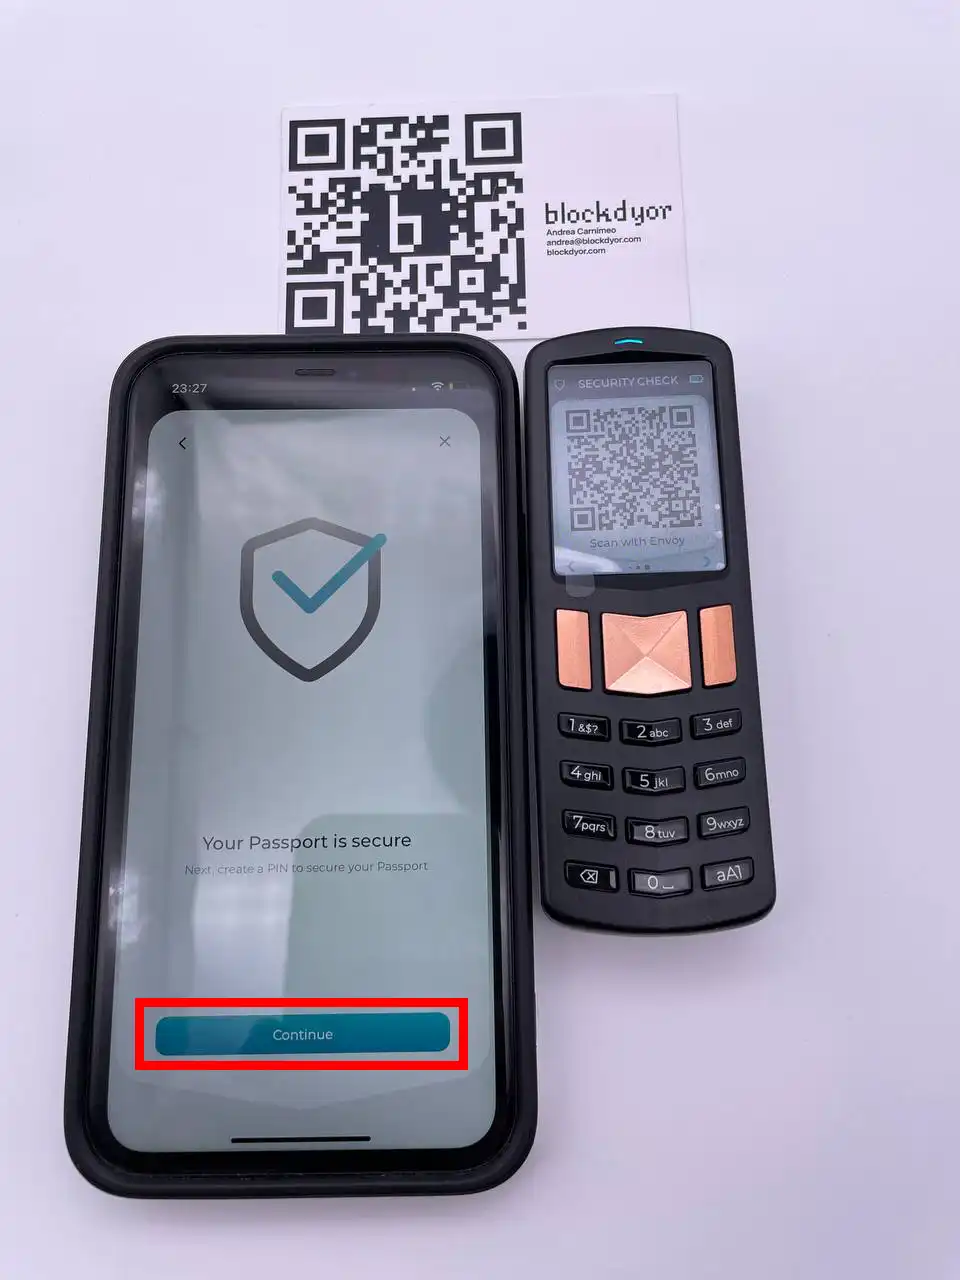
The initial step is complete; now, let's proceed with setting up the PIN. Tap "Continue," then head to the Passport and click the top right button on the keypad.
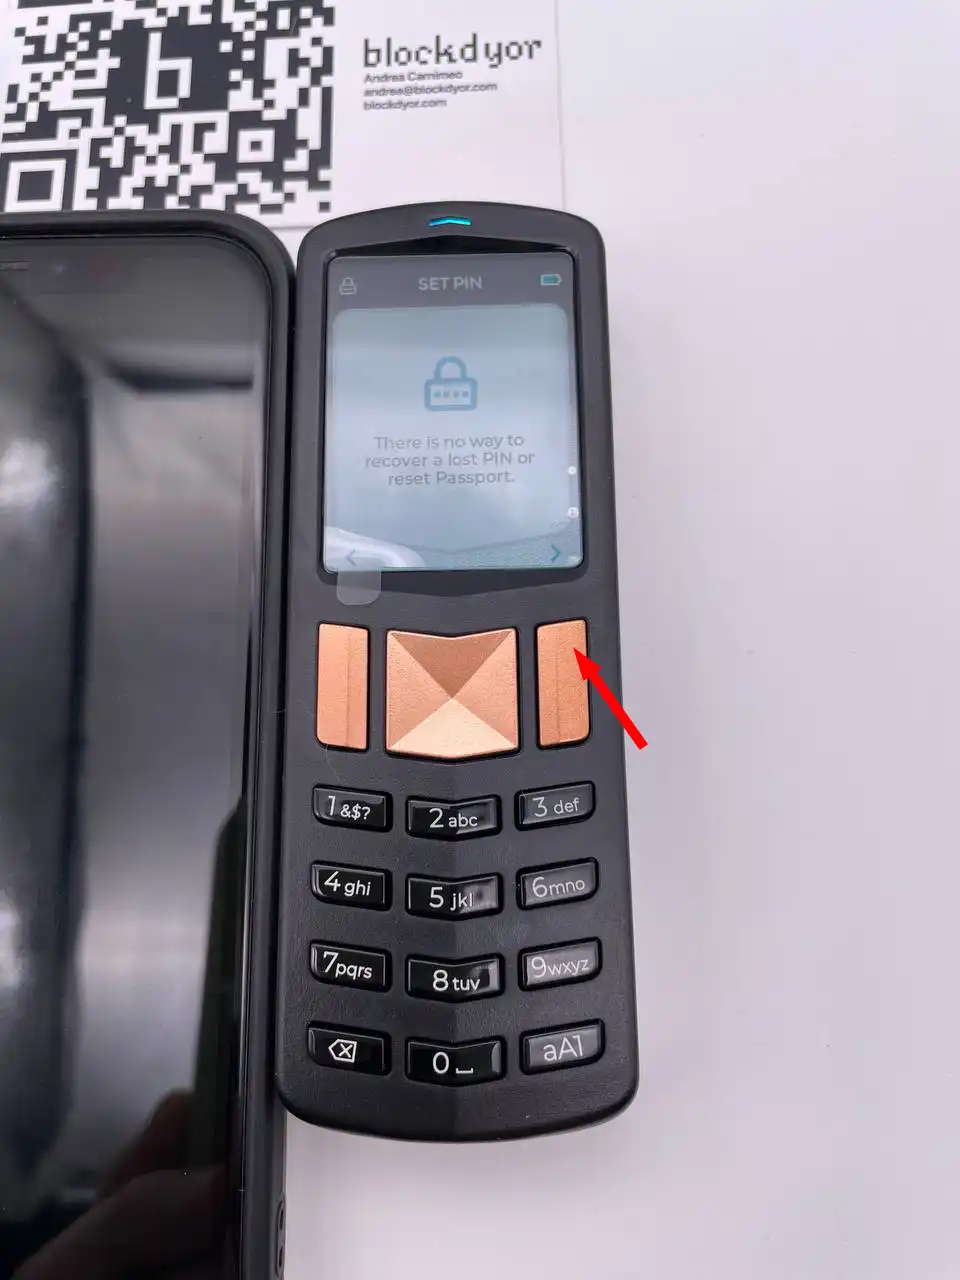
The Passport will now notify you that there is no way to recover a lost PIN or reset the Passport without it. It's crucial to write down this PIN in a secure place. Press the top right button on the keypad to proceed.

Press the top right button on the keypad once more to proceed.
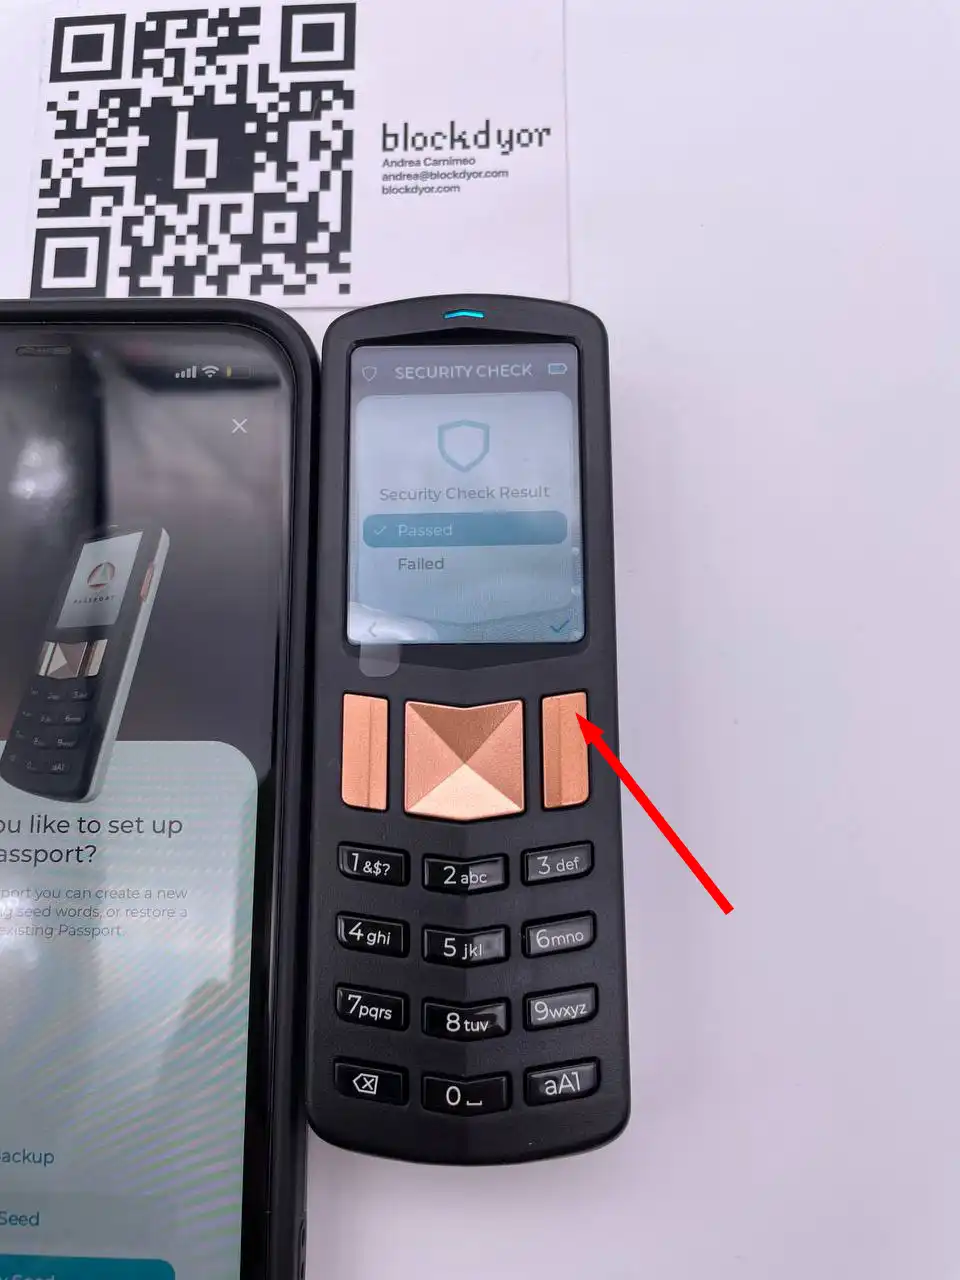
You'll need to enter the PIN twice, ensuring it's the same both times. Once completed, the Security Check Result will display as "Passed." Click on the top right button on the keypad to finalize the process.
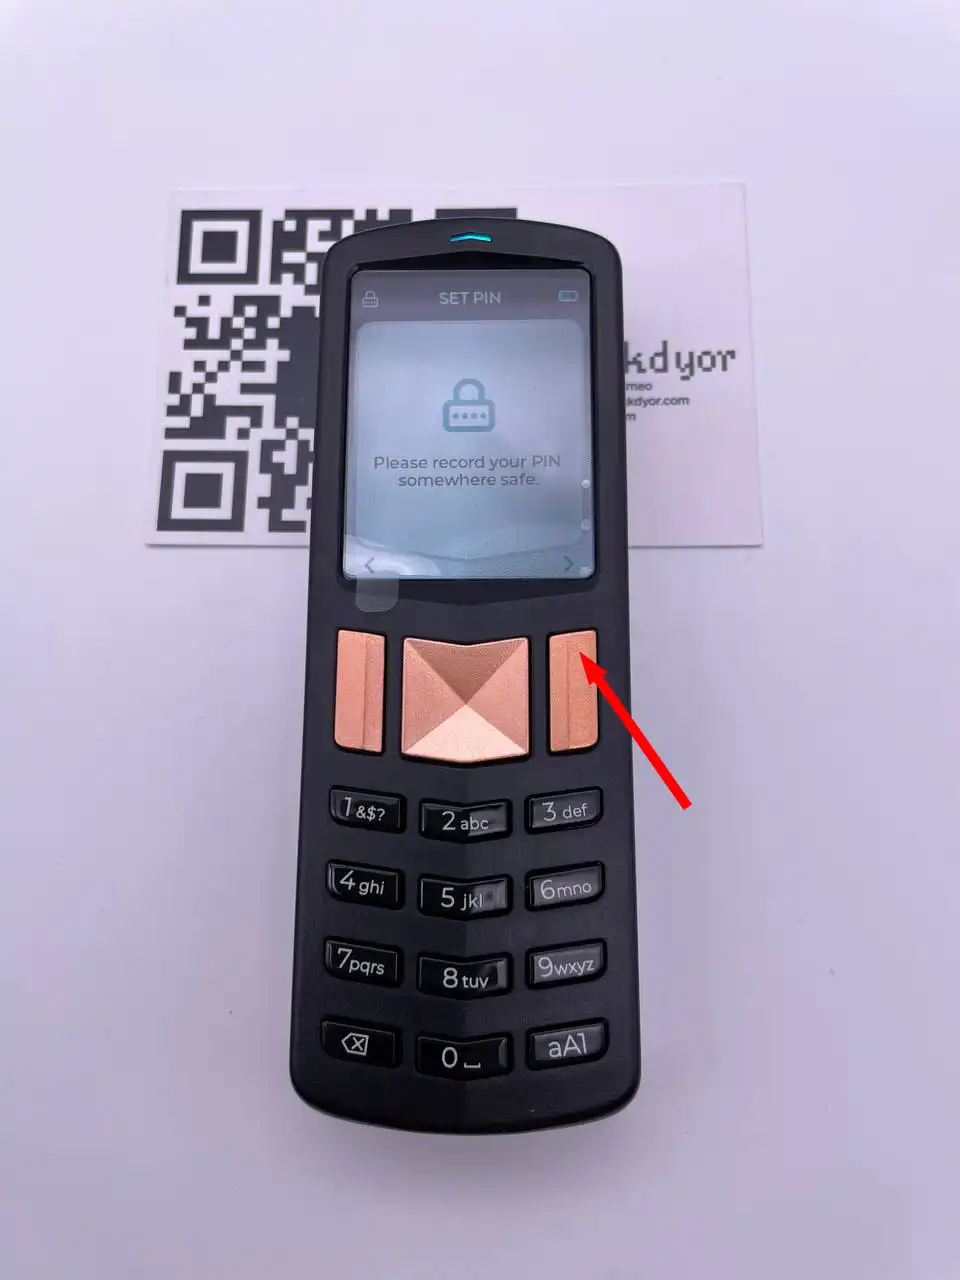
Here, the Passport strongly recommends once again that you write or save the PIN in a secure location. This caution is essential because forgetting the PIN could potentially result in the device becoming inaccessible after 21 incorrect attempts.
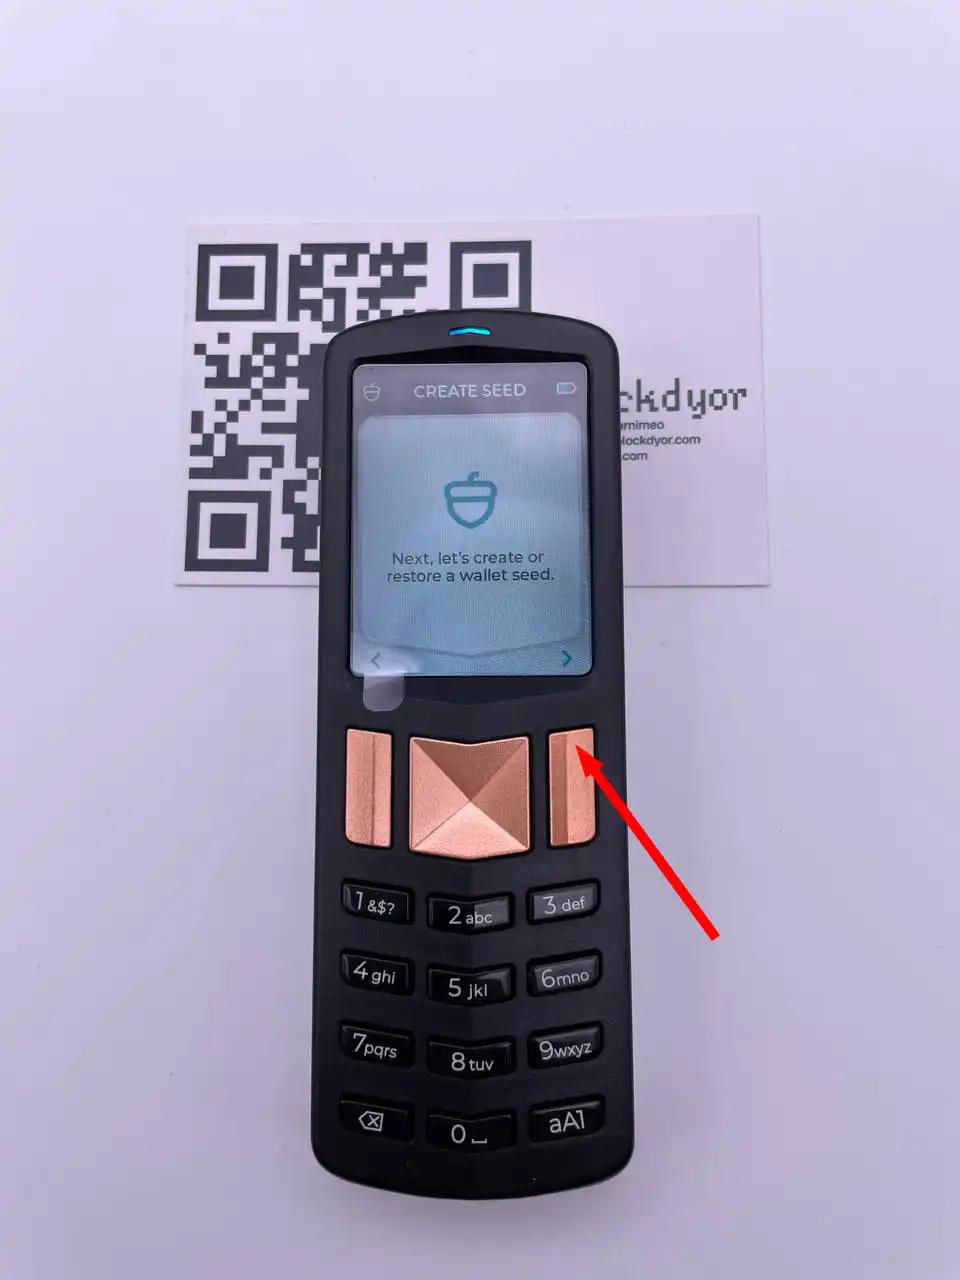
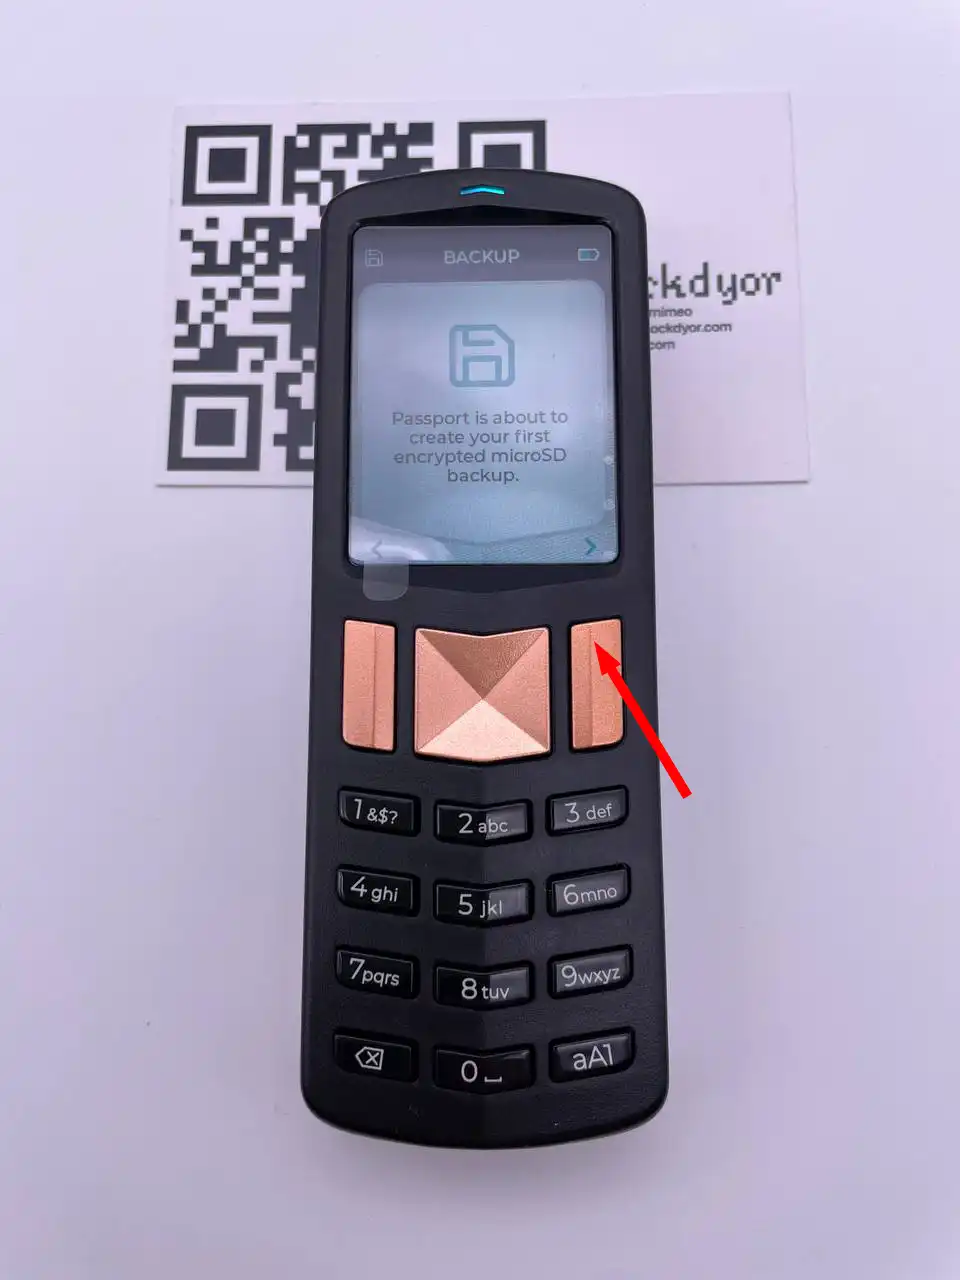
After successfully establishing and saving/writing down the PIN, it's time to generate the wallet seed. The Passport allows you to save the seed on paper or create a backup on the convenient Micro SD card.
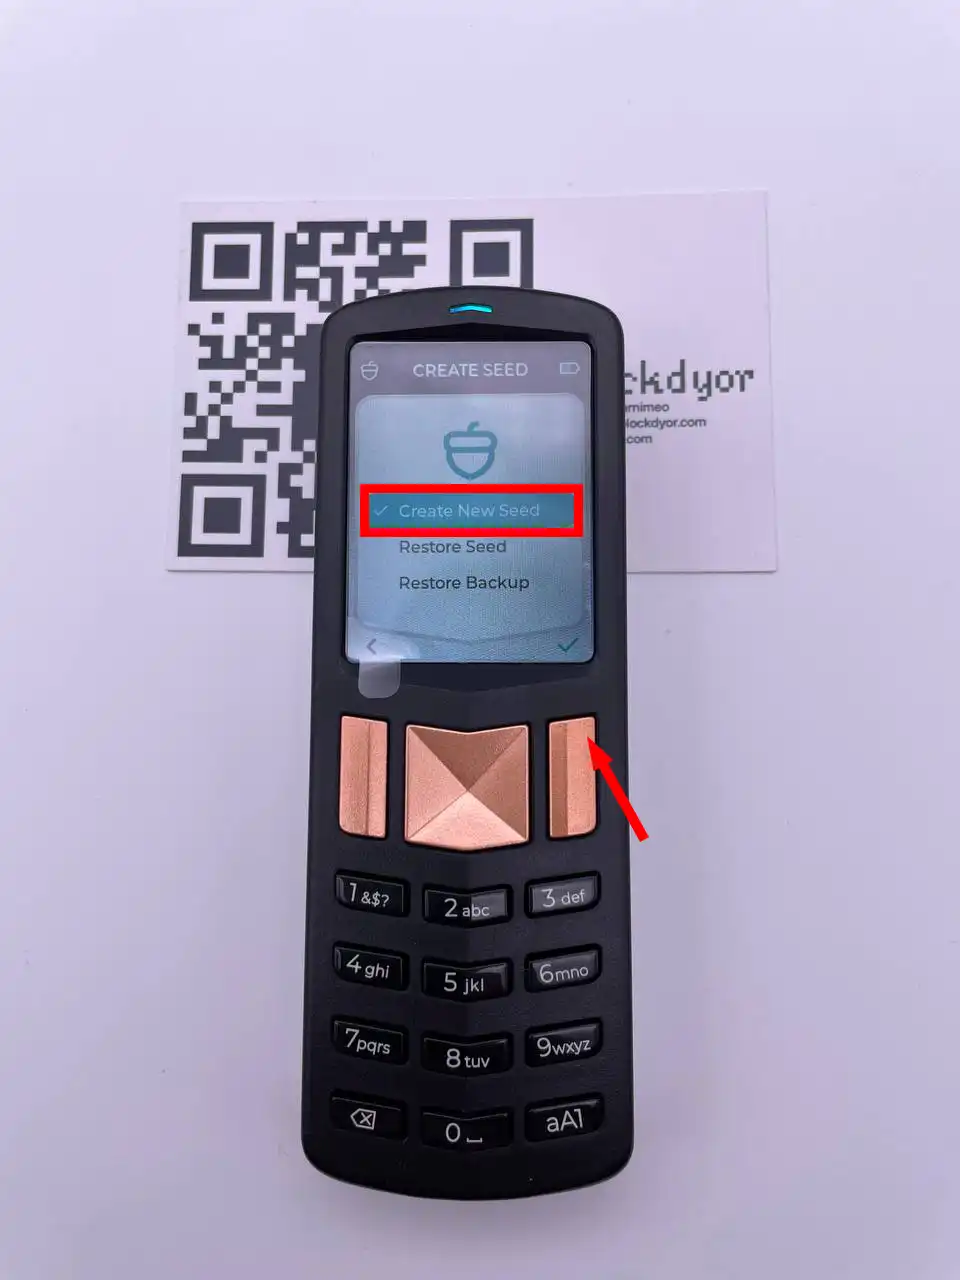
On the Passport, you have the option to import a seed or a backup (in this instance, from the MicroSD). However, for now, I'll proceed to "Create a New Seed" by using the entropy generator of the Passport.
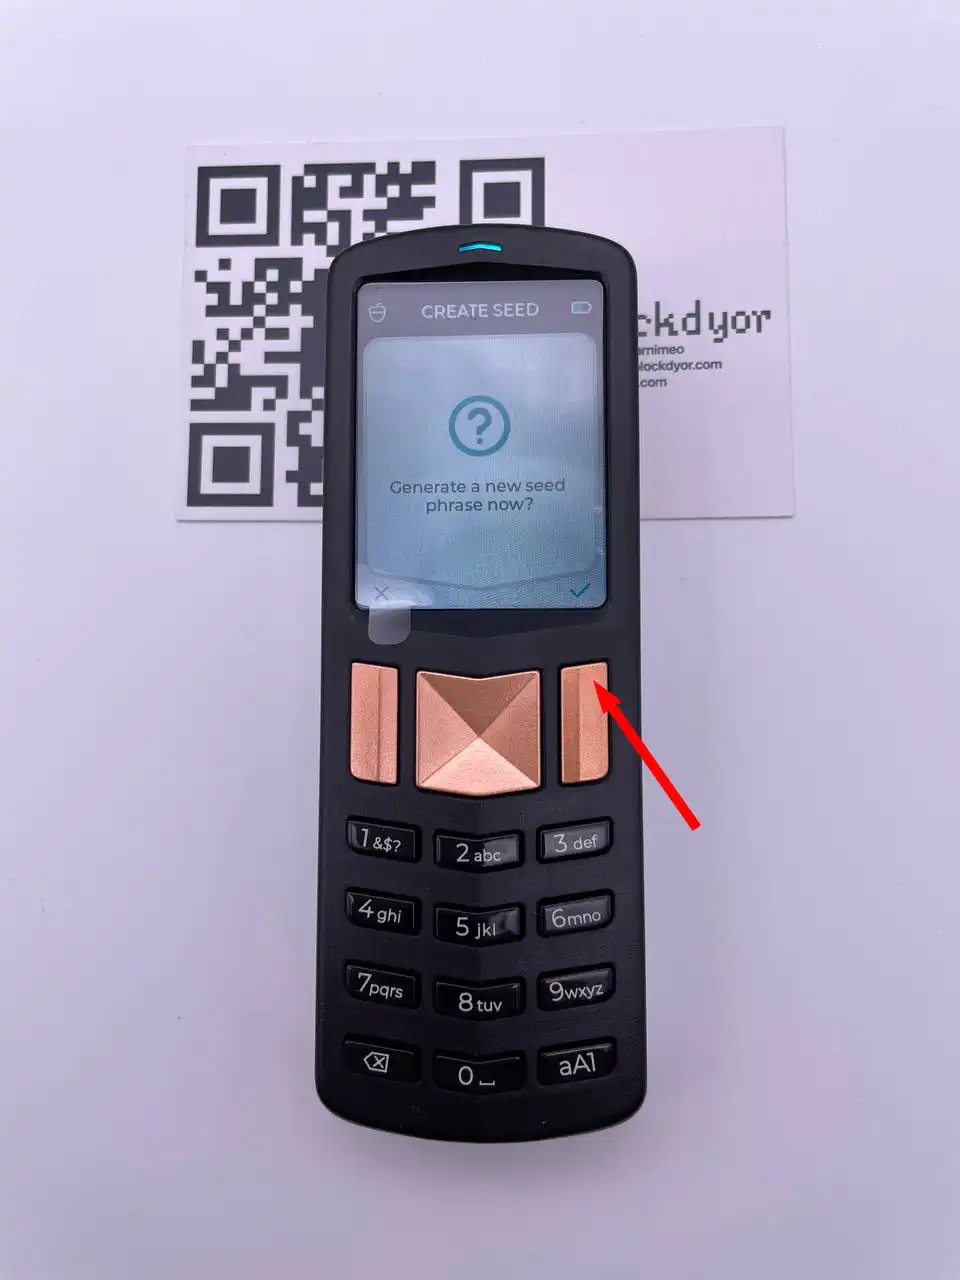
Now, you'll generate a new seed phrase. Click on the top right button in the keypad to proceed.
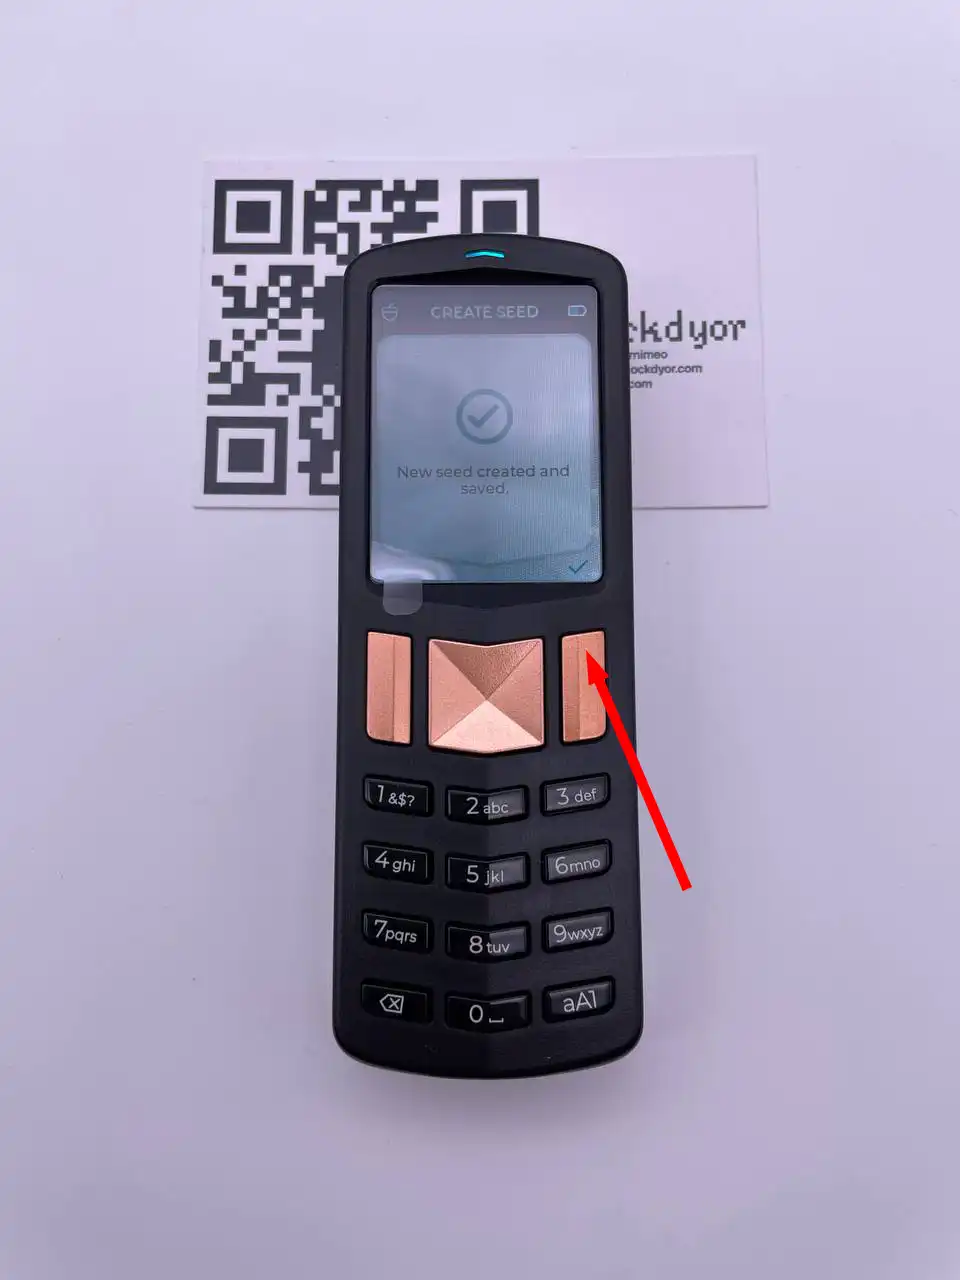
The new seed has been created. Click on the top right button in the keypad to continue.
As evident, there was no prompt to write down the seed phrase, as the Passport, by default, stores the seed phrase encrypted in the MicroSD card (you can view and write down the seed phrase later if desired). Click on the top right button on the keypad to start the process.
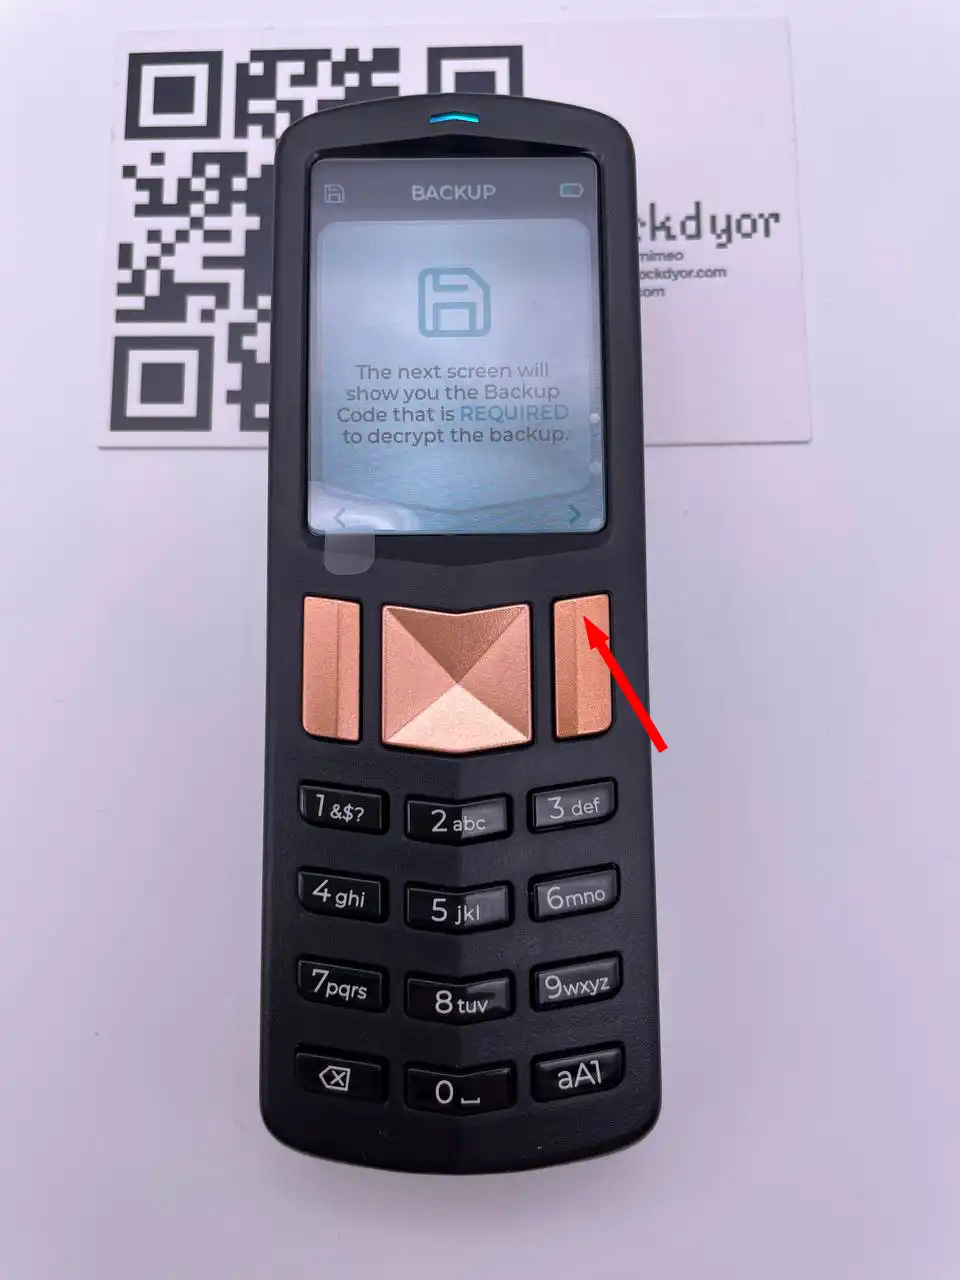
Now, you'll receive the Backup Code required to decrypt the backup of the seed phrase. Click on the top right button on the keypad to continue.
Click again on the top right button on the keypad to continue.
Click another time on the top right button on the keypad to continue.
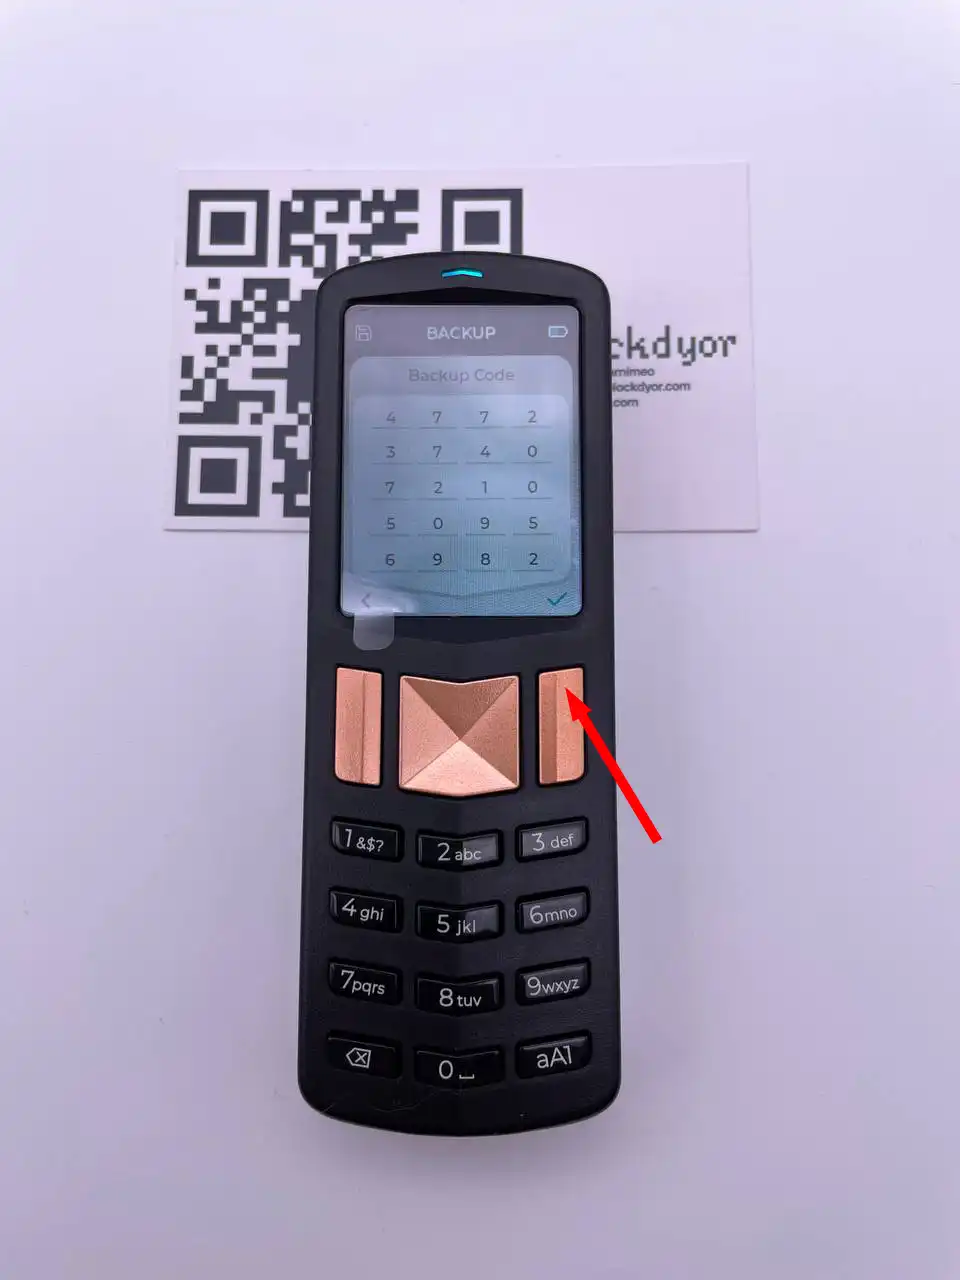
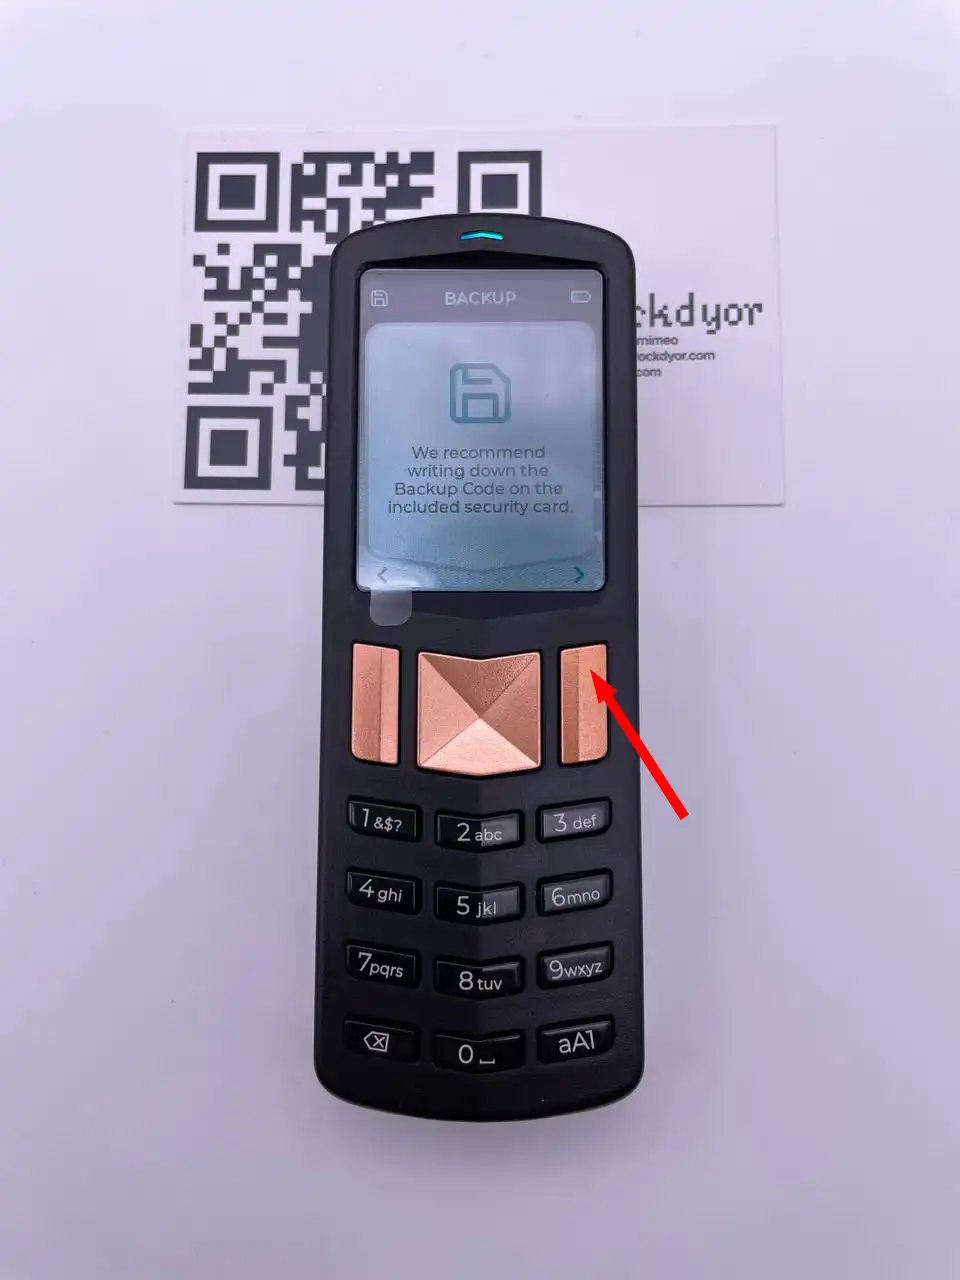
Here is the backup code that you need to note down. You can utilize the recovery paper included in the box, as it has a designated section for this purpose. It's important to clarify that this is not the seed phrase itself; rather, it is a backup code used to unlock the backup file containing the seed phrase. After writing it down, click on the top right button on the keypad to continue.
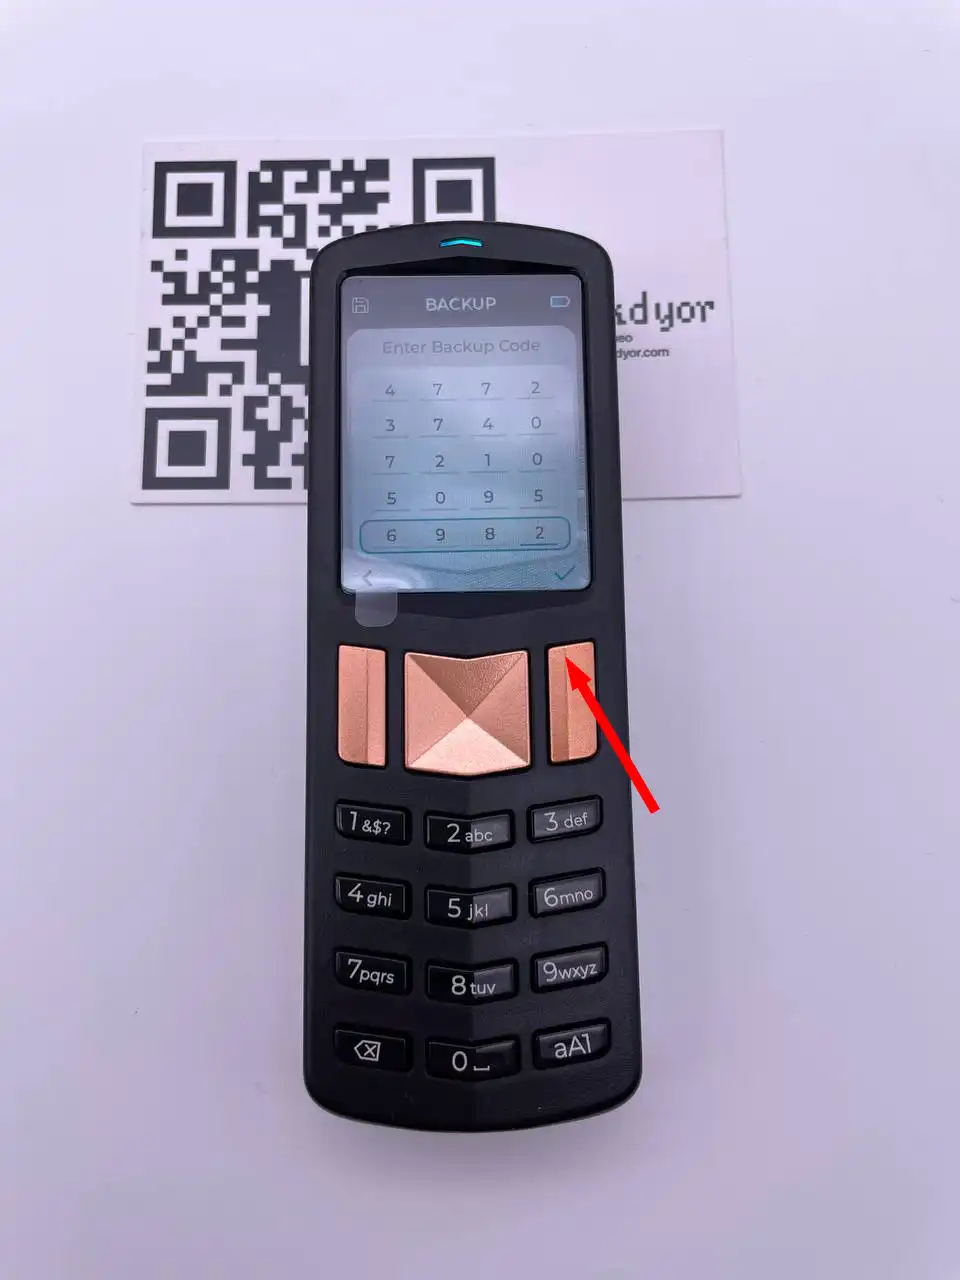
Enter the Backup Code shown before, and click on the top right button on the keypad to continue.
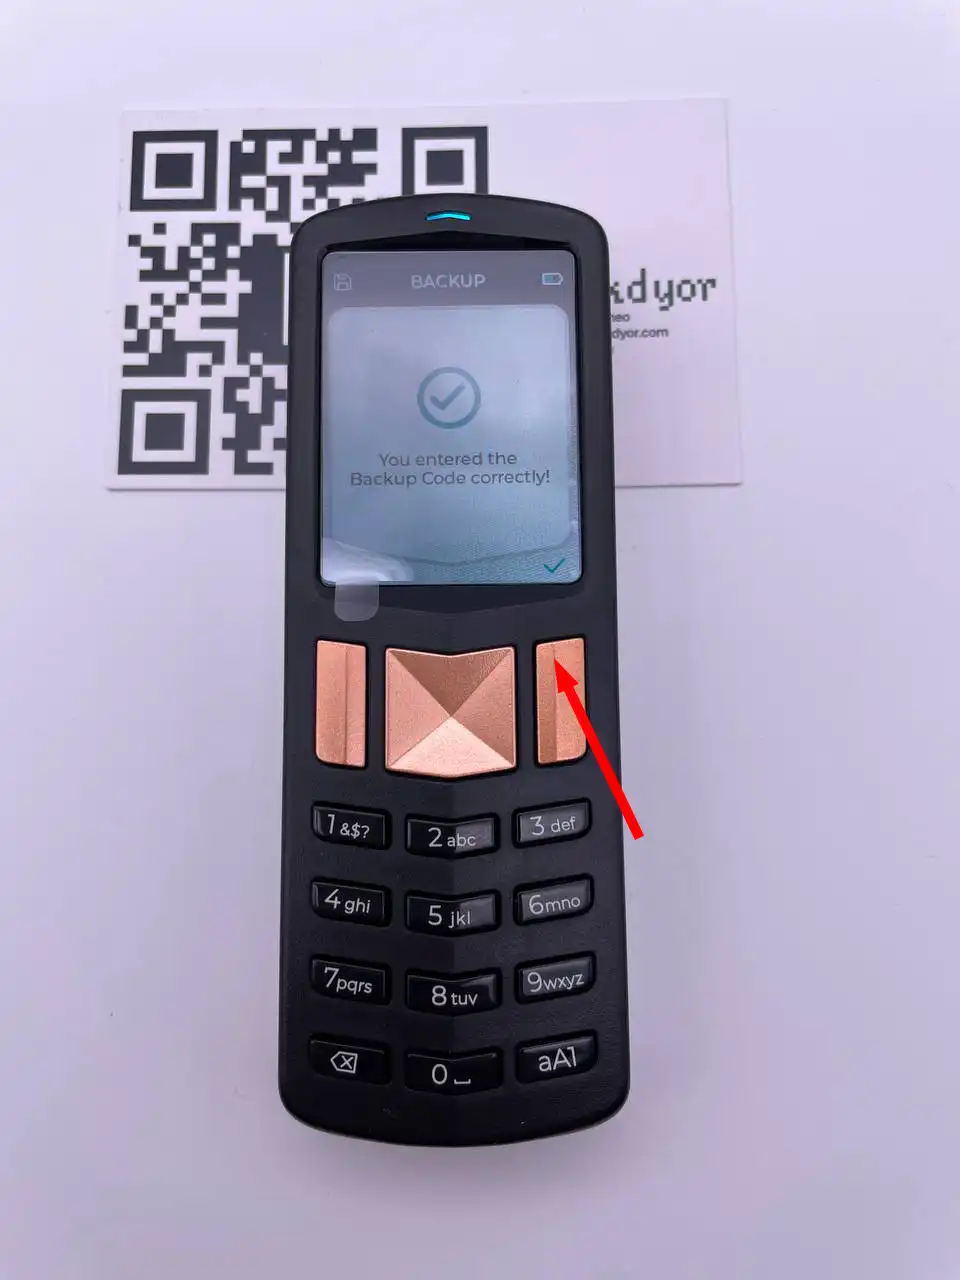
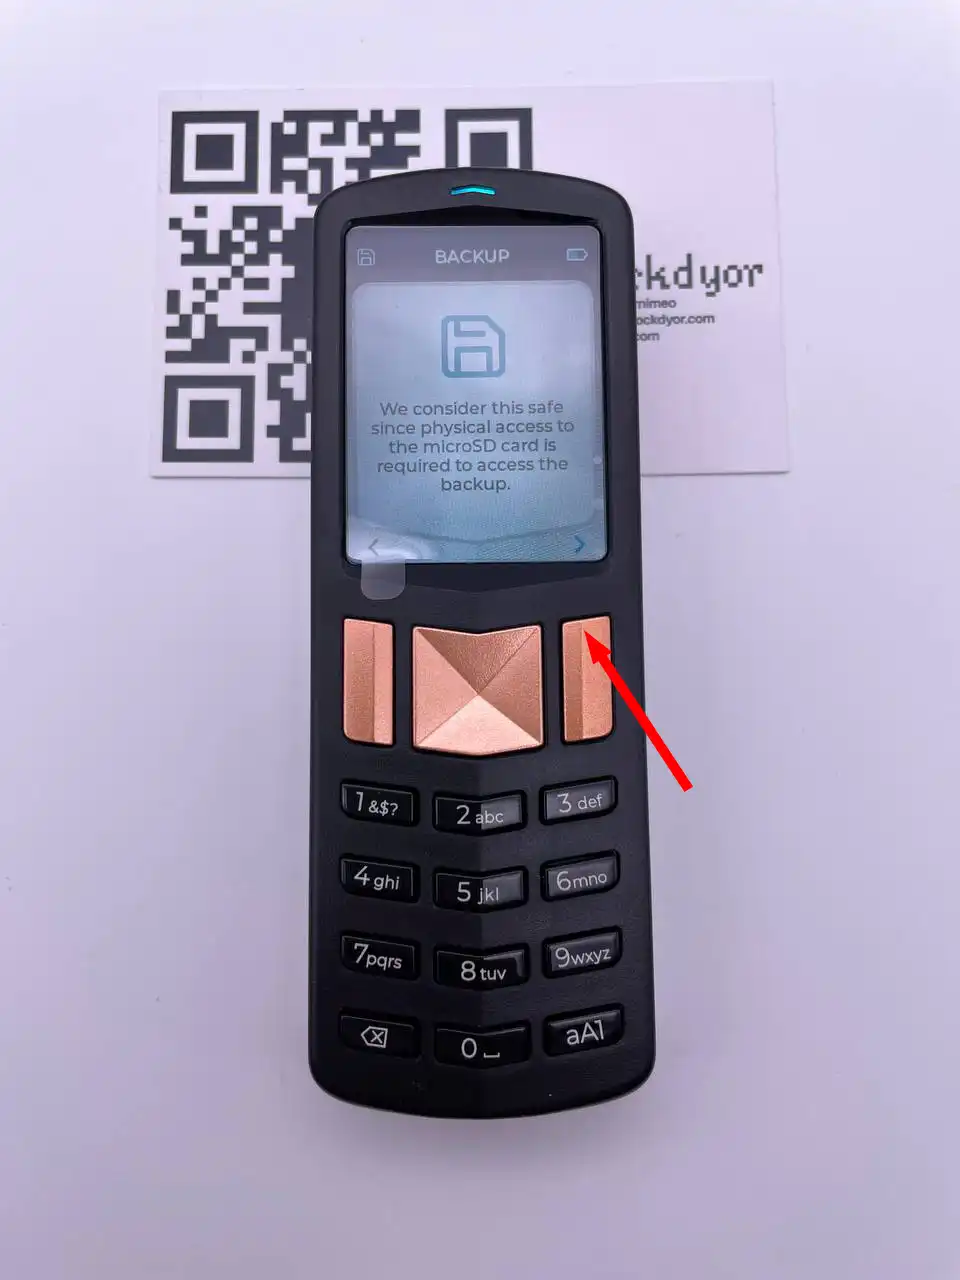
If you enter the Backup code correctly, Passport will show it. Click on the top right button on the keypad to continue and prepare the MicroSD card contained in the box.
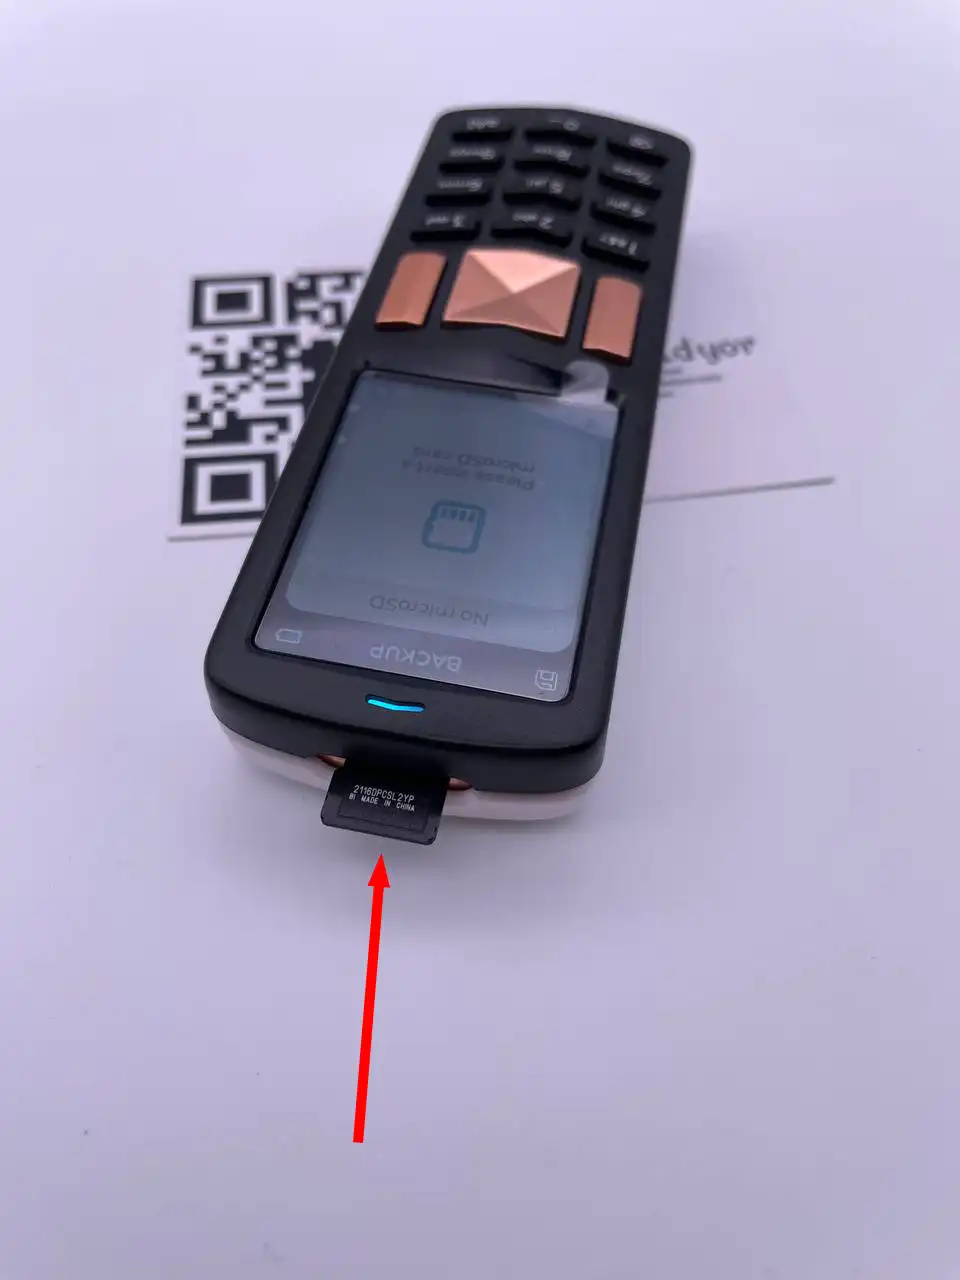
The Passport will prompt you to insert the MicroSD card to store the backup on this external device. Insert the SD card with the Sandisk logo facing downward and the connectors oriented downwards, as shown in the photo above. After you inserted the card, click on the top right button in the keypad to create the backup.
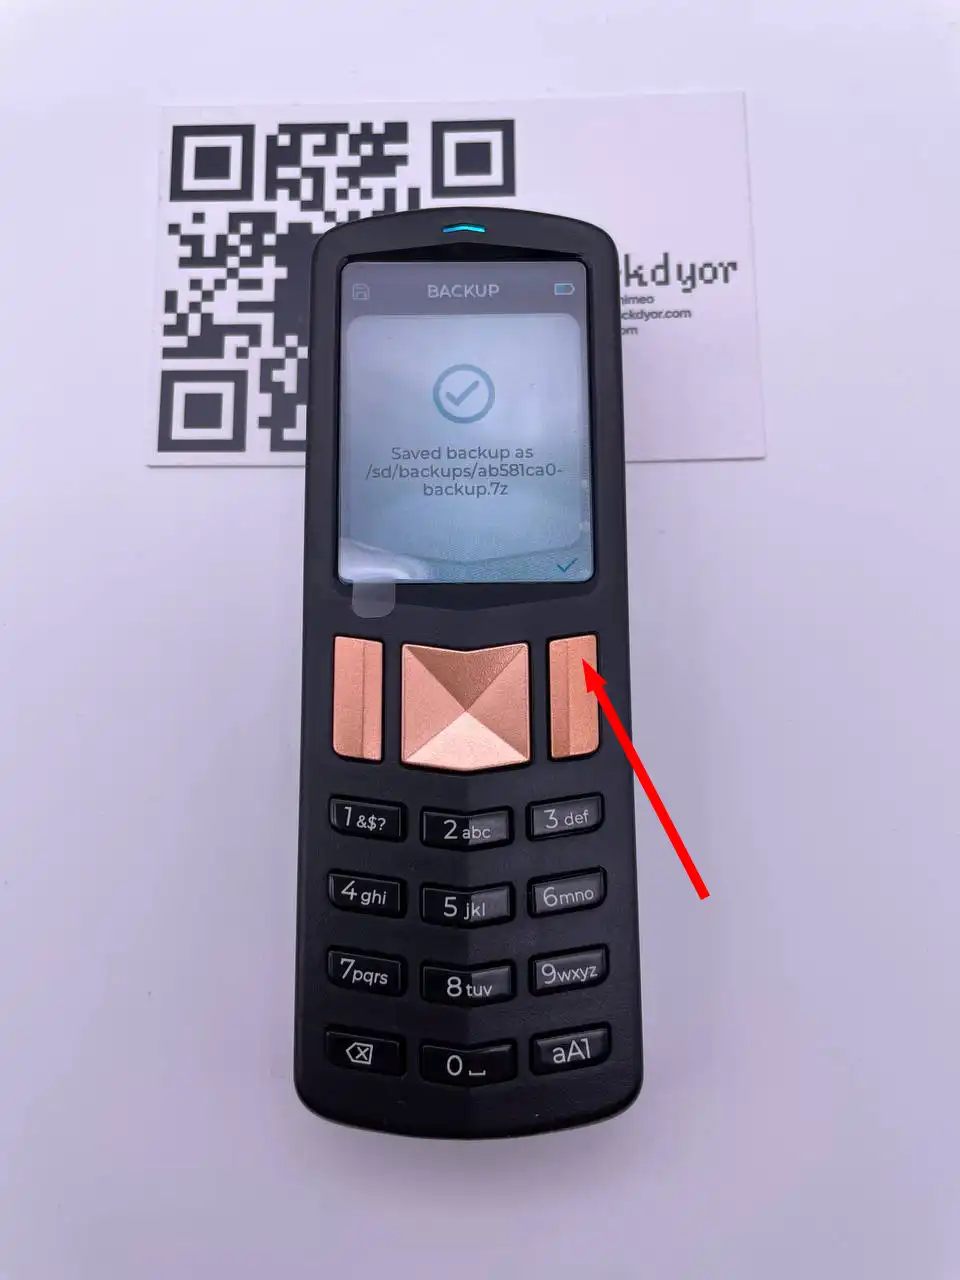
The backup has been saved in the MicroSD memory. Click on the top right button in the keypad to continue.
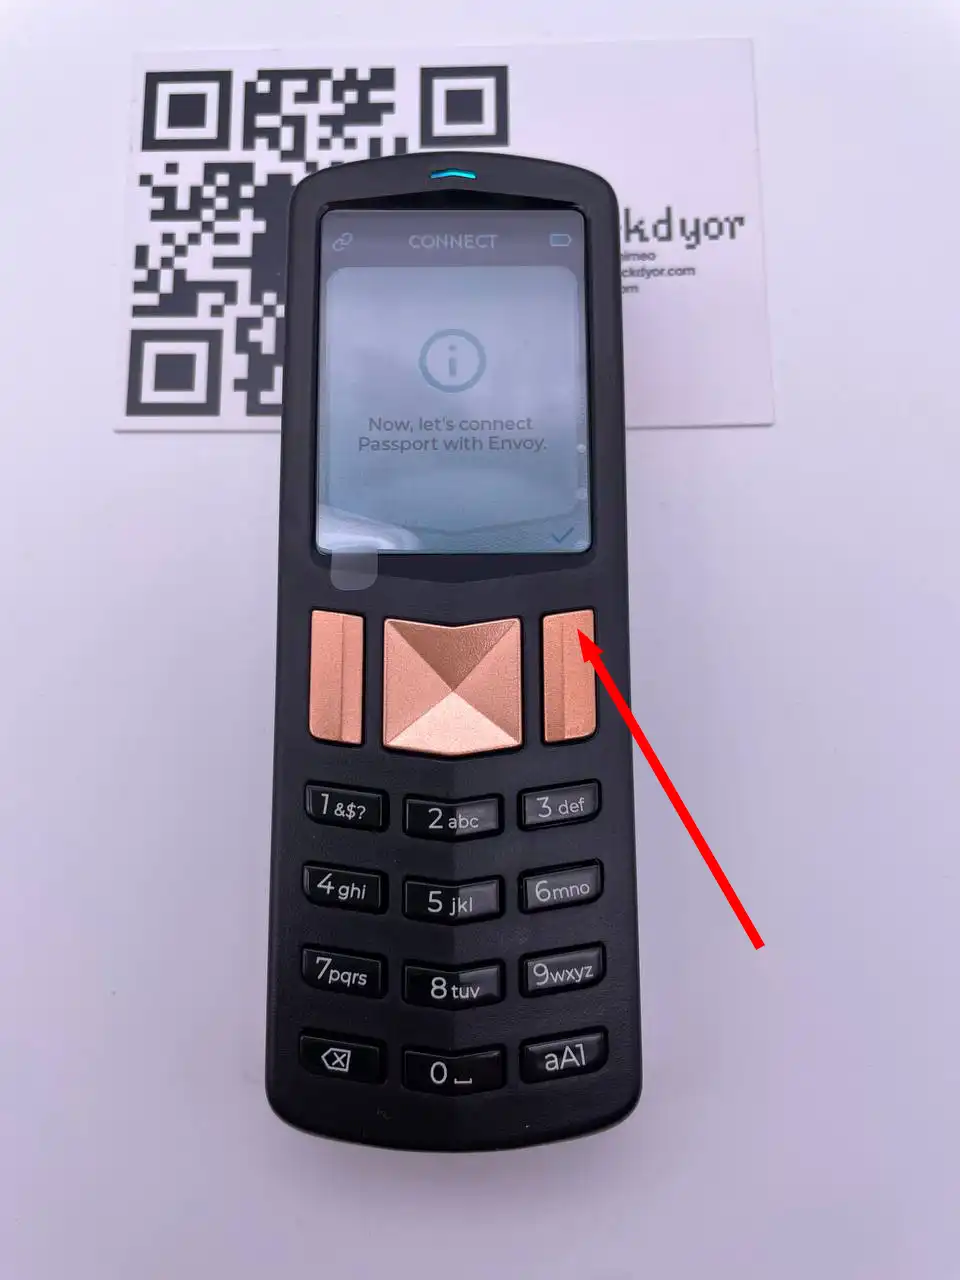
You will now proceed to connect Passport with Envoy. Click on the top right button in the keypad to create the backup.
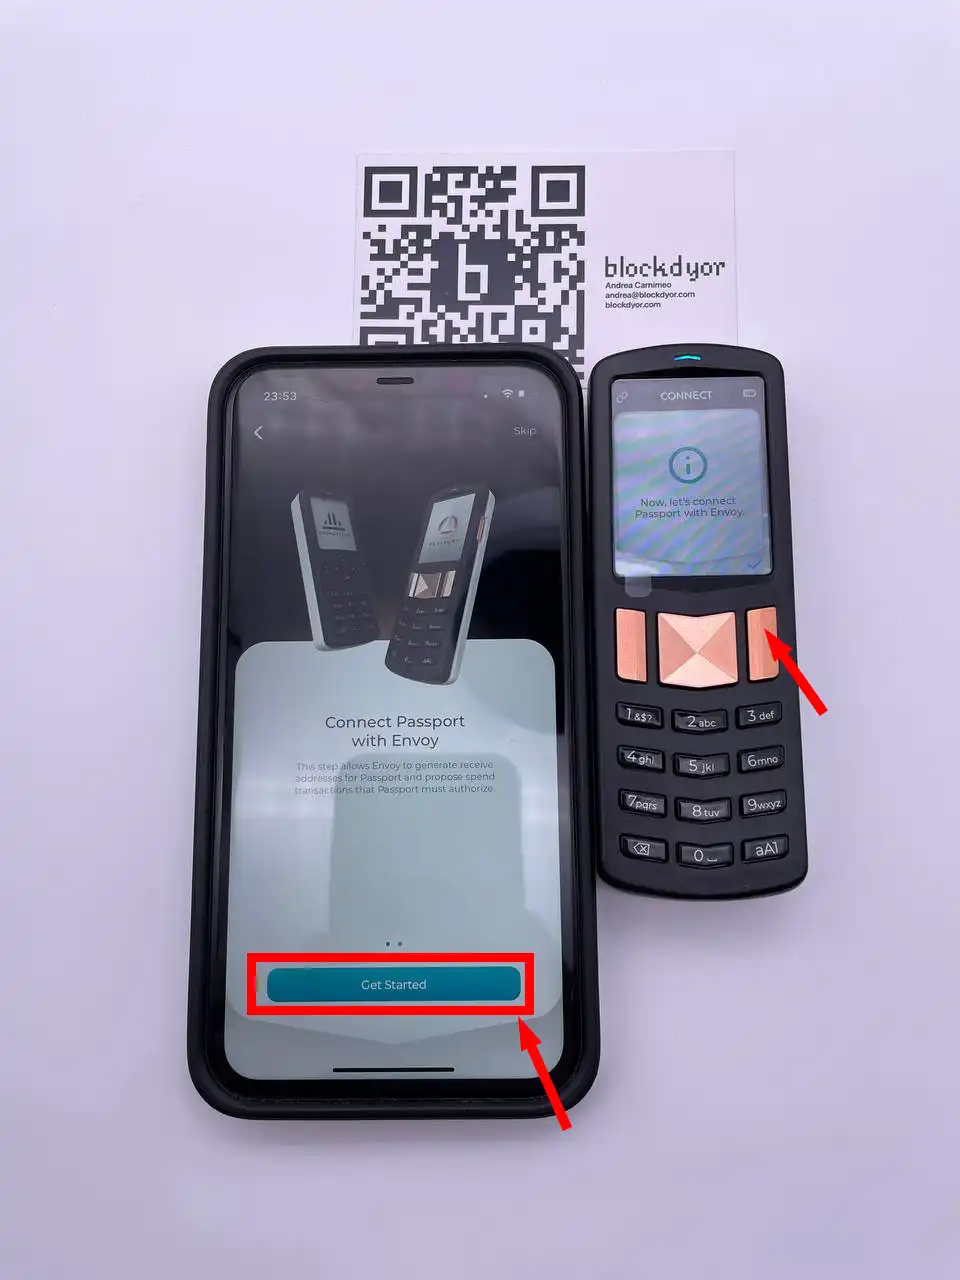
Tap on "Get Started" on the Envoy and then click on the top right button in the keypad of the Passport.
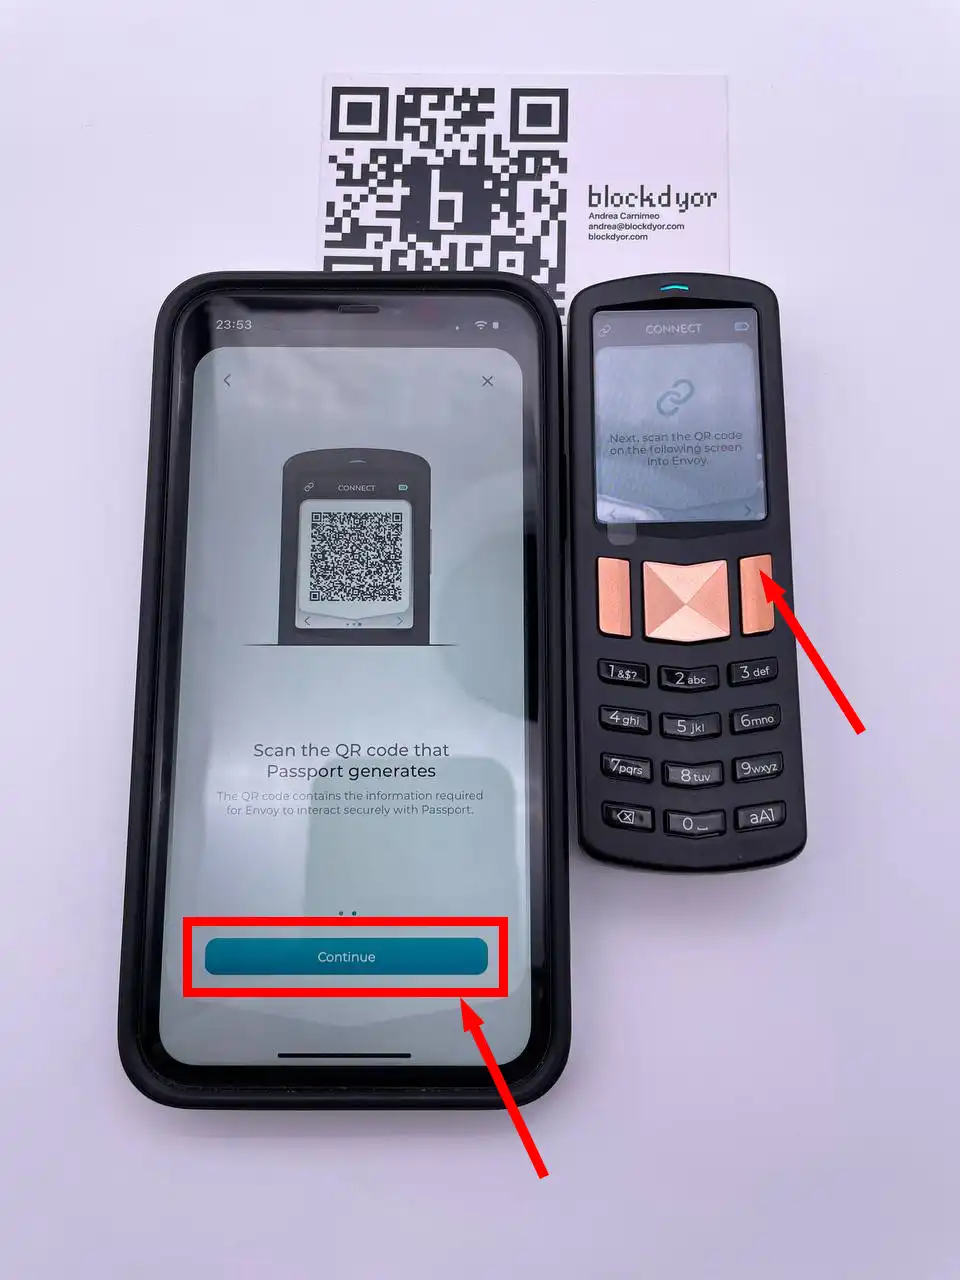
Click on "Continue" on Envoy and the top right button on the Passport.
Using the Envoy, scan the QR Code shown on the Passport.
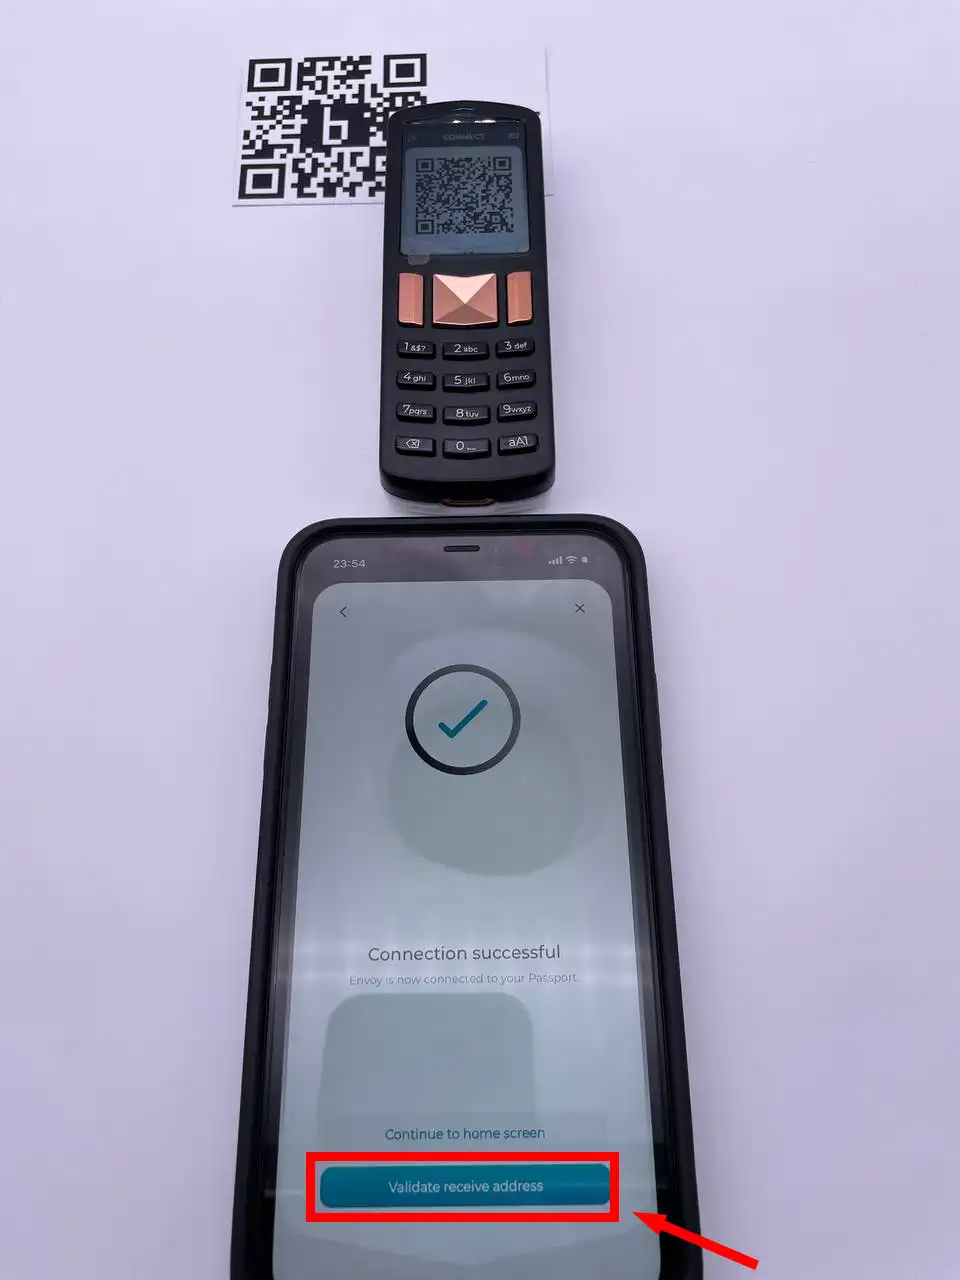
You will receive confirmation of a successful connection, and next, you can verify the receiving address by clicking on the "Validate receive address" option.
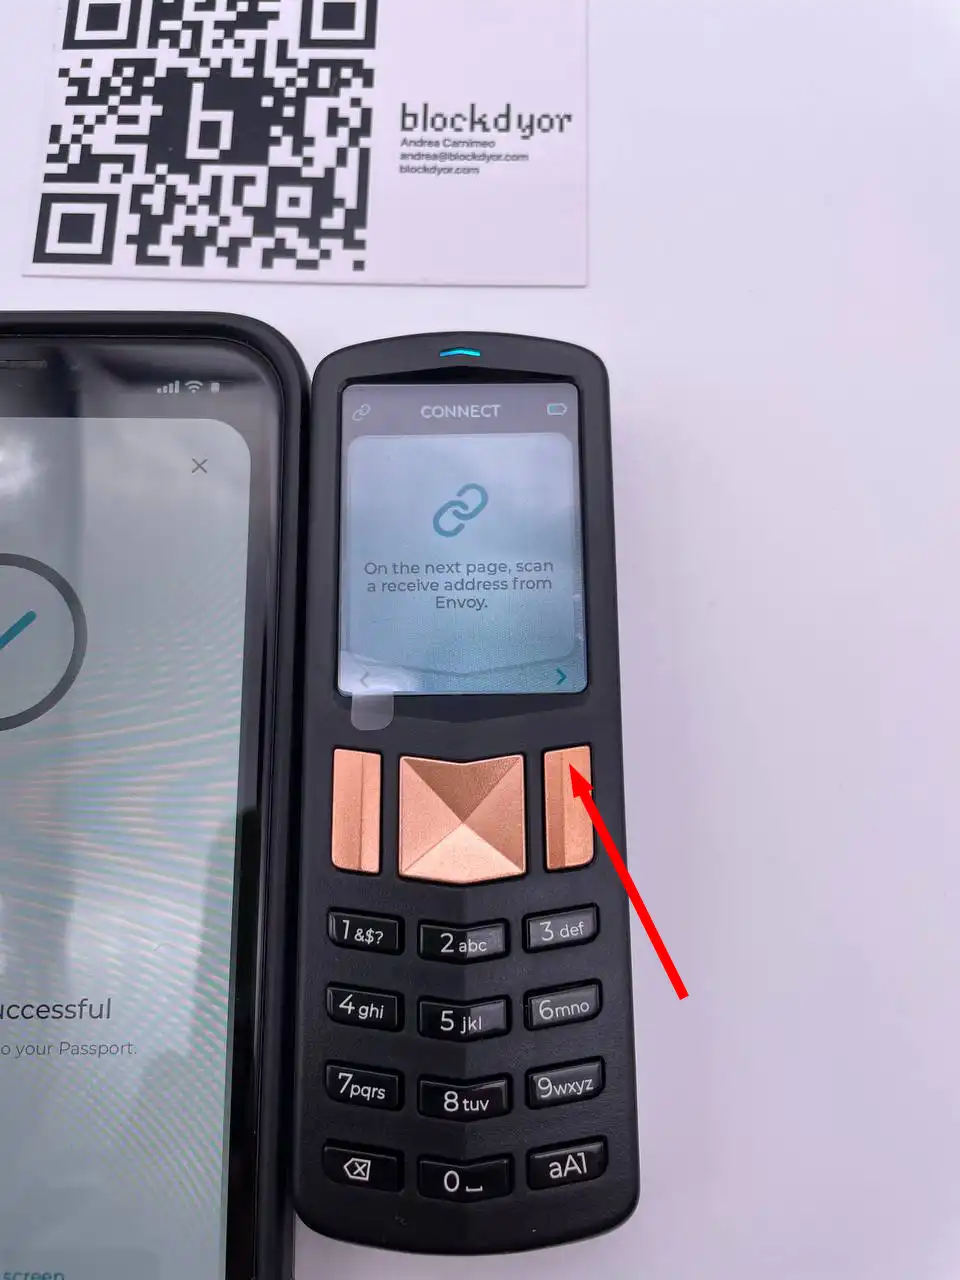
Upon returning to the Passport, you will be prompted to scan the receiving address generated on the Envoy.
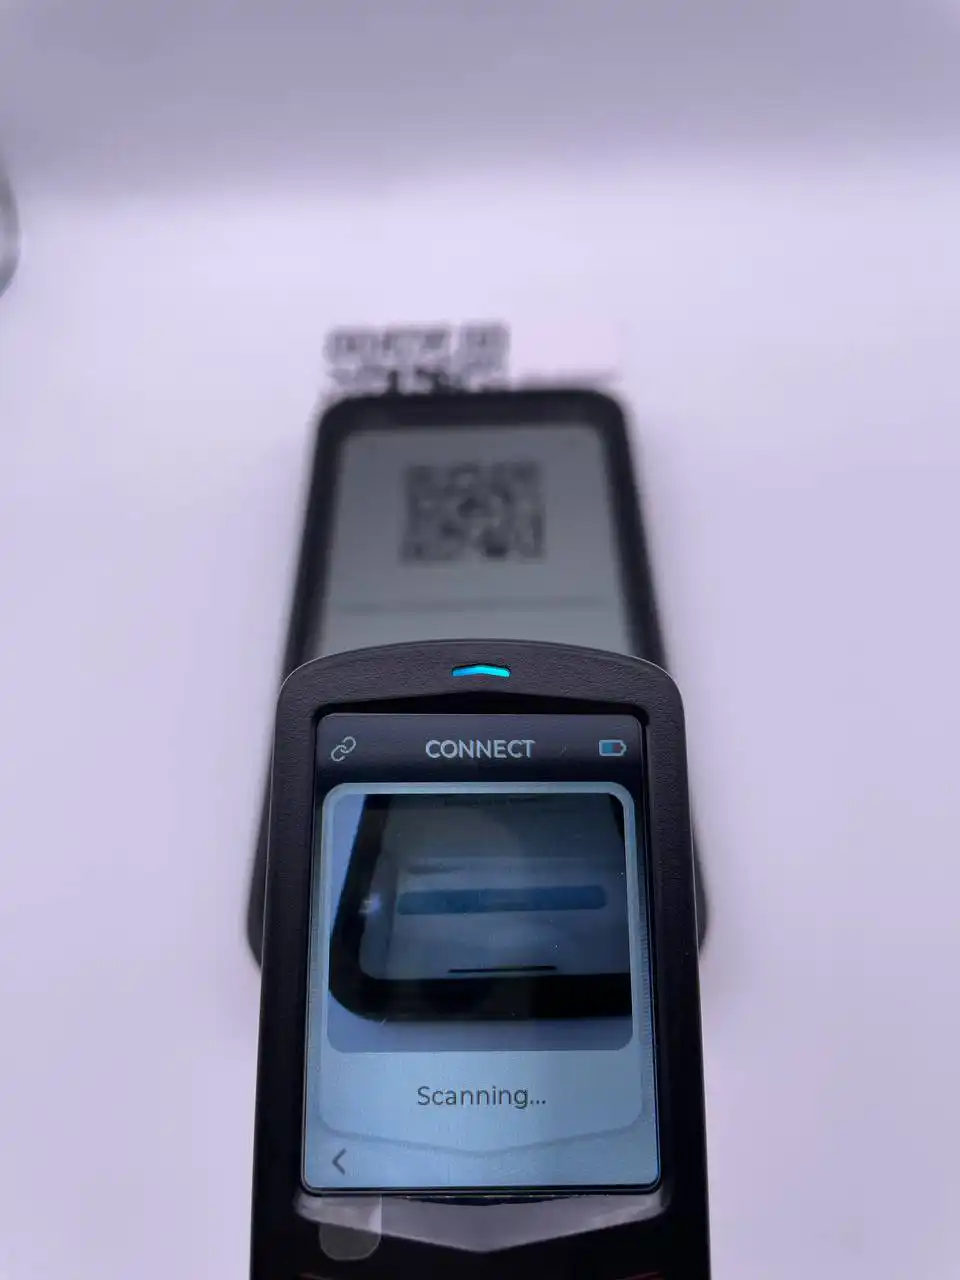
Point the camera to the QR Code and scan it.
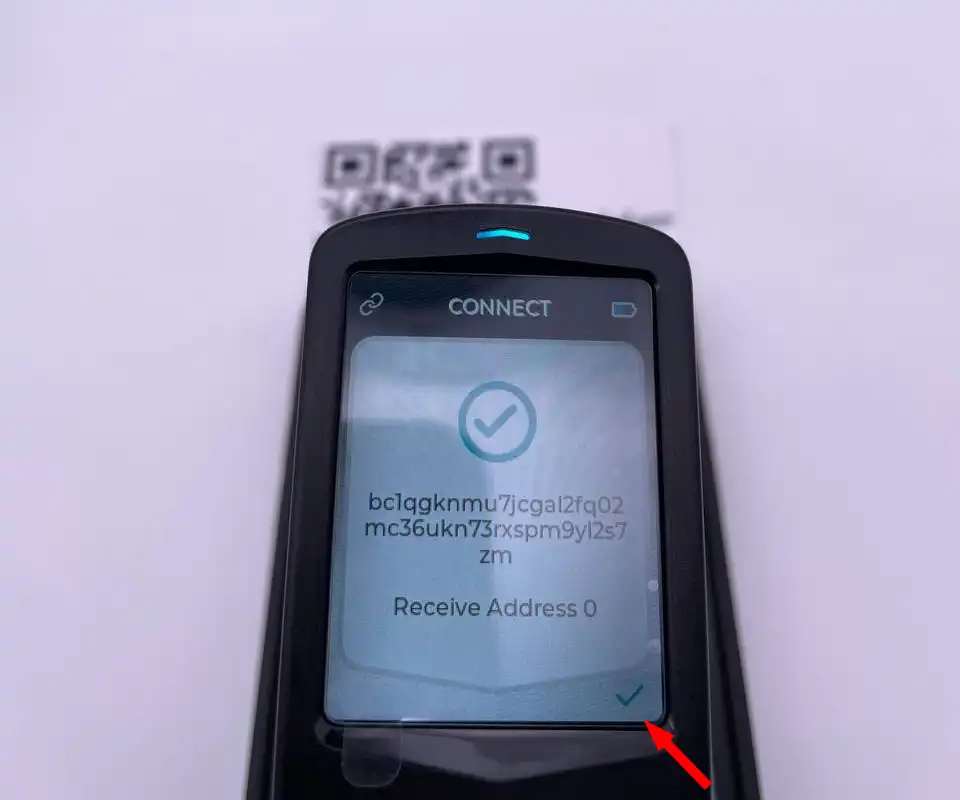
The receiving address displayed on the passport should match the one shown in Envoy. Confirm the match and proceed by clicking the button located at the top right of the keypad.
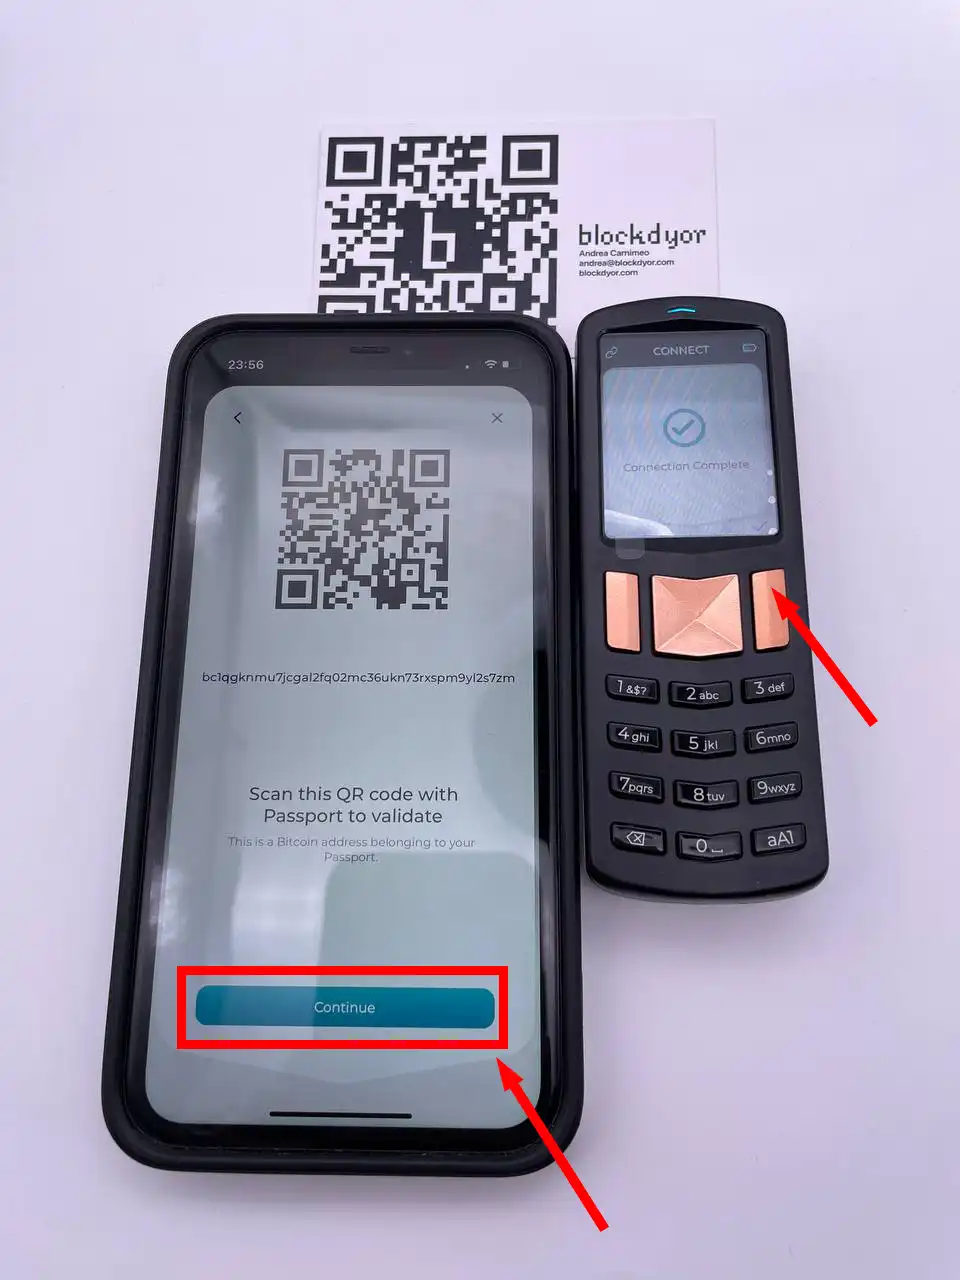
"Connection Complete" will be displayed on the Passport. Click the top right button on the Passport and tap "Continue" on Envoy to proceed.
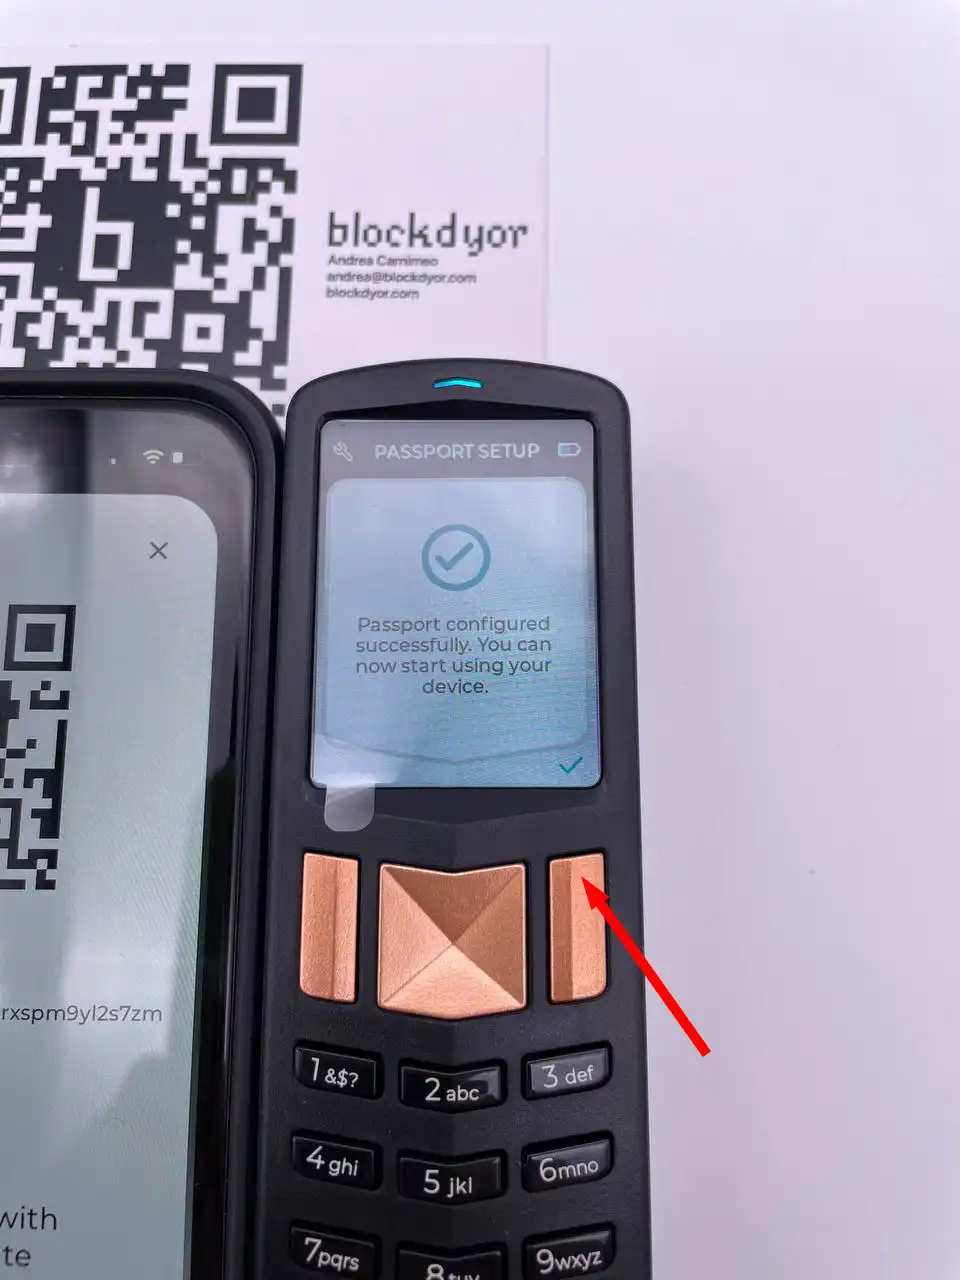
You have finally configured your Passport to work seamlessly with Envoy. Click the top right button on the Passport to finish.
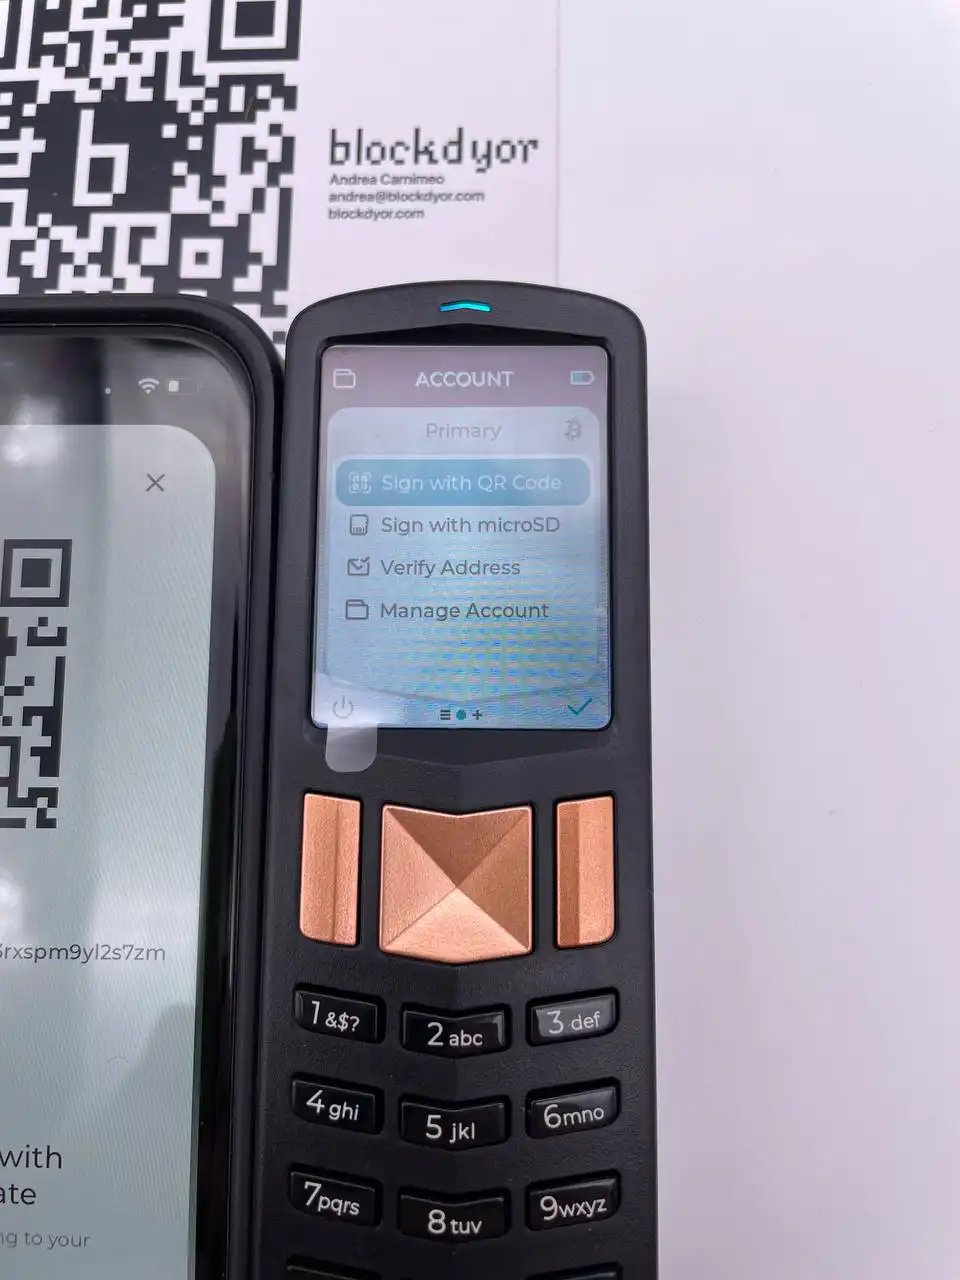
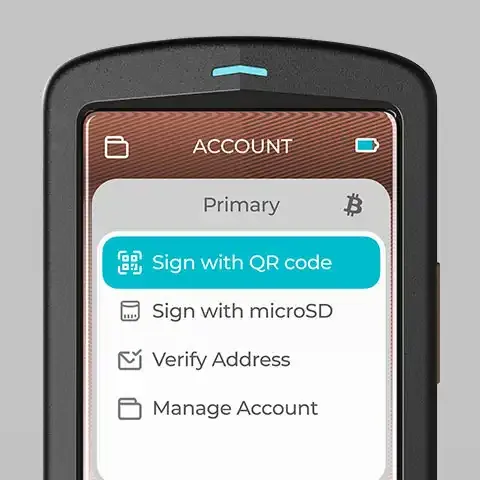
The main dashboard of the Passport is designed for simplicity, with key functionalities easily accessible:
- Sign with QR Code: To send funds (BTC) securely, sign the transaction by scanning the QR code in an airgapped manner.
- Sign with microSD: If the broadcasting device lacks a camera for QR code scanning, you can utilize this option for transaction signing.
- Verify Address: Verify and ensure the accuracy of the recipient address before proceeding with any transaction.
- Manage Account: Access account management features to handle various account-related settings.
By navigating left and right, additional options and functionalities become available on the dashboard.
Sending/Receiving Funds with the Passport
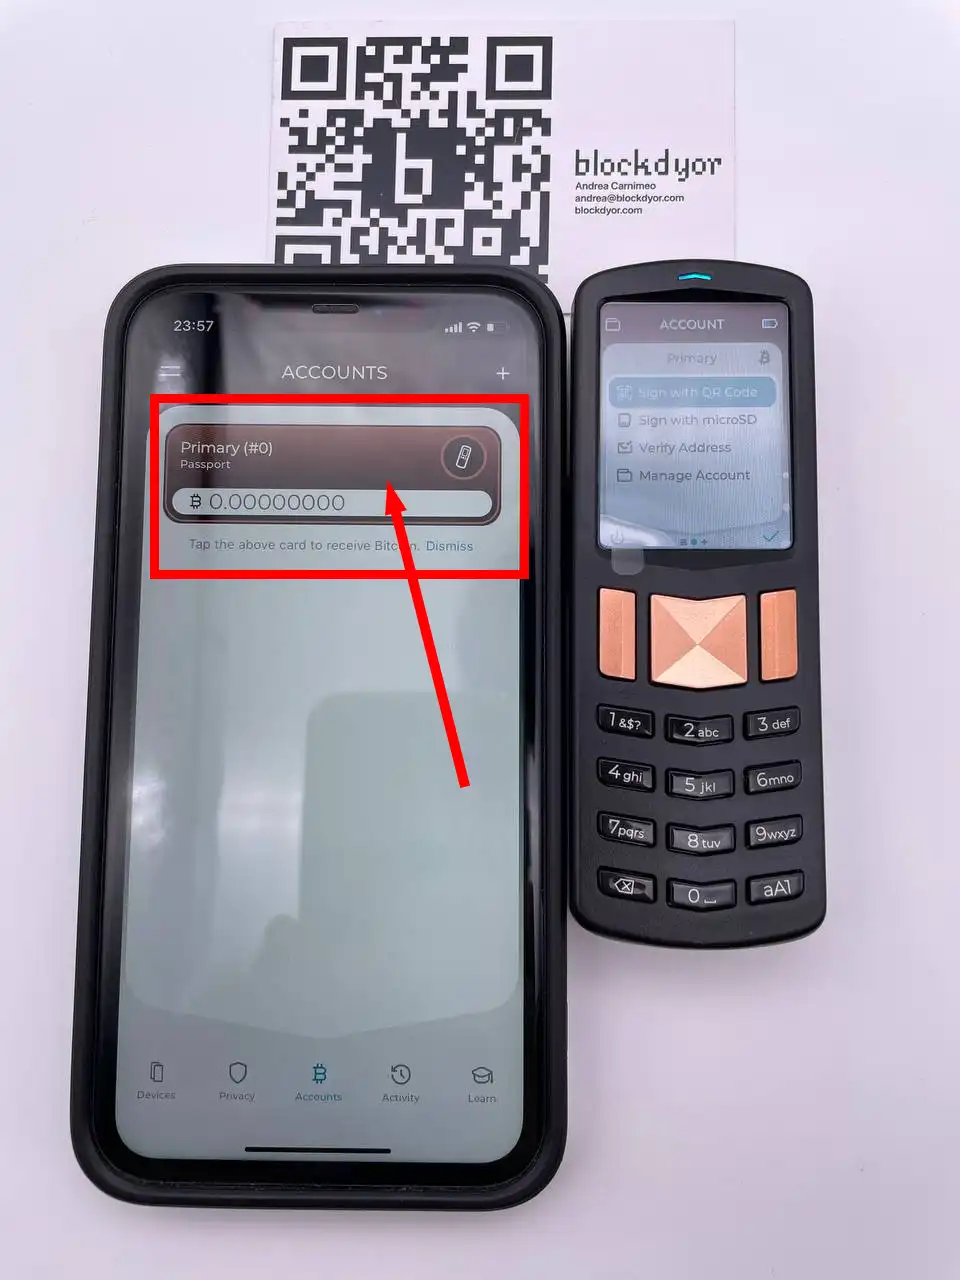
To start the process of receiving or sending funds using the Passport, begin by setting up the transaction in Envoy. Tap on the colored wallet area to start the setup process.
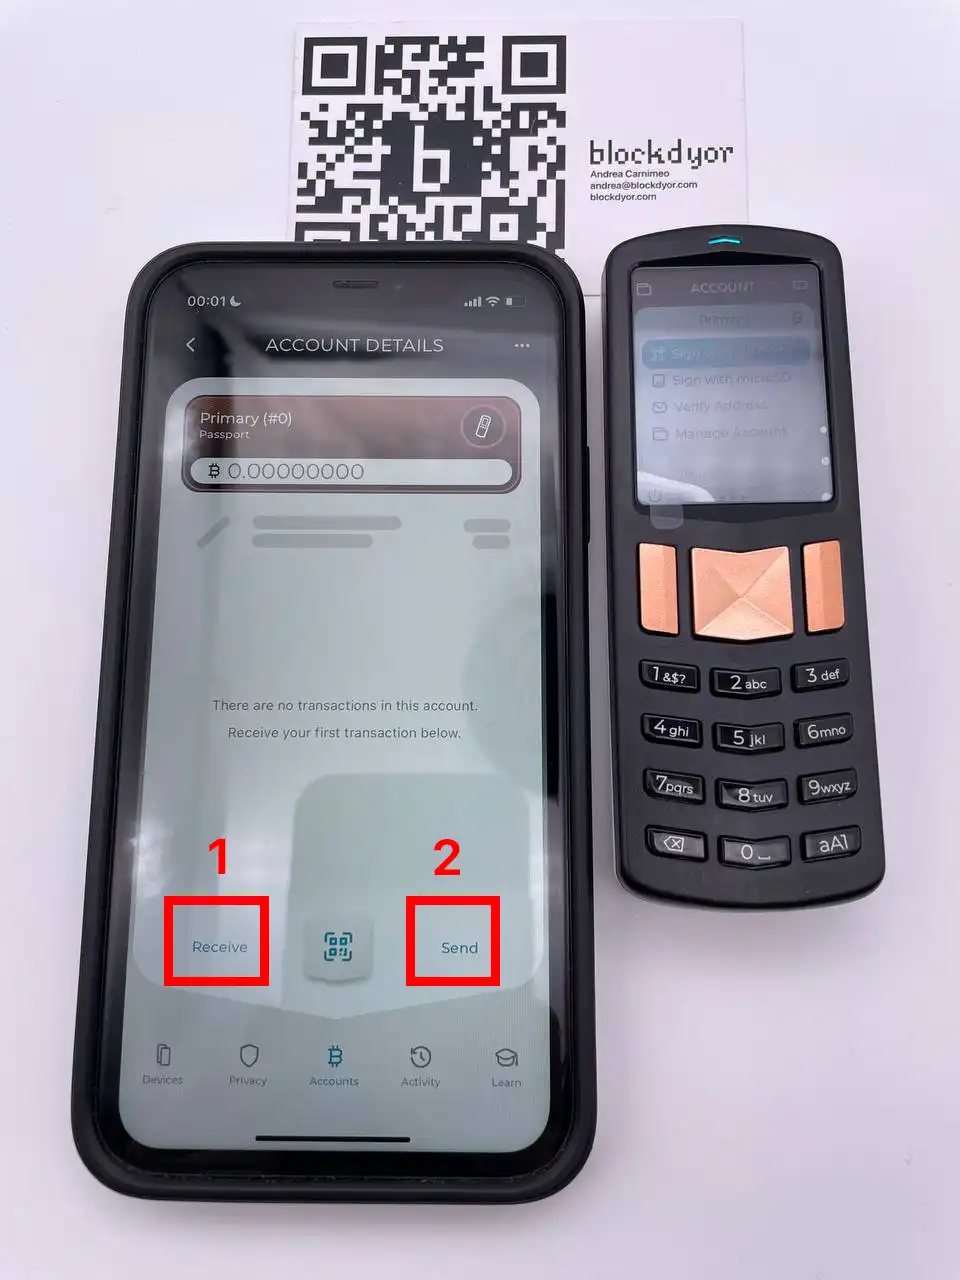
Within the Account Detail view, you have the following options:
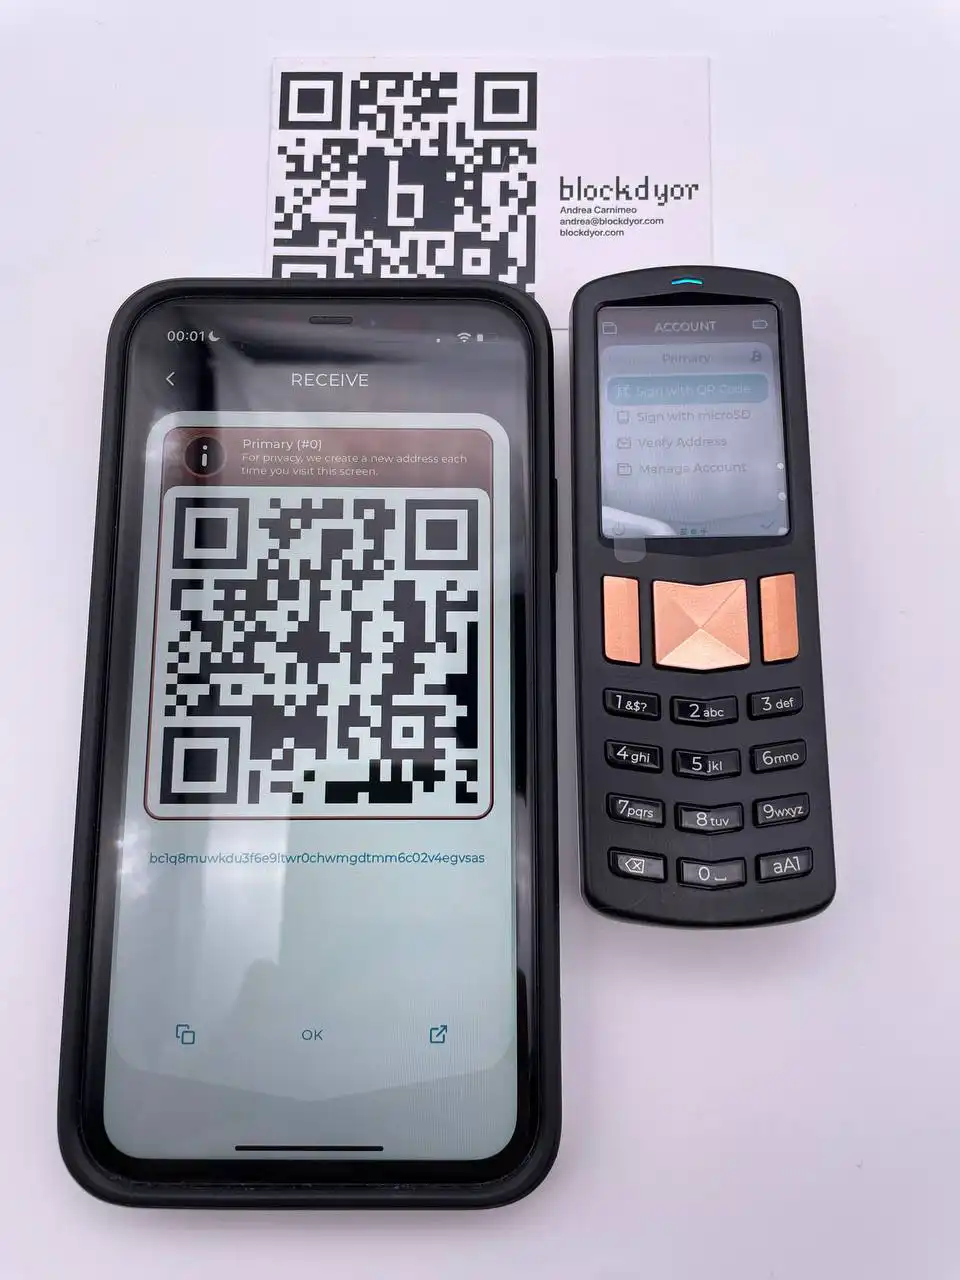
- Receive (1): Accessing this option will provide you with a receiving address where you can receive funds. Share this address to receive payments.
- Send (2): This option allows you to sign transactions with the Passport by scanning a QR Code that will be generated and displayed by the Passport. Use this for secure and convenient transaction signing.
Design & Hardware
This hardware wallet stands out as one of the most impressive bitcoin-only hardware wallets I've encountered to date. Resembling the compact form of early 2000s Nokia phones, it is discreet and small enough to easily pass through airport security without drawing attention.
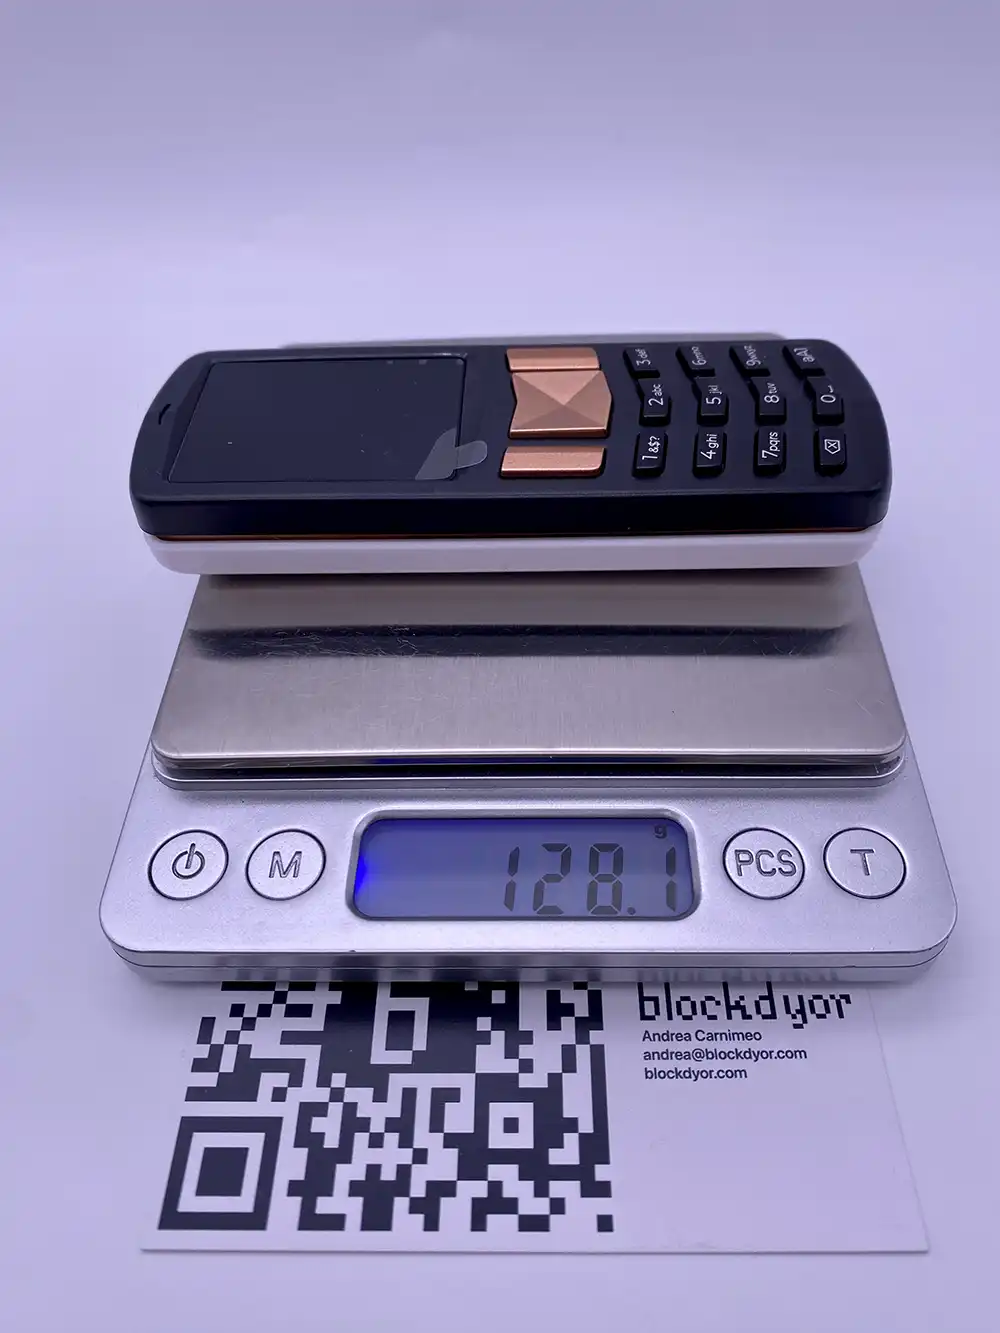
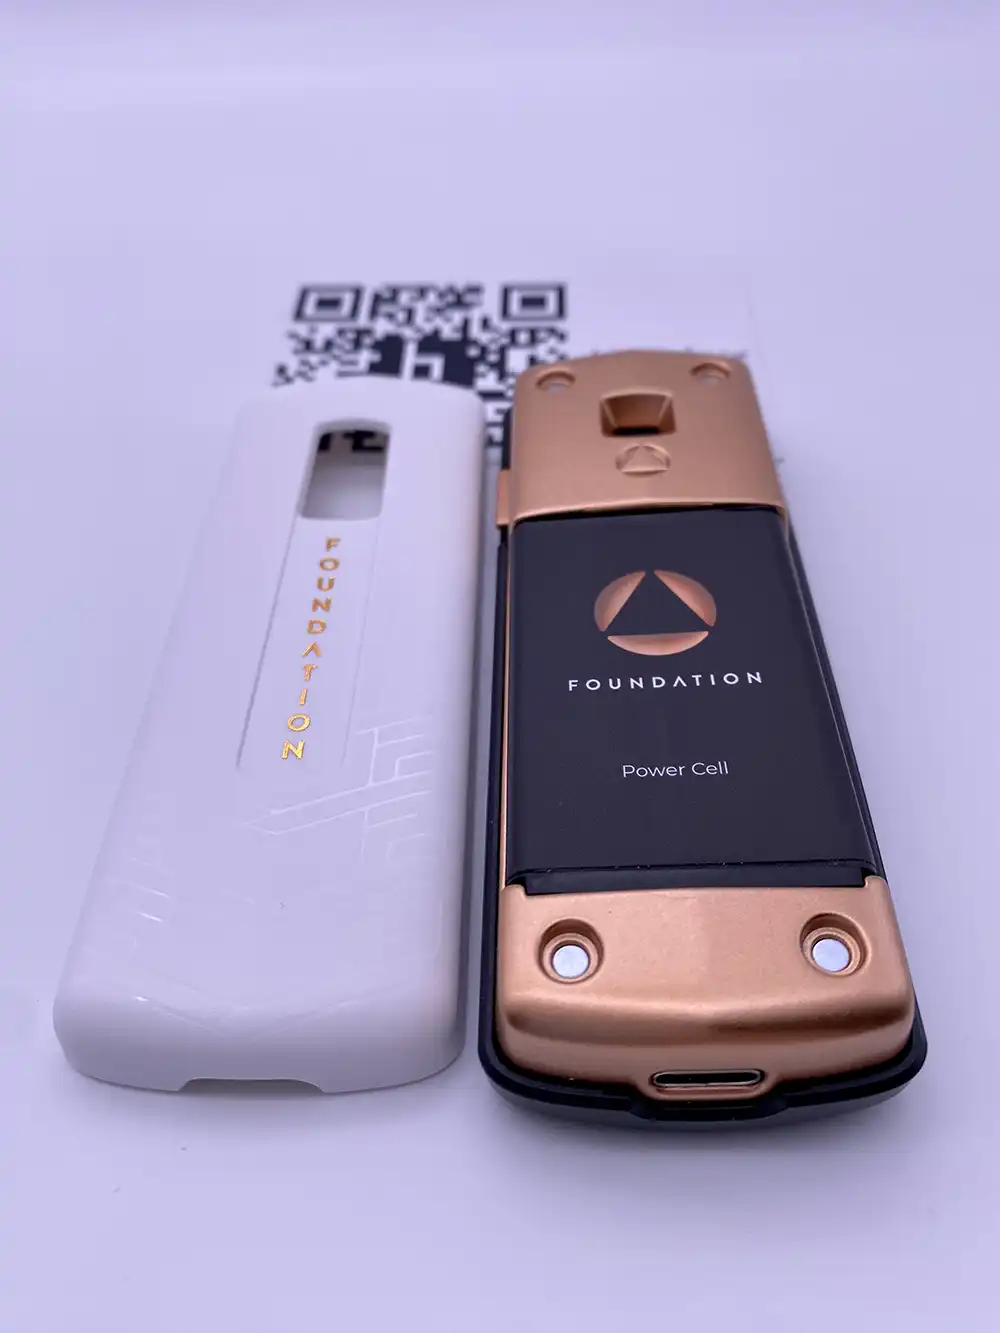
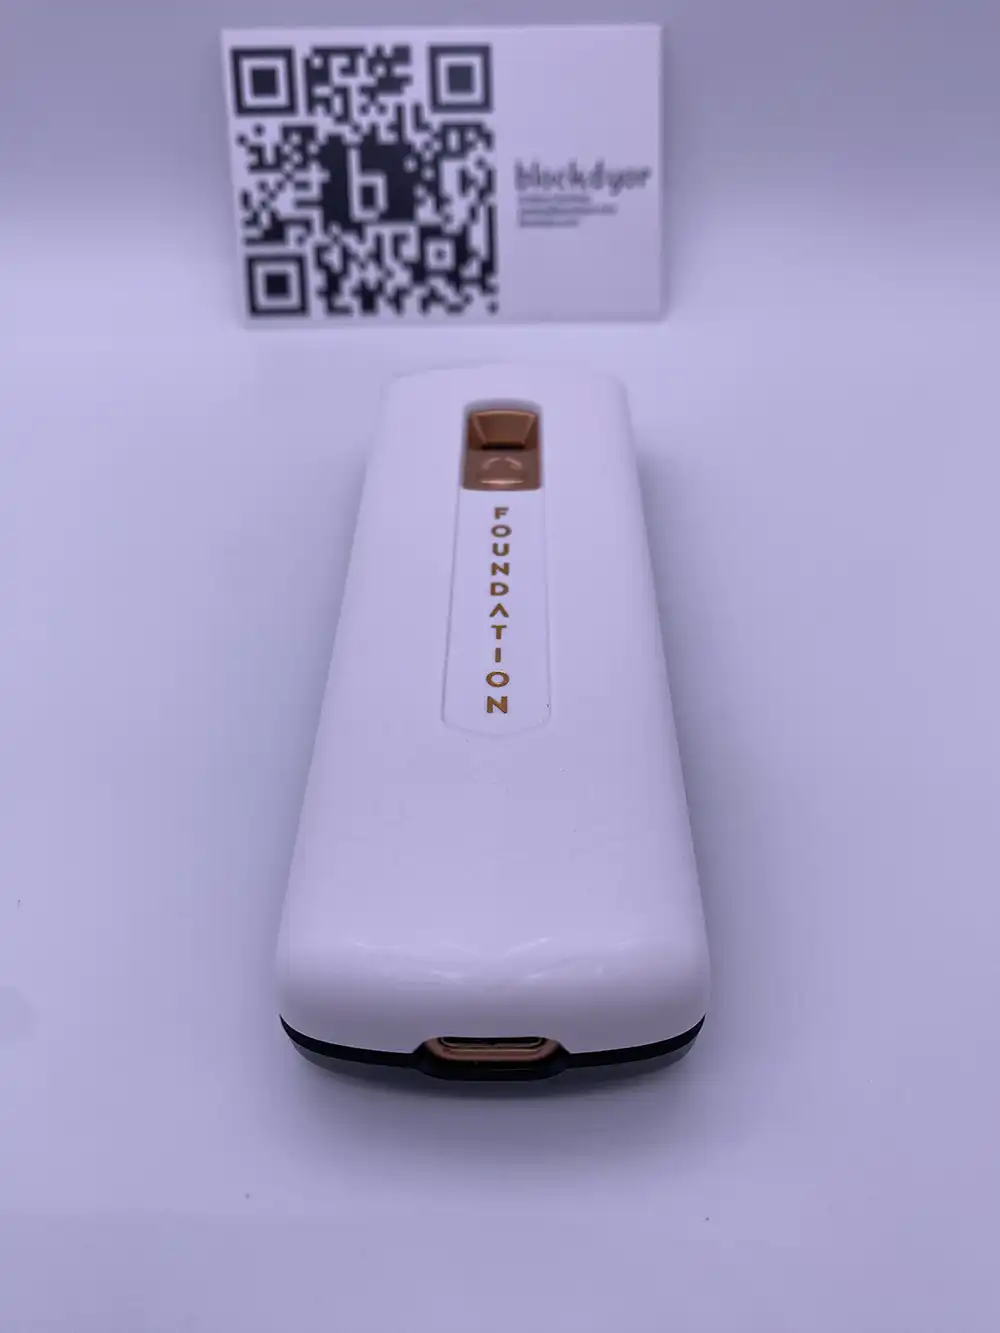
The premium feel is accentuated by its weight of 128 grams (4.52 oz), thanks to the zinc alloy body plated in copper.
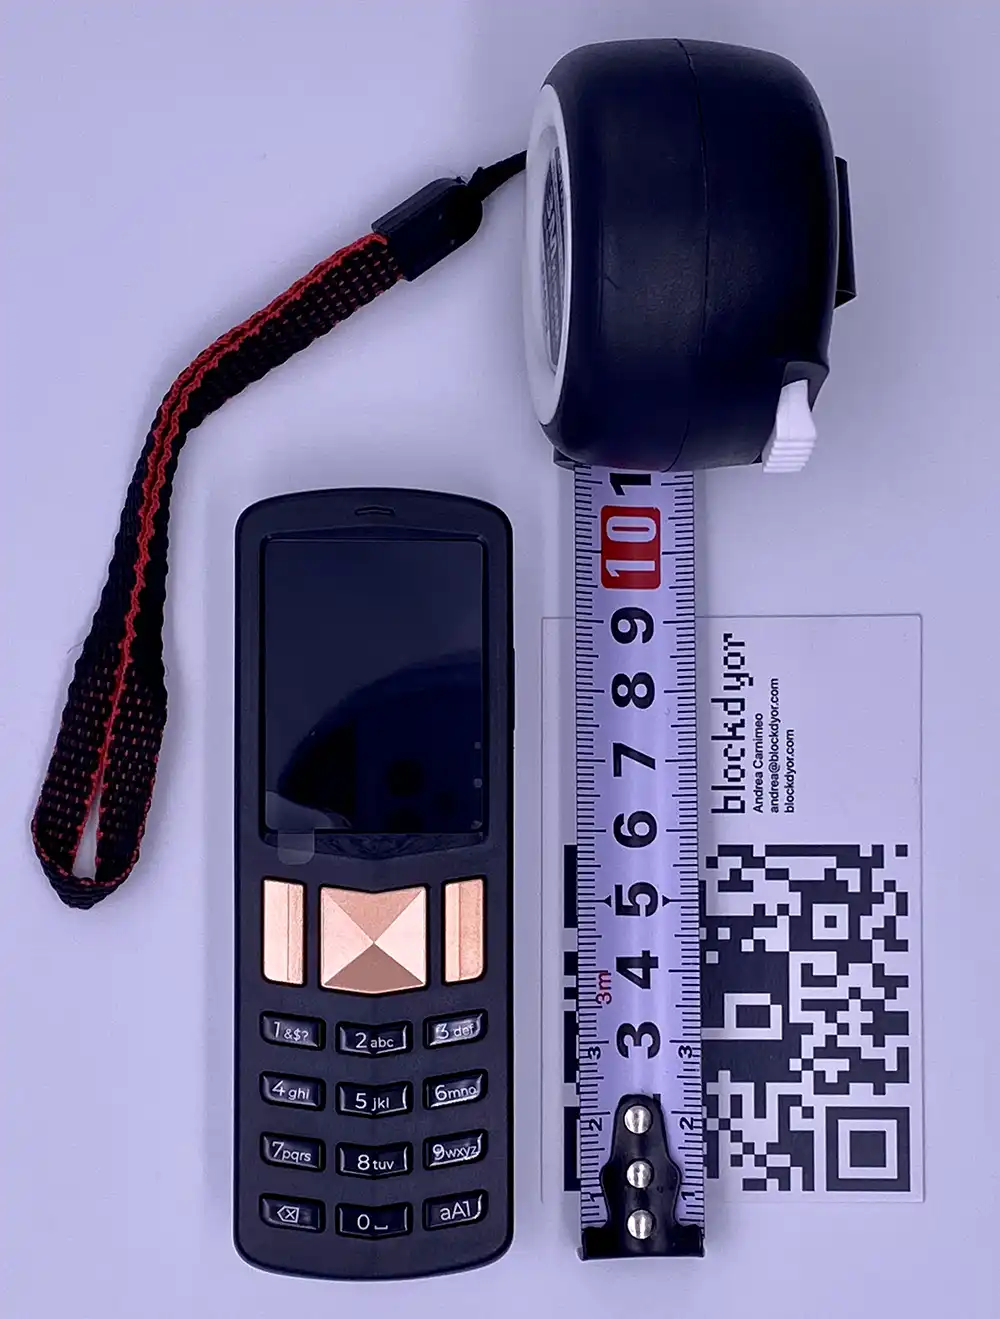
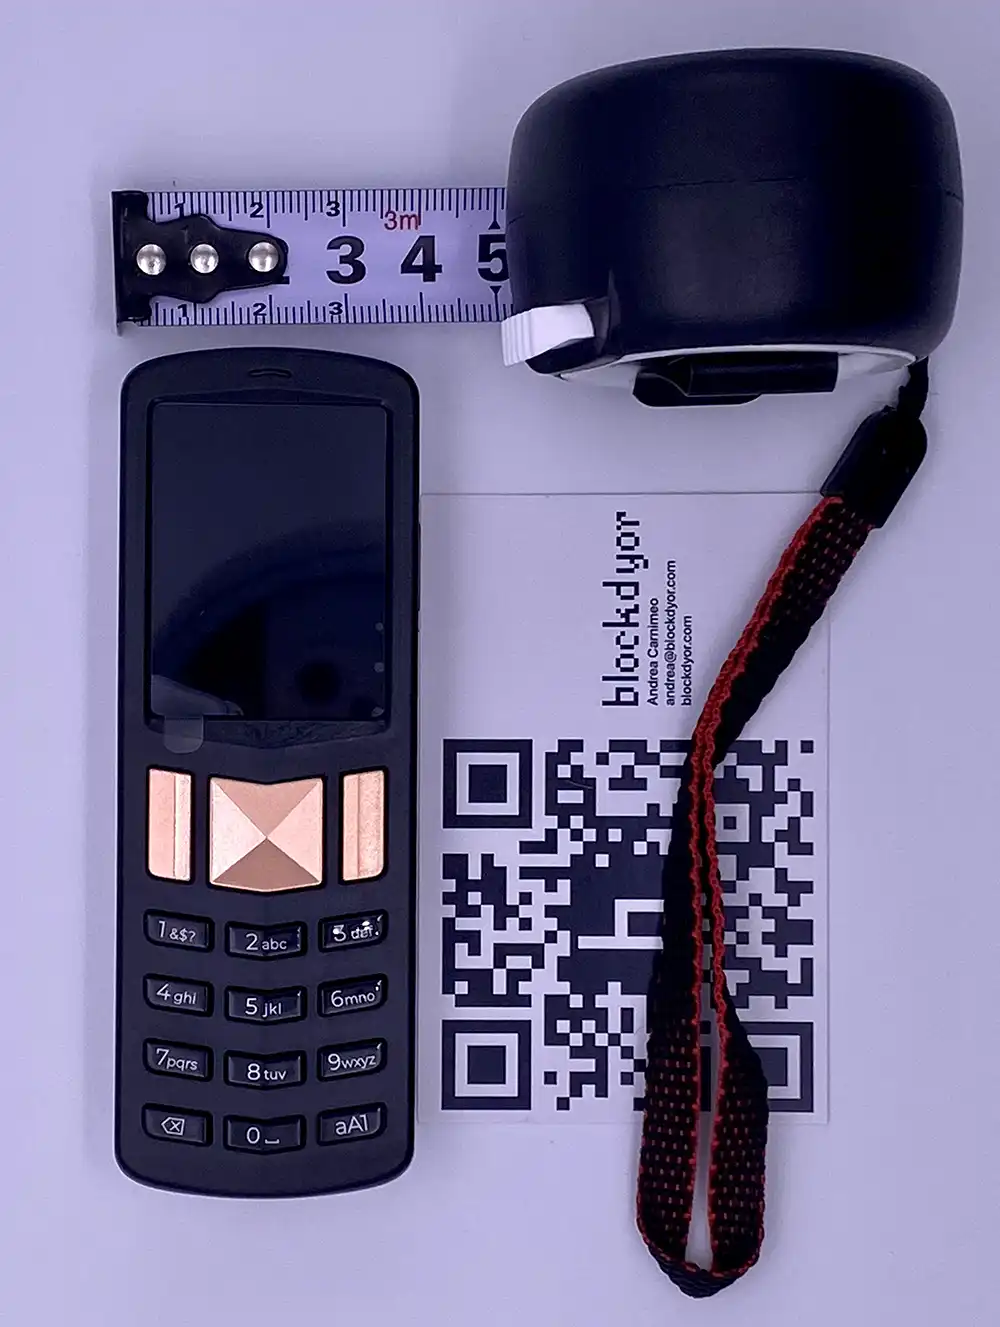
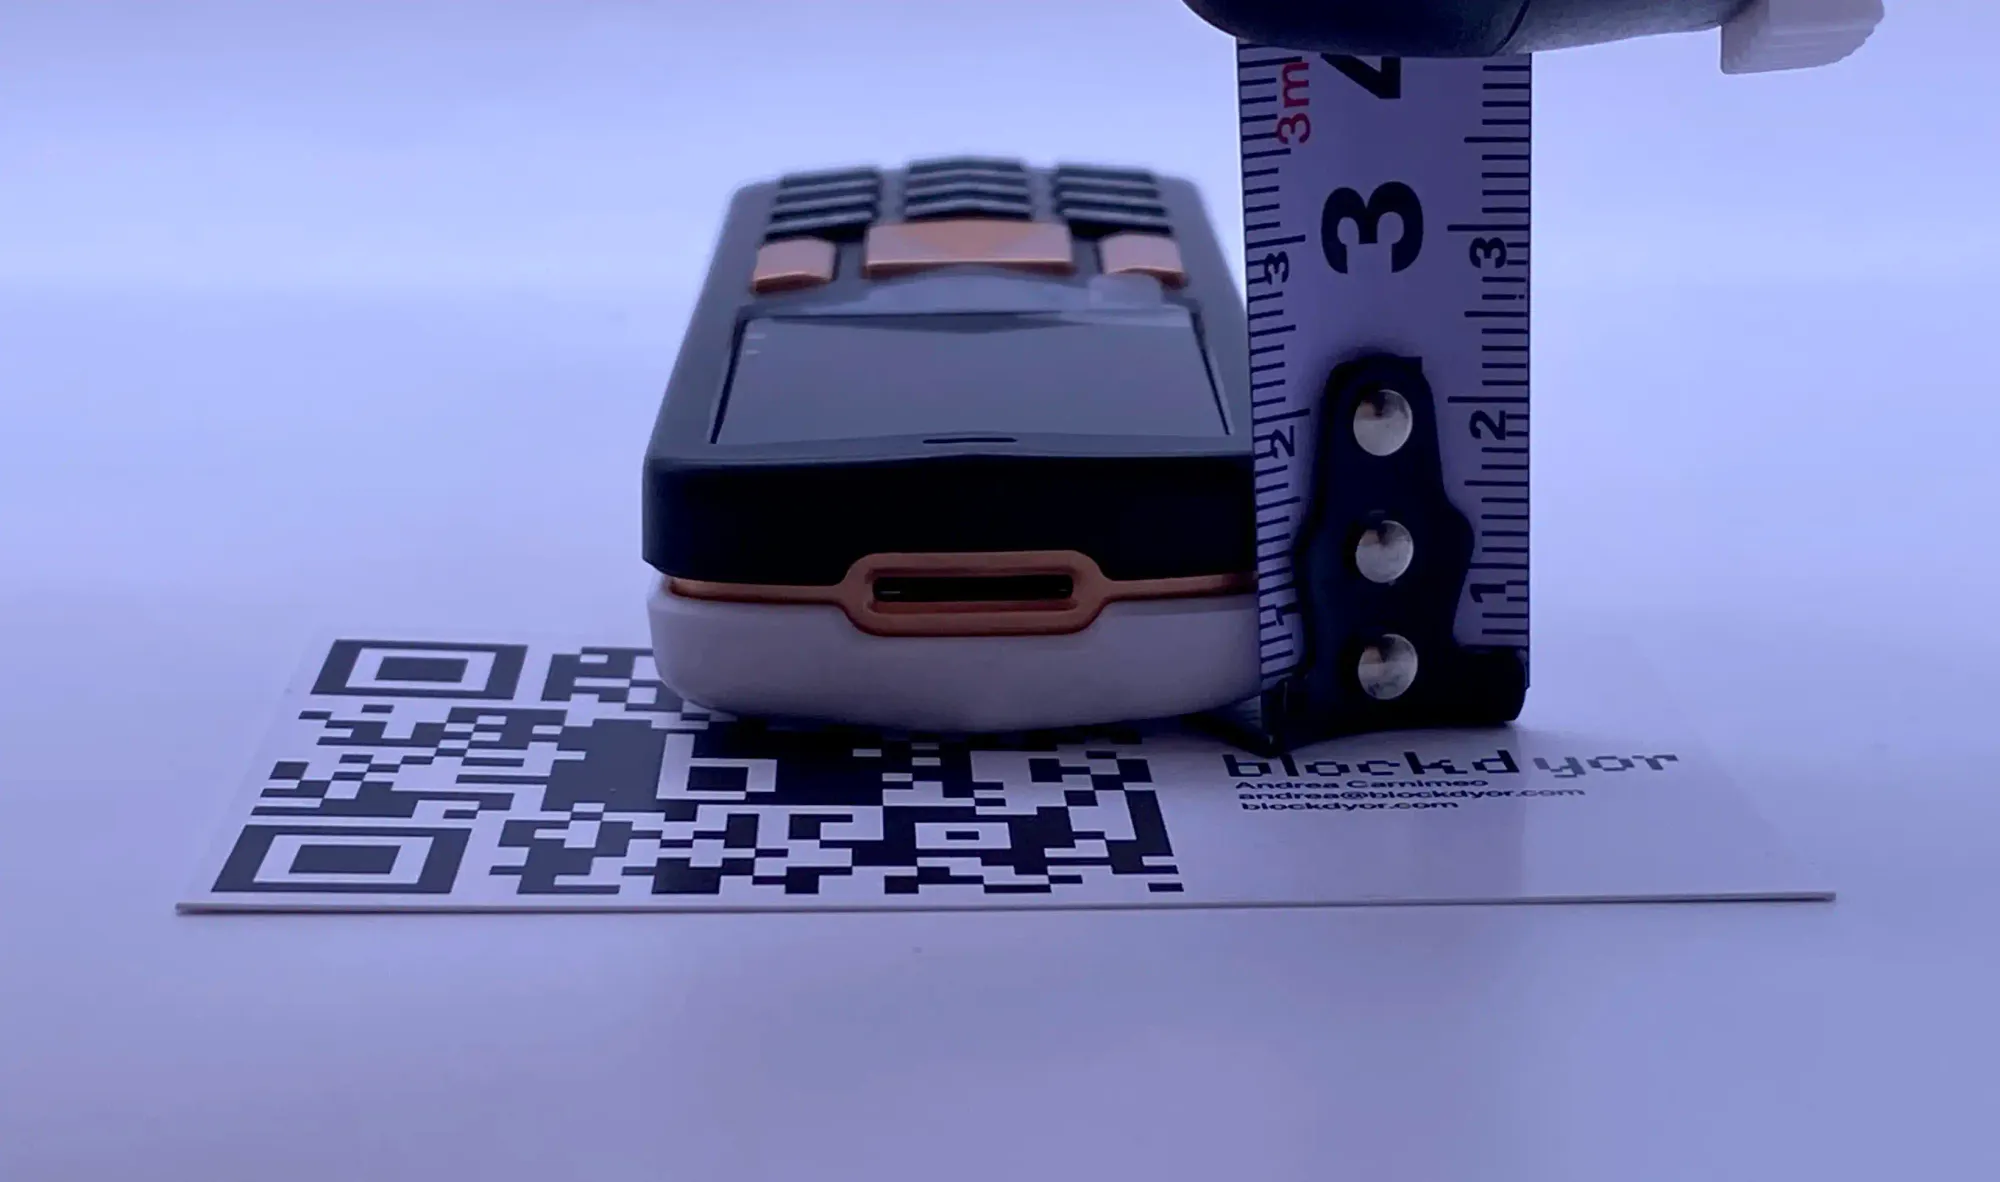
It's quite small however, as it's just 39mm x 110.8mm x 19.2mm (86.61 cm³), equivalent to 1.54 inches x 4.36 inches x 0.76 inches (5.29 in³). The device has a removable 1200 mAh Lithium-Ion battery, conveniently rechargeable via a USB Type-C cable. The screen is exceptionally bright, setting a new standard for bitcoin-only wallets.
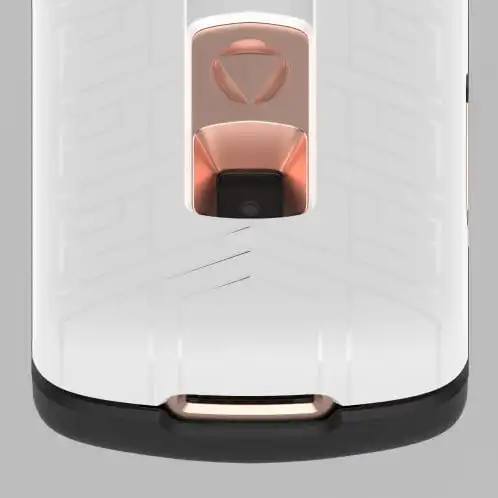
Additionally, the inclusion of a camera, specifically an Omnivision CameraCube, facilitates effortless airgapped cold storage. For those who prefer not to use the camera, the MicroSD option is available, enabling the signing of PSBT transactions and facilitating airgapped transactions securely. The attention to detail in its design and the range of features make this hardware wallet truly remarkable.
However, the tactile feel of the buttons becomes somewhat lacking with extended use. While not a significant issue, the buttons lack substantial travel, resulting in a missing firm and satisfying 'press through' sensation.
When extracting the SD card, you'll observe that the Passport lacks a mechanism to securely lock the MicroSD card into the SD slot, unlike the Coldcard MK4, which features a clicking mechanism that locks the card in place until pushed again. On the Passport, the MicroSD card simply slides in without locking, and removing it can be a bit challenging due to the tapered housing around the SD slot, especially for users with larger fingers.
Connectivity
This wallet is completely airgapped, so it doesn't have any type of connectivity you would expect in other wallets, such as bluetooth or wifi. Everything is done with the MicroSD card that can be used the sign transactions via PSBT (Partially Signed Bitcoin Transaction) or, more practically, by using the integrated camera on the back. This last way is ideal to use it in conjuction with the vendor client app Envoy.
Advanced Features
The device is equipped with many advanced features, which I'll summarize below:
- SeedQR: This innovative solution enables the use of the Passport in a stateless manner. The private key is never stored on the device and can be recovered by simply scanning the SeedQR, a special QR code that you keep securely.
- Casa Integration: Foundation's Passport is supported as one of the hardware devices that can be utilized in your Casa app vault, enhancing the overall security and functionality of your digital assets.
- Postmix Integration: The Passport seamlessly integrates with the coinjoin service known as Postmix, specifically with Whirlpool. This integration contributes to enhanced privacy and security in your cryptocurrency transactions.
- Key Manager Extension: The Key Manager extension facilitates the creation and export of BIP-85 defined 12 or 24-word 'child seeds' and NIP-06 defined Nostr private keys. This functionality allows for the deterministic generation of keys from your Passport's master seed, providing a single backup solution for potentially numerous wallets or keys.
These represent only a subset of the advanced features, and there are numerous others waiting to be explored. Foundation consistently releases firmware updates, introducing new features and enhancements, ensuring that users can continually discover and benefit from the latest capabilities of the Passport.
Warranty
The Foundation Devices Passport comes with a 1 year warranty that covers manufacturing defects only. No returns are accepted according to the Foundations's policy.
Security & Privacy
The Passport goes beyond its sleek and luxurious appearance; its true strength lies in the field of security and privacy. Its airgapped functionality significantly enhances security, providing an extra layer of protection.
Additionally, the Passport supports multisig, representing the pinnacle of cold storage security within the industry. Notably, its open-source nature ensures transparency and allows users to verify the device's security features thoroughly.
Let's delve into the key aspects that make it stand out in terms of security and privacy.
Code Openness & Reproducibility
The Passport it's not just open source in the software, but also in the hardware! Electronics and assembly open sourced via CERN Open Hardware License Version 2 - Strongly Reciprocal (it behaves like GPL); software open sourced via GPLv3. On their github you have all the files to easily build and verify Passport firmware in a reproducible way.
Seed Generation
Passport uses an open source true random number generator (TRNG), called an avalanche noise source, in combination with other sources of randomness to generate a 24-word seed.
Passport will then prompt you to back up your seed to the microSD cards included with your device. To do this securely, Passport creates an encrypted backup file and saves it on each microSD card. The backup is encrypted with your Backup Password, which we recommend storing in a password manager or cloud storage.
The encrypted backup includes more than just the seed phrase; it also contains the complete device state, comprising settings, account names, extensions, multisig configurations, and more.
Unfortunately it doesn't let you to create a seedphrase using dice roll from the device, but you can do it offline let's say with Electrum installed on Tails on an offline computer (super-paranoid mode) and then import the seed in your Passport.
Seed Storage
Unlike traditional hardware wallets that require users to memorize or write down a 12- or 24-word recovery seed, Passport takes a unique approach. Foundation Devices securely stores the recovery seed on a microSD card, employing encryption with a password for an added layer of protection.
This design simplifies the recovery process—users can effortlessly retrieve their bitcoin by inserting the microSD card and entering the password. Despite the ease of recovery, security remains robust, as any potential attacker would need access to both the card and the password to compromise funds. Each Passport wallet comes with one microSD cards.
Passport securely stores the seed phrase in its Secure Element chip. It's important to note that a unique pad value from the MCU adds an extra layer of security, requiring compromising both the MCU and SE to access the seed from the SE. This design ensures resilience against physical attacks and tampering, even in the harshest conditions.
Since the Passport hardware wallet remains physically disconnected from computers and is safeguarded by PIN numbers, the storage and management of seed words are executed with utmost security.
The encrypted backup on the MicroSD further increases protection, featuring an automatically generated 20-digit secure backup code.
This robust security infrastructure extends to mobile wallet usage. Passport enables secure transaction signing with a mobile wallet through the use of microSD or QR codes, offering a seamless and secure experience.
Recently, Passport introduced the SeedQR standard, allowing users to operate the device in a stateless mode. In this way, the private key is not stored in the secure element, and users can restore their funds at will by scanning the SeedQR code when powering up the device. This innovative technology simplifies the user experience while adding an extra layer of security.
For those who prefer the traditional method of securing their wallet with a 24-word seed phrase written down on paper or engraved on durable materials like the Black Seed Ink steel plates, the Passport caters to these preferences as well. Users can access the seed words through the advanced options on the Passport. This flexibility ensures that users can choose the method that aligns with their security preferences and practices.
Interface & Ease Of Use
The Passport is surprisingly easy to use thanks to the great display and nice disposition of the elements in the UI: you always know what you are about to do and navigating around it it's a breeze.
The keypad makes you feel you are using something extremely familiar, and the user interface is elegant but at the same time simplified, without confusing.
Using Airgapped wallets it's never easy, but with the Passport every action is carefully crafted, making it feel it's a great user experience without sacrificing the security.
Compatibility
As an airgapped and multisig wallet, the Passport is compatible not just with the companion app Envoy, but with a vast amount 3rd party software wallets. Some of them are: Bitcoin Core, BlueWallet, BTCPay, Casa, Electrum, Nunchuk, Simple Bitcoin Wallet, Sparrow, Specter, Wasabi, and other wallets supporting PSBTs via microSD or QR codes.
The Passport facilitates various transaction types, including Bitcoin transactions through PSBTs (partially signed Bitcoin transactions) using either a MicroSD card or QR Code, and it also supports multisig transactions.
When it comes to charging, the Passport exclusively employs the USB Type C cable, aligning with the global standard.
Nevertheless, the package includes MicroSD cards adapters to accommodate older Apple and Android devices, ensuring compatibility across a range of devices.
Envoy: the Passport's companion app
Envoy, the official Passport app, seamlessly integrates with the Passport for a user-friendly experience. Developed by Foundation, it stands out as an uncomplicated option for managing multiple Bitcoin wallets. The app's streamlined interface allows easy Bitcoin transactions and enables users to maintain a small amount in their mobile wallet.
It serves as a bridge to connect your Passport for cold storage capabilities, and users can opt for private Internet connections via Tor or link to their node to increase massively privacy (nobody will see your addresses) and self validating transactions as an economic actor in the Bitcoin network. The app guides Passport setup, ensuring security checks and firmware updates are effortlessly completed.
One notable feature, available for mobile wallets only, is Magic Backups, a 60-second setup that securely backs up your seed and application data without requiring personal information.
Also the app is open source under GPLv3, employs end-to-end encryption, and supports Tor for enhanced privacy. With in-app support resources and the ability to download the latest Passport firmware updates, Envoy prioritizes user convenience and security.
Passport Review: Supported Coins
Regarding cryptos, the Passport supports Bitcoin, and Bitcoin. Simple, no?
This let's them concentrate on more airtight functions for this cryptocurrency, while reducing the surface attack because in the software there are definitely less lines of code compared to an equivalent that supports thousands of cryptos.
How To Buy the Passport
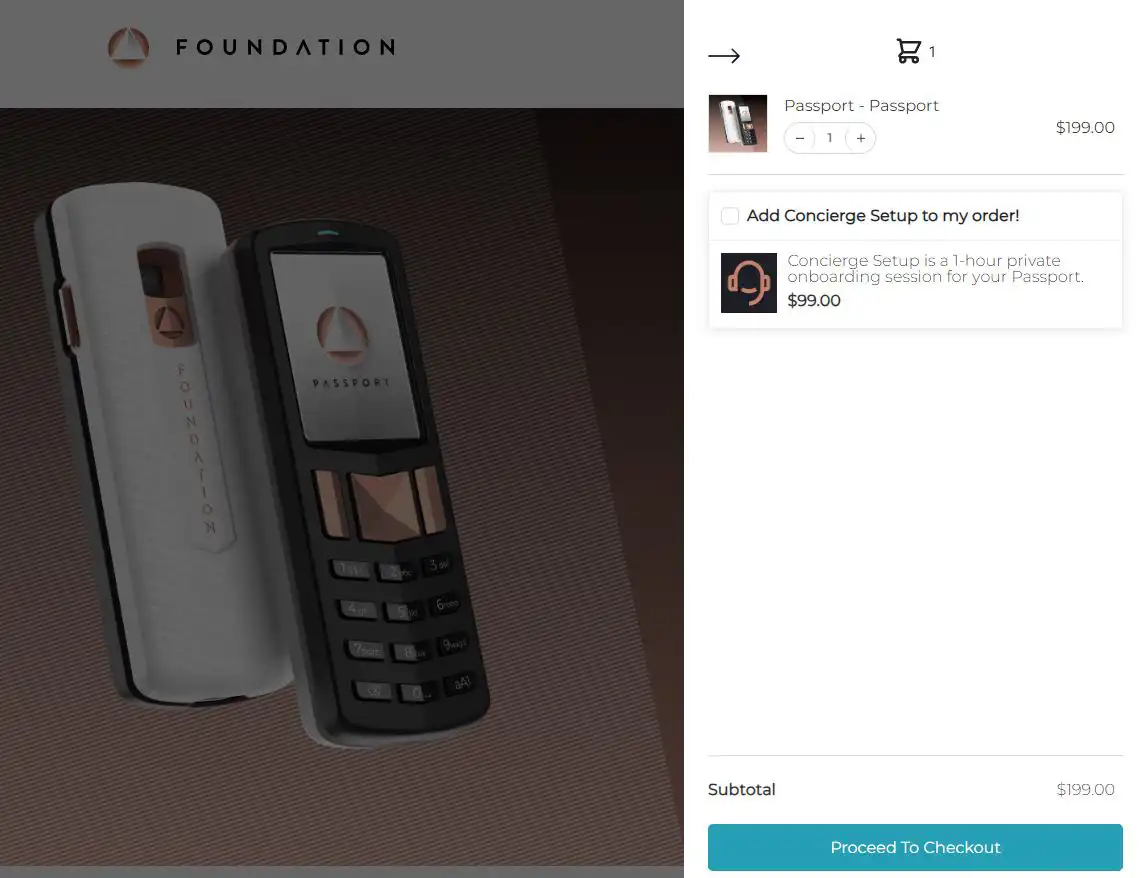
Getting the Passport is a straightforward process, with a convenient checkout option to include the Concierge Setup—an hour-long private onboarding session for your Passport.
The shipping process is efficient, ensuring a swift and tracked delivery experience. To purchase the Passport, follow these steps:
- Visit the official website of Foundation Devices at foundationdevices.com.
- Add the Passport to your Cart.
- Proceed to Checkout.
- Enter your shipping information, including address details.
- Provide payment details, which can be done using a credit card or bitcoin.
- Confirm your order.
- Expect to receive your Passport within a few days. Note that additional costs may apply if you are located outside the USA, so it's advisable to double-check before making the purchase.
Passport Price and Value for Money
While the Passport may seem a bit pricey, especially compared to other high-end hardware wallets like the Bitbox02 and Coldcard MK4, its premium feel justifies the cost.
The inclusion of a high-grade microSD card, various cables, adaptors, and a built-in battery contributes to the overall value. When safeguarding significant amounts of bitcoin, the slight difference in price becomes negligible.
The Passport boasts essential security features suitable for varying investment levels, whether you're storing thousands, tens of thousands, hundreds of thousands, or even millions worth of BTC.
Its airgapped nature ensures it never needs to connect to a computer or the internet, enhancing its security profile. In my view, the device is well worth the investment, providing peace of mind for securing your valuable assets.
While there might not be a current coupon code available, it's advisable to check back in the coming months for potential updates.
Passport Alternatives
It's reasonable to draw comparisons among Bitcoin-only, Airgapped compliant hardware wallets, and the most fitting alternatives seem to be the Coldcard and the Blockstream Jade.
| Passport | COLDCARD Mk4 | Blockstream Jade | |
|---|---|---|---|
| 🧱 blockdyor Total Score | 97/100 | 90/100 | 92/100 |
| 💰 Price | $199/€199 | $147.94/€134.31 | $64.99/€60.95 |
| 📅 Release Year | 2022 | 2022 | 2021 |
| 🔐 Number of Secure Elements | 1 | 2 | N/A (Blind Oracle) |
| 🔄 Open Source | Yes | No (Source Available) | Yes |
| 🔒 Bitcoin-only Firmware | Yes | Yes | Yes |
| 💾 Memory | 8GB MicroSD, 2MB of flash and 1GB RAM | 840 kB + 8 MB RAM | N/A |
| 🔗 Connector | USB Type C | USB Type C | USB Type C |
| 📱 Display Type | Color IPS Screen | Monochromatic OLED screen | Monochromatic OLED screen |
| 🛠️ Materials | Zinc alloy plated in copper | Semitransparent plastic case | Brushed stainless steel and plastic |
| 🔄 Bluetooth | N/A | N/A | Yes |
| 🔐 Multisig | Yes | Yes | N/A |
| 📊 Number of Cryptocurrencies | 1 | 1 | Bitcoin & Liquid Assets |
| 🔑 BIP39 Seedphrase Words Number | 24/12 Words | 24/12 Words | 24/12 Words |
| 🔐 Shamir Compatible | N/A | Seed XOR | N/A |
| 📶 NFC-V Compatible | N/A | Yes | N/A |
| 🔄 SD Slot | Yes | Yes | N/A |
| 📷 Camera | Yes | N/A | Yes |
| 🔋 Battery | Yes | N/A | Yes |
| 🌐 Airgapped | Yes | Yes | Yes |
Coldcard MK4: The Coinkite team expressed displeasure over the use of certain software by Foundation, which was originally sourced from the Coldcard during its open-source phase. Despite the Passport's superior usability, enhanced by features like the battery, camera, and a user-friendly interface, the Coldcard MK4 offers additional functionalities not present in the Passport. These include NFC, Seed XOR, and several other features. However, the Coldcard lacks a battery and camera like the Passport, and being a source-available only system, users need to consider these factors. For further insights, you can explore the Coldcard MK4 Review.
Blockstream Jade: The Jade, priced significantly lower than the Passport, stands out as a cost-effective alternative. Equipped with both a camera and a battery, it shares these features with the Passport. However, the user interface, in comparison, falls short, primarily due to a lower-quality screen and usability. Navigating and inputting information on the Jade may prove less efficient than on the Passport, where operations are notably faster. Despite these differences, the Jade supports SeedQR, a feature recently integrated into the Passport. Furthermore, its firmware receives impressive updates, maintaining an airgapped design and extending support beyond Bitcoin to include liquid assets. For additional infos, have a look to our comprehensive Blockstream Jade review.
Pros & Cons of the Passport
| Pros | Cons |
|---|---|
| ✅ Premium feeling | ❌ Keypad buttons lack substantial travel |
| ✅ Easy to use User Interface | ❌ Price is high |
| ✅ IPS Display | |
| ✅ Fully Airgapped | |
| ✅ FOSS |
Identifying downsides to the Foundations Passport proves challenging, as the realm of Bitcoin-only hardware wallets has seen limited evolution in recent years, with few devices reaching the premium standard set by Foundation. However, if compelled to highlight drawbacks, the somewhat underwhelming buttons and the occasional difficulty in removing the microSD card could be mentioned.
On the flip side, the advantages significantly outweigh any shortcomings. The Passport impresses with its premium aesthetics, high-quality materials, a removable Nokia-style battery, a vibrant screen, a user-friendly interface, and the flexibility to choose from various airgap configurations. These positive attributes collectively contribute to the overall appeal and functionality of the device.
Is The Passport Right For You?
The Passport commands a higher price point compared to its competitors, but the investment aligns with the quality and features it delivers. In a landscape of more modest offerings, the Passport stands out like a Mercedes among FIATs (no pun intended), offering a premium experience.
It caters well to a broad spectrum of Bitcoin-only users, simplifying the airgap configuration that can be cumbersome with other wallets. The user-friendly interface, complete with clear explanations of ongoing processes and critical actions, adds to its appeal, making it an excellent choice for Bitcoin enthusiasts. While there may be alternatives at a lower cost, they often lack the same level of elegance and sophistication that the Passport brings to the table.
Bottom Line
The Passport emerges as a standout choice in the realm of Bitcoin hardware wallets, offering a premium experience that justifies its higher price point. With a sleek design, top-notch materials, and innovative features like a removable Nokia-style battery, it sets itself apart in terms of both form and function. The airgap configuration, often a complex endeavor with other wallets, is seamlessly simplified, catering to users across the Bitcoin spectrum.
While it may face some criticism for its buttons' usability and the microSD card removal process, the overall positives far outweigh these minor drawbacks. The Passport's user-friendly interface, coupled with a wealth of security features and regular firmware updates, positions it as a leading solution for Bitcoin enthusiasts who prioritize both security and usability. In a market where premium options have been scarce, the Passport is as an outstanding choice, offering a luxurious and effective means of safeguarding one's Bitcoin holdings.
Passport Evaluation
With an impressive blockdyor Score of 97 out of 100, the Passport surpasses its hardware wallet competitors by a significant margin. Ideal for those exclusively focused on securely cold storing Bitcoin, this wallet may not be the best fit for users with budget constraints or a diverse range of cryptocurrencies.
Security: Unapologetically airgapped, it lacks NFC, Bluetooth, and other potential vulnerabilities, ensuring that the seed remains entirely isolated from computers and the internet. The option for multisig and coinjoin functionality enhances its overall security profile.
User-friendliness: Passport excels with a bright, top-tier screen and an intuitive interface. However, there is room for improvement in device ergonomics, as the buttons lack a satisfying click and may feel somewhat rushed.
Compatibility: Offering support for various third-party wallets and seamless integrations with services like Casa and Postmix. While the Passport has faced accusations of code theft, these claims are unfounded, as the utilized software is openly sourced and transparently acknowledged on their GitHub repository.
Reputation: While the Passport has faced some trolling from other companies accusing of code "theft", these claims are unfounded, as the utilized software is openly sourced and transparently acknowledged on their GitHub repository.
Cost: Considering its higher-than-average cost, the Passport may not be the catalyst for mass adoption of Bitcoin self-custody. Nevertheless, its exceptional security measures, user-friendly interface, and compatibility make it an outstanding choice for those prioritizing the secure storage of Bitcoin assets.