
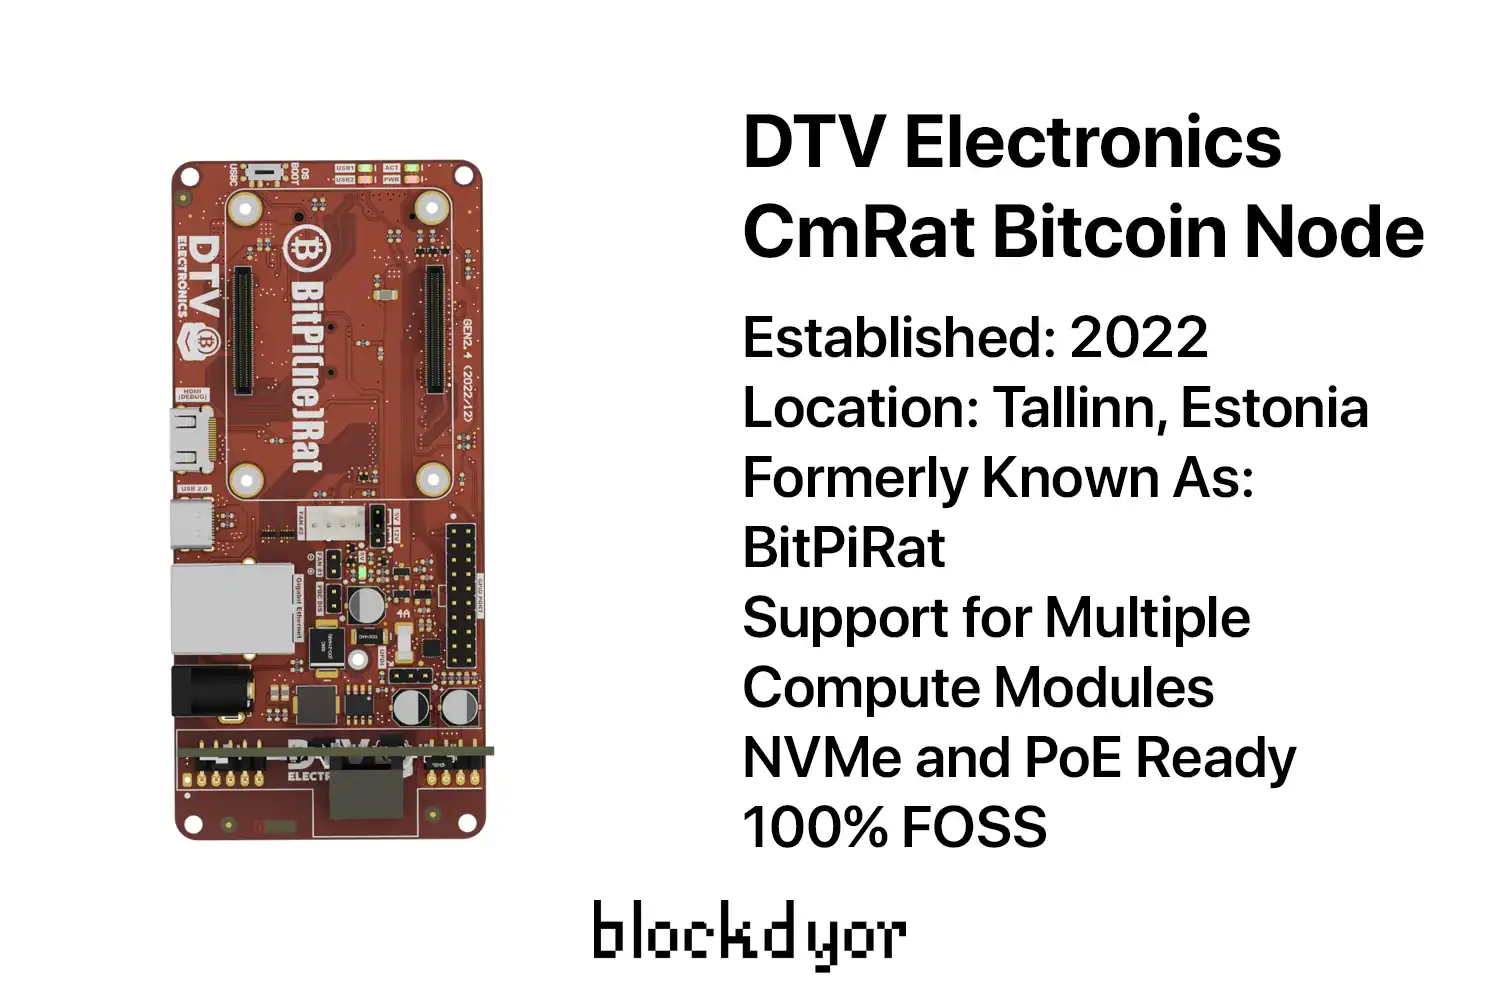
DTV Electronics, an Estonian Bitcoin focused electronics hardware company, champions the notion that running a Bitcoin Node should be as free as in freedom. Their unapologetic approach is embodied in the CmRat solution—a versatile carrier board comparable to a motherboard. CmRat (previously known as BitPiRat) empowers users to incorporate their chosen processor and RAM (compute module), install a preferred operating system, and engage in Bitcoin transactions in the most cost-effective and high-performance manner imaginable.
In alignment with GUI pioneer Alan Kay's belief that "People who are really serious about software should make their own hardware," DTV Electronics fully embraces this philosophy. They not only engineer and produce the carrier board but also deliver complete, plug-and-play Bitcoin nodes (or even just barebones). What sets DTV Electronics apart is their unwavering commitment to freedom and open source, aligning seamlessly with Bitcoin's ethos.
Through close collaboration with Free and Open Source Software (FOSS) Bitcoin node operating system developers like Citadel, DTV Electronics ensures a user-friendly experience. Nevertheless, the CmRat project remains entirely open source and FOSS, ensuring compatibility mainly with Citadel but also with any other Bitcoin Node OS. This underscores its versatility and dedication to the principles of freedom, offering a unique and unrestricted approach to Bitcoin node operation.
| Description | Details |
|---|---|
| 🌐 Website | dtvelectronics.com |
| 🏙️ Location | Tallinn, Estonia |
| 📅 Year Founded | 2022 |
| 💻 Hardware Model | CmRat (formerly known as BitPiRat) Gen 2.4, Radxa CM3 |
| 🚀 Processing Power | Quad-Core ARM Cortex A55 Rockchip 3566 Compute Module |
| 💾 Memory | 8GB RAM |
| 🕒 Initial Blockchain Download Time | ≈<7 days. 50% after 12 hours |
| 📡 Connectivity | Gigabit Ethernet (with PoE), HDMI, USB Type C, MicroSD Slot, NVMe Hard Drive |
| 🔒 Security Features | Login with Password, Backup with seedphrase, Connection with TOR |
| ⚙️ Compatibility | Compatible with RunCitadel, Nirvati, Radxa Android/Debian/Ubuntu Server |
| 📈 Scalability | Upgradable NVME, Upgradable Compute Module, Upgradable Heatsink and Fan |
| 💻 Power Consumption | ≈ 10W |
| 📏 Dimensions | 12 cm x 5.5 cm x 3 cm (4.72 in x 2.17 in x 1.18 in) |
| 🌐 Volume | 198 cm³ (12.07 in³) |
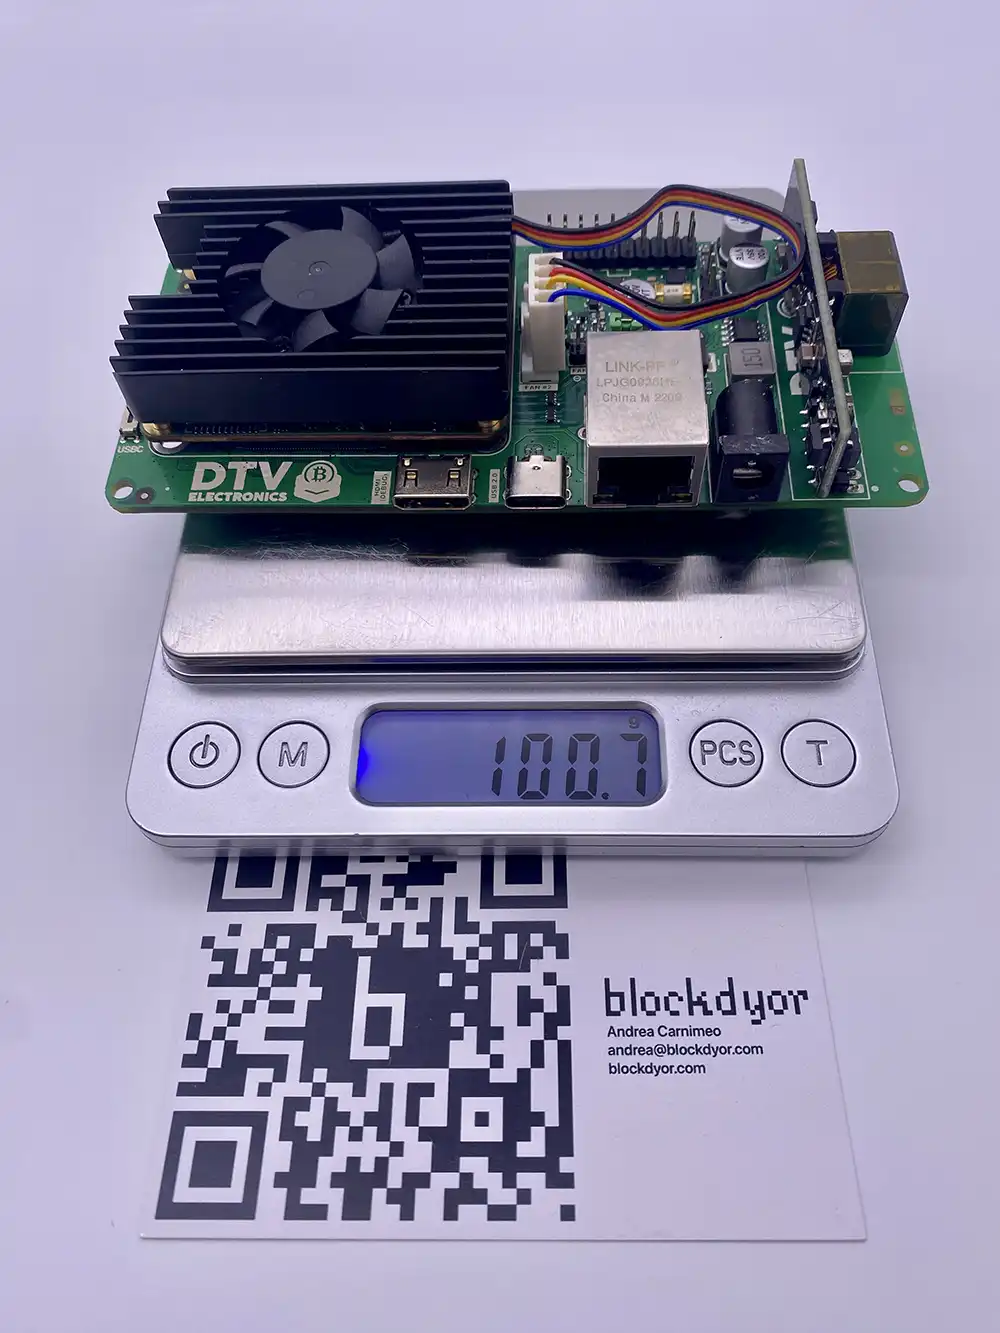
| ⚖️ Weight | 100 g (3.53 oz, including storage) |
| 📱 Mobile App | Web UI on citadel.local |
| 💬 Customer Support | Email to [email protected] |
| 🔄 Open Source | FOSS (Free and Open Source Software) |
| 💳 Price | From $50-60 (TBA) |
| 🌍 Shipping Availability | N/A |
| 📜 Warranty | N/A |
| 📖 User Reviews | N/A |
DTV Electronics History
Before we dive into the review, it's essential to explore the background of DTV Electronics. The inception of the CmRat Bitcoin Node traces back to a few years ago when Ant, the founder of DTV Electronics, connected with Aaron Dewes, a developer associated with Umbrel, another Bitcoin Node OS.
Aaron became disenchanted with Umbrel's development trajectory and its departure from the Free and Open Source Software (FOSS) ethos (Umbrel isn't open source). Consequently, he opted to fork off from Umbrel, creating Citadel—a FOSS alternative to Umbrel. The collaboration expanded as they engaged with Mirek, an experienced PCB designer in Poland. Mirek had developed a carrier board project capable of running a Raspberry Pi 4 Compute Module (CM), essentially the brain of a Raspberry Pi 4, while retaining full software support and customizable inputs/outputs on the carrier board.
The trio deliberated on this innovative board, and the outcome was the establishment of DTV Electronics. Fast forward to this review, almost 2 years passed, and the BitPiRat board we are examining today, featuring the Radxa CM3 (compute module 3), represents the pre-production, beta version. This version supports different compute module processors and multiple iterations of Citadel—remaining completely open source, FOSS, and proficient in running virtually any other software thanks to the possibility of just swapping the compute module (which is the CPU, RAM and a few other stuff).
How The DTV Electronics CmRat Works
Reviewing the DTV Electronics CmRat involves a layered exploration of its functionality. Primarily serving as a carrier board, its design necessitates the mounting of a compute module housing the CPU and RAM.
Subsequently, an additional layer involves affixing a heatsink atop the compute module, in order to keep it cool. Delving into each of these components provides a comprehensive understanding of the CmRat's architecture.
Carrier Board

DTV Electronics creates in-house their carrier board, serving as the foundational framework for the entire setup of the bitcoin node. This carrier board is equipped with various input/output features, including:
- A dedicated Full 2280 M.2 M-key socket designed for NVMe PCIe SSD drives with a capacity of 1TB or more. This is the space where the blockchain data and other applications will be installed.
- A microSD card slot. This is the location where the operating system (such as RunCitadel, Nirvati, etc.) will be installed.
- A Gigabit RJ45 port (GbE). The Ethernet port serves as both an internet connection interface and supports Power over Ethernet (PoE). This dual functionality enables the use of a single cable for both power supply and connectivity.
- USB-C (USB 2.0) port for CM4 module flashing, providing both power and data connectivity.
- A 2-pin 5VDC header for a fan with GPIO control (utilizing an open-collector driver) and a 4-pin Molex socket for a fan with PWM control (incorporating an EMC2301 controller with I2C).
- MIPI DSI port dedicated to an LCD panel.
- A Qwiic port utilizing an I2C interface.
- PCM audio port.
- User LEDs.
- MiniHDMI video output for debugging purposes.
- Overvoltage and overcurrent protection mechanisms.
- A slide switch for boot/flash mode selection.
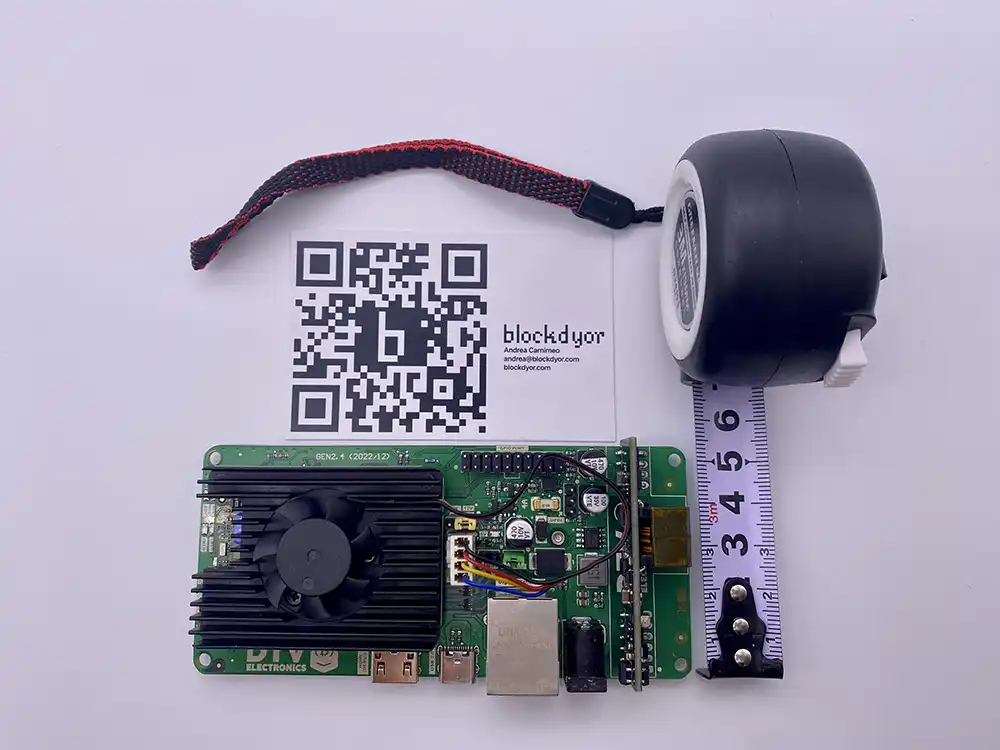
The size of the board is unusual and doesn't resemble any other on the market. It's really compact and lightweight, and it's noteworthy that is touted as one of the smallest on the market, despite featuring a full-size M.2 NVMe slot on its underside along with a rich array of IO ports on the topside.
Compute Module
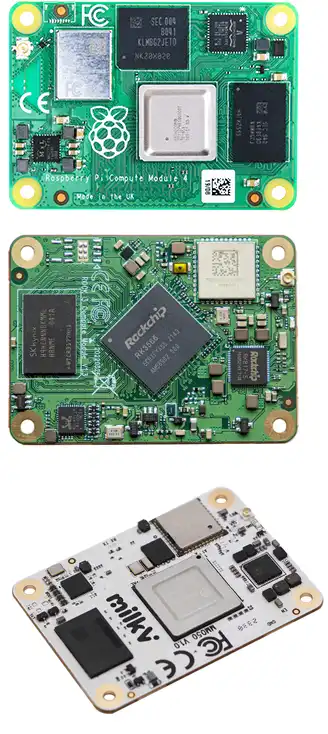
The BitPiRat has been primarily designed for Raspberry Pi Compute Modules, but the product's nomenclature is anticipated to change to "CmRat" in the future. This shift is prompted by challenges in obtaining sufficient quantities of Raspberry Pi compute module units. Notably, the carrier board extends its compatibility beyond Raspberry Pi Compute Modules, supporting various alternatives such as the Radxa CM3 module or the Milk-V Mars CM.
The flexibility to interchange the compute module with different options offers a wealth of possibilities. For instance, if one desires to run Umbrel on the Radxa CM3 module, it may not be possible due to the absence of a supported image from Umbrel developers. However, by swapping the CM3 for a Raspberry Pi CM4, one can run the Raspberry Pi 4 version of Umbrel. Alternatively, flashing the official Ubuntu Server Radxa version and then installing Umbrel is another viable approach.
Moreover, the impending convergence of Citadel into a new operating system called Nirvati is on the horizon. Nirvati is set to include features such as media player apps, Bitcoin Node apps, and more. This broadens the horizons for compute module possibilities, offering virtually limitless options for applications and configurations.
Returning to the compute module highlighted in this review, integrated into the CmRat, is the Radxa—a Chinese manufacturer specializing in compute modules centered around the RockChip RK3566. The DTV Electronics full node configuration incorporates this compute module (Radxa CM3), boasting the following specifications:
- Quad-core ARM Cortex A55 Rockchip 3566 Compute Module
- 8GB RAM
- OEM specification, excluding eMMC memory, WiFi, or Bluetooth
- Standardized pinout
- Performance on par with or slightly surpassing that of a Raspberry Pi CM4 8GB
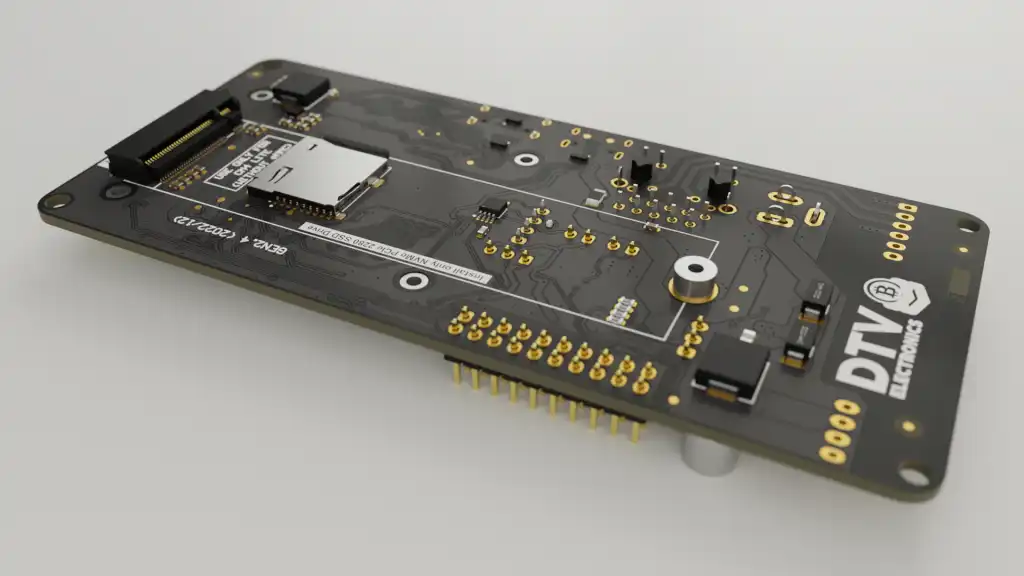
Storage
When you flip the carrier board, you'll discover two ports:
- 1x NVMe PCIe 2280 SSD Drive (for Bitcoin blockchain storage)
- 1x MicroSD Port (for flashing the OS)
In barebone configurations, storage isn't included. However, for the Bitcoin full node plug-and-play option, a 2TB storage will be provided (MicroSD details not specified). The freedom to choose your configuration allows you to opt for an already configured setup or go for the barebone, giving you the flexibility to purchase storage separately, 3D print the case yourself, and more.
By integrating the carrier board with the compute module and incorporating a microSD for the operating system and an NVMe M.2 for storage, you can build a machine ready to work 24/7 as your Bitcoin Node, with the added option to enhance performance and reliability by including a heatsink and fan. This duo helps manage heat dissipation during operation, ensuring optimal functionality.
In the forthcoming section, I will guide you through the step-by-step process. For those who prefer a more convenient approach, DTV Electronics offers fully assembled plug-and-play full nodes with all the necessary components, including the case, heatsink and fan, pre-installed.
However, building a node independently using the DTV Electronics carrier board (and compatible compute modules) solution not only ensures cost-effectiveness but also allows you to have full control over performance optimization and the aesthetic appeal of your Bitcoin Node.
DTV Electronics CmRat Quick Review
This review covers a lot, but if you want a quick look at the DTV Electronics CmRat Bitcoin Node, there's a short summary for a speedy glance.
| 🔐 Privacy & Security (48/50) | ||
|---|---|---|
| 📄 Open Source Compliance | Source Code adheres to FOSS (Free and Open Source Software) principles | 10/10 |
| 🔄 Firmware Integrity | Firmware can be built from source, and binaries match with source code | 10/10 |
| 🧅 TOR | All traffic is routed through TOR for enhanced anonymity | 5/5 |
| 🔐 Encryption | HTTPS readiness, but functionality not yet operational | 2/5 |
| 💾 Backup | Generates a seed phrase for Bitcoin and Lightning wallet | 5/5 |
| 🔑 Authentication | Mandatory password, with optional 2FA for added security | 5/5 |
| 💰 Purchase Procedure | Shipping address data is destroyed after 30 days, can pay with BTC | 5/5 |
| 📦 Packaging Safety | Double-boxed with bubble wrap for secure transit | 5/5 |
| 🚀 Features (45/50) | ||
| 🖥️ User-Friendly UX | Intuitive design, minimal settings, and customization options | 5/5 |
| 🎨 Design & Build Quality | Innovative board design, robust construction, and fan cooling | 5/5 |
| 🧱 IBD (Initial Blockchain Download) | <7 days; similar perfs with other RP4 nodes | 4/5 |
| 🔄 Compatibility | Enables module swapping for installing diverse operating systems | 5/5 |
| 📱 App Store | Pre-loaded with a variety of FOSS apps for immediate use | 5/5 |
| ⚡ Consumption | CmRat with 10W TDP costs around $2.19 annually, continuous usage, $0.25/kWh. | 5/5 |
| 🔌 Connection | Primary port is Ethernet, handling both Internet and power; lacks Wi-Fi or Bluetooth | 4/5 |
| 📦 Ready-to-Use Package | Currently in beta; offers both barebones and plug & play solutions | 5/5 |
| 📚 Documentation | Limited availability of user guides online | 3/5 |
| 🛠️ Customer Support | Company provides customer support through email or Telegram | 4/5 |
| 🧱blockdyor Score (93/100) |
How To Setup The DTV Electronics CmRat
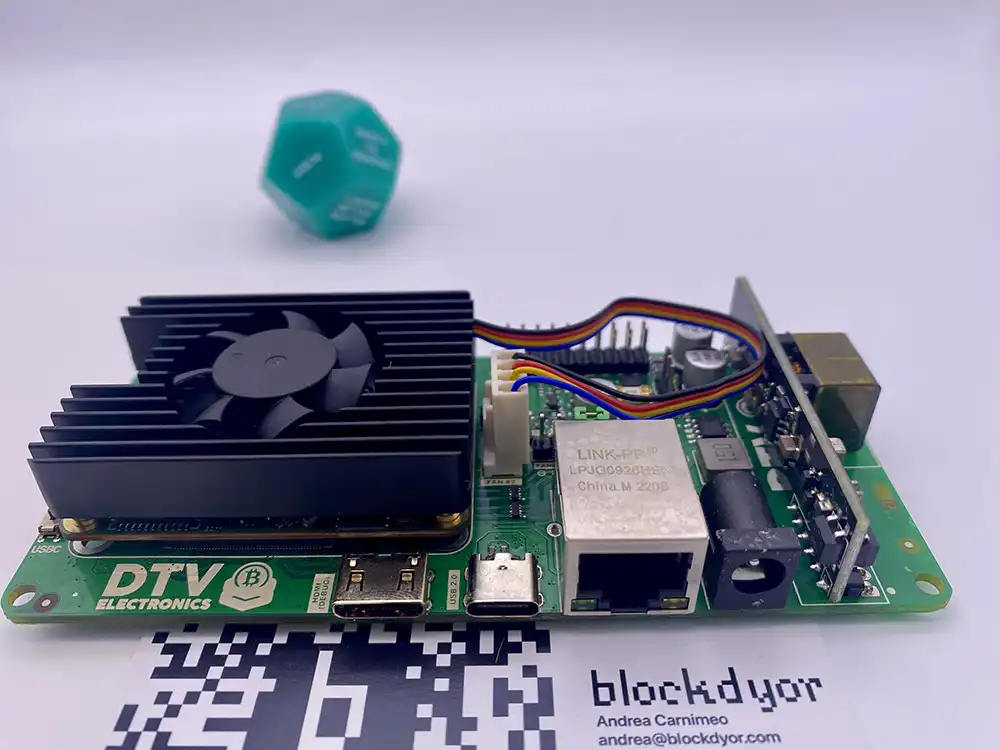
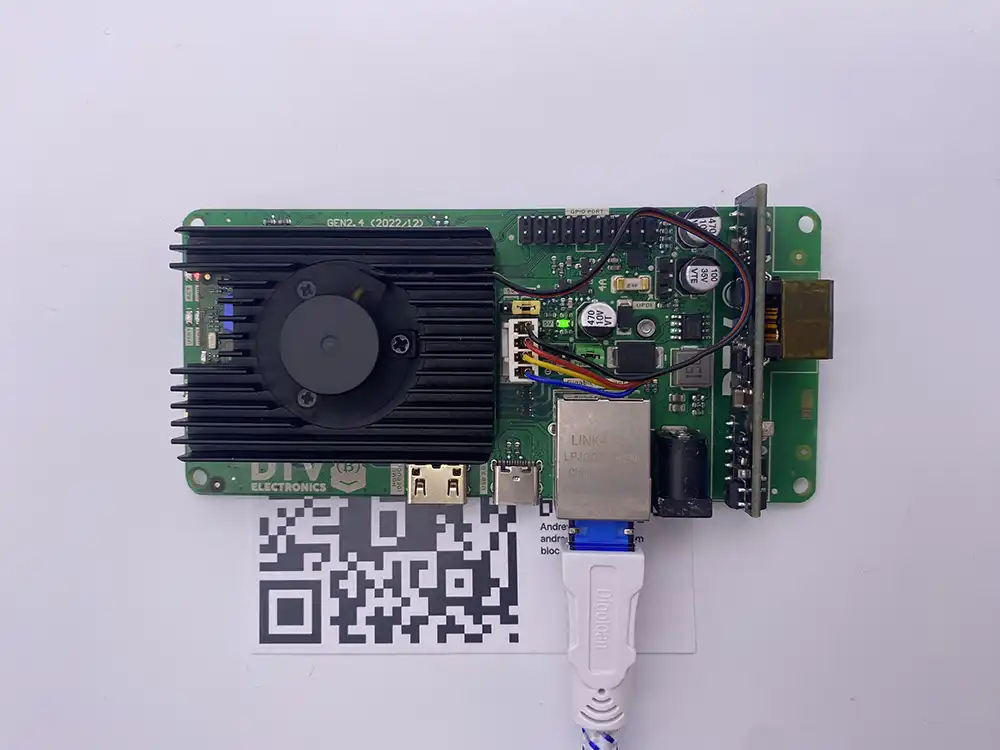
In the photo displayed above, you can observe how I received the CmRat from DTV Electronics. This configuration represents one of the most basic setups from them, given that they are yet to commence full-scale production.
Despite its preliminary state, it is already set up for use, featuring a compute module (the Radxa CM), a heatsink, and all the necessary ports. Notably, the Ethernet port is the primary one in use, as it supports Power over Ethernet (PoE), enabling device power through a single cable (requires a PoE switch). Alternatively, you can use the adjacent power port if PoE is not available.

When you turn the board over, noticeable distinctions set it apart from other boards. The ingenious approach from the DTV Electronics team involves relocating the storage area to the opposite side of the board. This design incorporates an NVMe PCIe 2280 SSD Drive for blockchain storage and a Micro SD Card for the operating system, keeping them separate. This not only results in a cleaner and more compact appearance but also ensures consistent coolness as they are positioned away from the compute module.

Situated between the heatsink and the compute module is thermal paste, facilitating the transfer of heat from the CPU to the heatsink. Subsequently, the heatsink undergoes cooling. This setup ensures that the CmRat maintains a notably low temperature profile.
Over the course of several days, I observed the device, particularly during the initial blockchain download, and the temperatures consistently remained below 42 degrees (without case and at an ambient temperature of approximately 22-24 degrees), which is exceptionally cool. On the device's low-profile side, you'll find a mini HDMI port, a USB Type C port, an Ethernet port with PoE functionality, and a power port too.
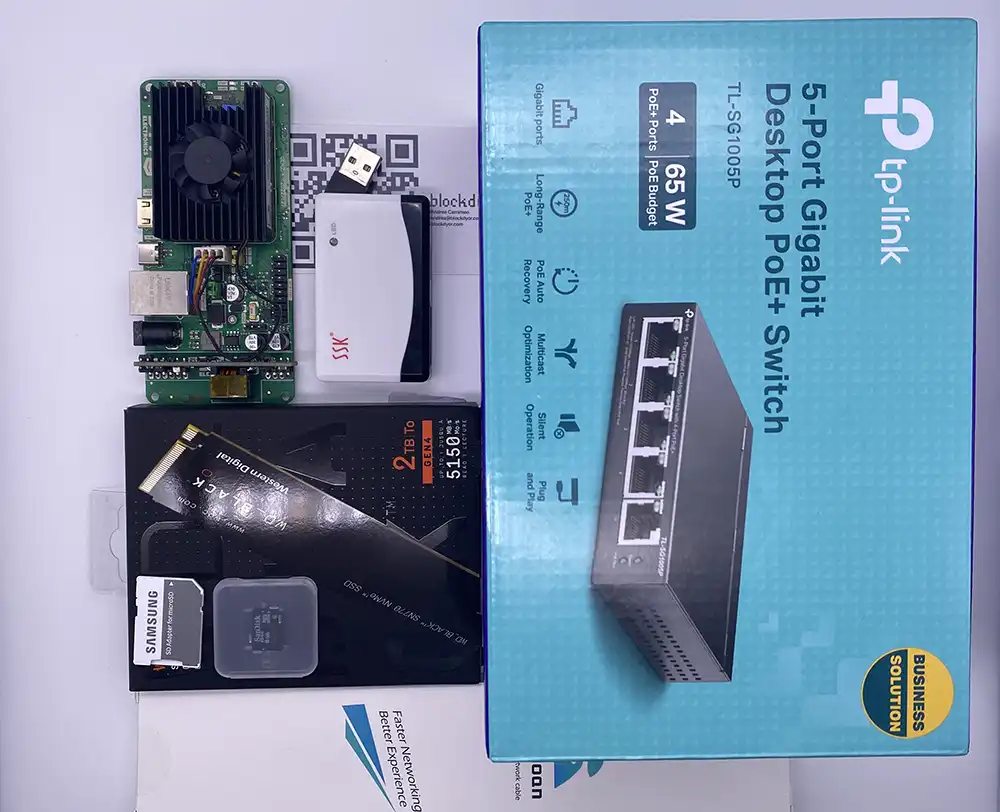
Now, let's prepare the additional peripherals for the setup. Here's what I acquired for the occasion:
- A 2TB NVMe (WD Black SN770): this will serve as storage for the blockchain and other RunCitadel applications.
- An 8GB Micro SD (SanDisk): reserved for containing the RunCitadel applications.
- A PoE 5-Port Gigabit Switch (TP-Link): this will be used to connect the board to the internet and simultaneously provide power, thanks to a single Ethernet cable.
- Some Adaptors: various adapters to ensure compatibility and connectivity between different devices.
These peripherals were acquired separately as part of the preparation for the BitPiRat setup. This was necessary as the initial configuration received from DTV Electronics was a "barebone configuration."
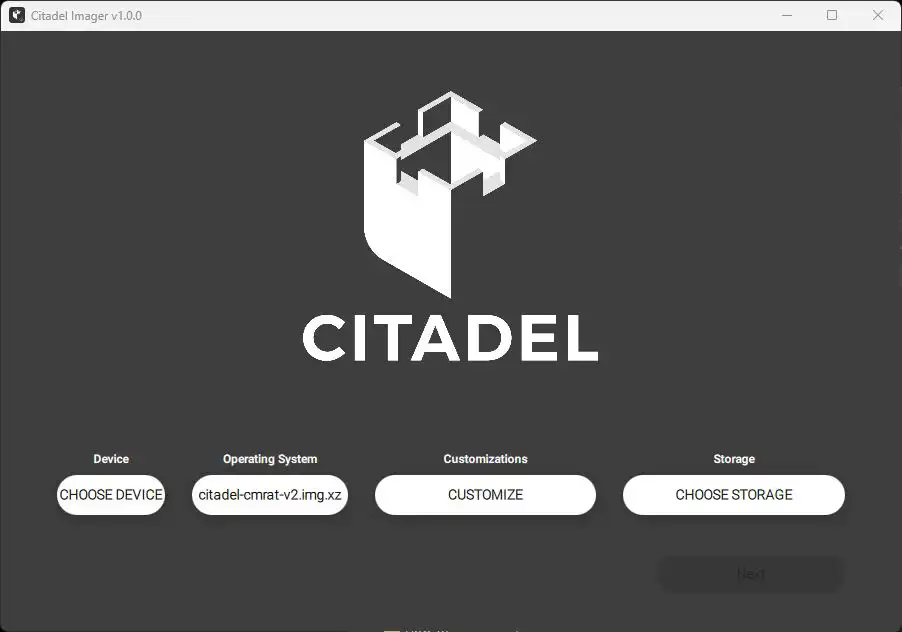
Go on the Citadel official website, download and install the Citadel Imager and then choose the device where to burn the image, in this case the MicroSD we are going to install on the CmRat. In this specifica case, the OS is a custom beta image called citadel-cmrat-v2.img which I found on the DTV Electronics Telegram group.

Simply slide the MicroSD card into the port until you hear a distinctive click – and that's all there is to it.
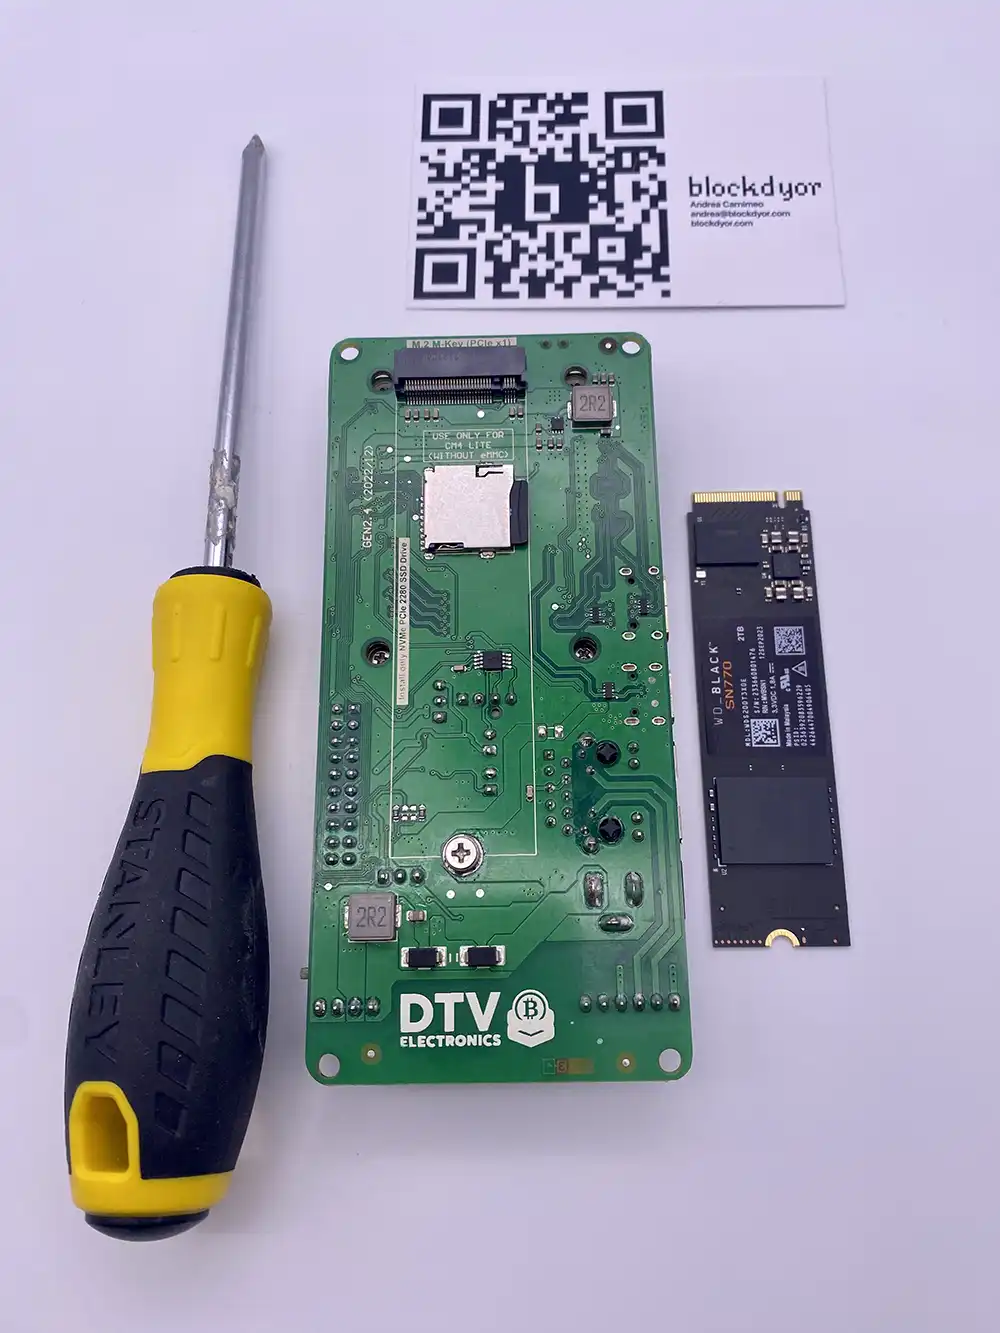
Now that the MicroSD is in place, it's time to install the NVMe storage, please double check that the one is compatible, as it's should be PCIe 2280.
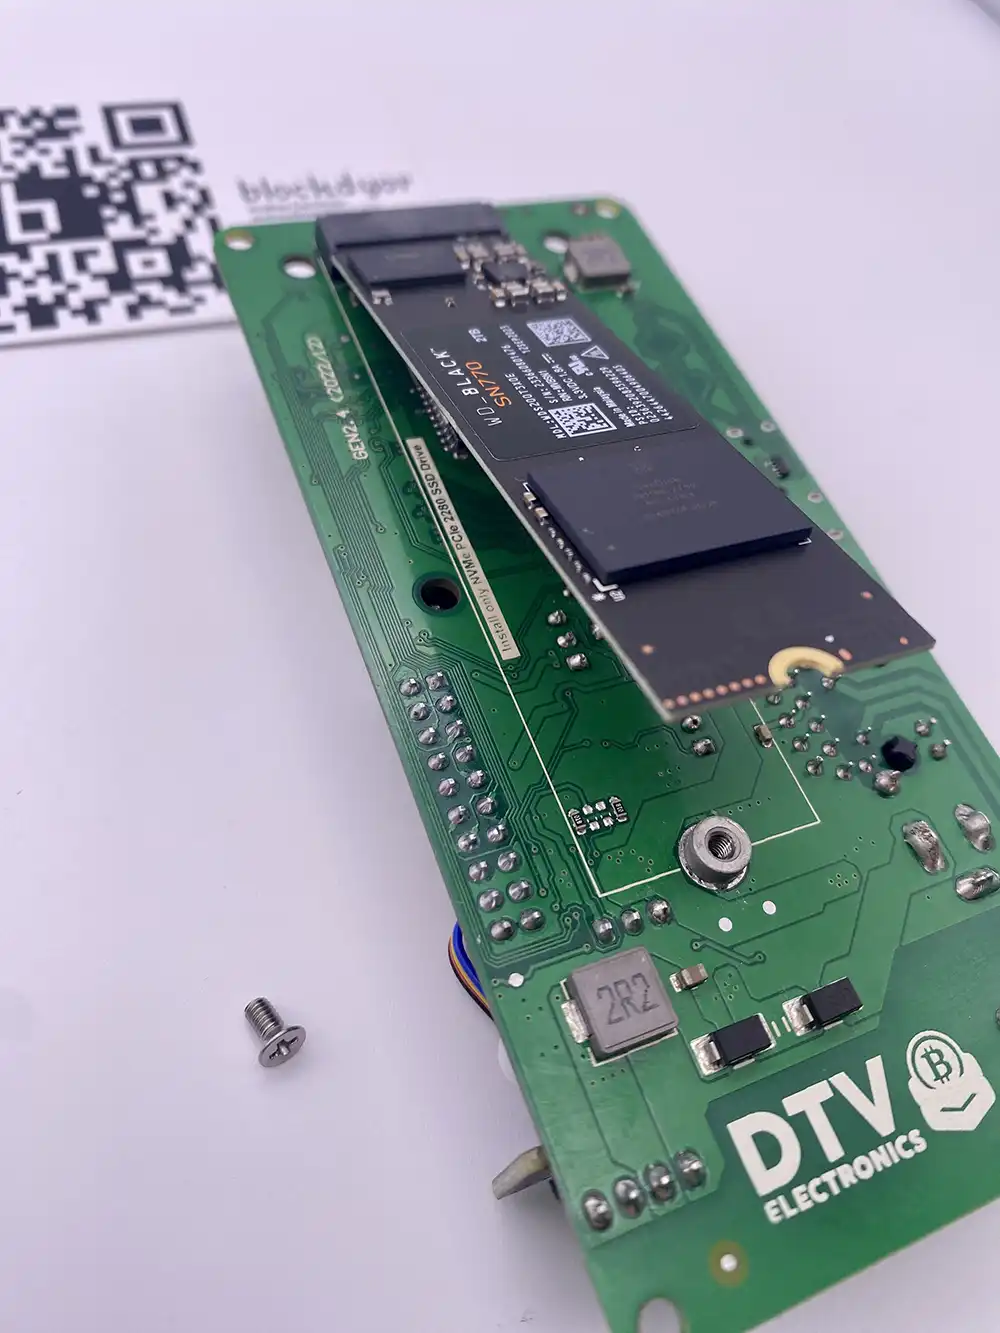
Loosen the small screw, slide the component inside, and then secure it in place with the screw. That's it!
One consideration, more of a configuration necessity for the NVMe, is that the operating system (Citadel) requires the SSD to be properly formatted. If you have access to an NVMe to USB adapter or can format it using another computer with a Linux Filesystem, it's recommended.
Alternatively, you can format it once it's installed in the CmRat. However, formatting the NVMe while Citadel is running can be a bit tricky since Citadel designates it as a swap drive, making unmounting challenging due to ongoing processes.
Nevertheless, you can attempt the formatting with these three commands by connecting to the CmRat via SSH using software like Termius and the machine's Citadel IP, using the following credentials: user: citadel, pwd: freedom.
sudo swapoff -a
sudo umount -F /dev/nvme0n1p1
sudo mkfs.ext4 -F /dev/nvme0n1p1
Before connecting to power, double check that the selector in the photo is set to "OS BOOT".

Now, all you have to do is plug in an Ethernet cable and connect it to your PoE switch—that's all. In terms of hardware, simplicity reigns, as everything seamlessly flows through a single cable!
The CmRat will initiate its power-up sequence autonomously. The fan will begin to spin, and several LEDs will illuminate—some steadily, while others blink. This is all normal behavior. The entire process is automatic, and the system will power on everytime as soon as you plug in the Ethernet cable.
Assuming you've already burned the image onto the microSD and formatted with the linux filesystem your NVMe, as outlined earlier, you can proceed to visit the network address citadel.local (or the ip of the machine) in your web browser. This will launch the Citadel initial wizard, allowing you to explore and engage with the installation process.
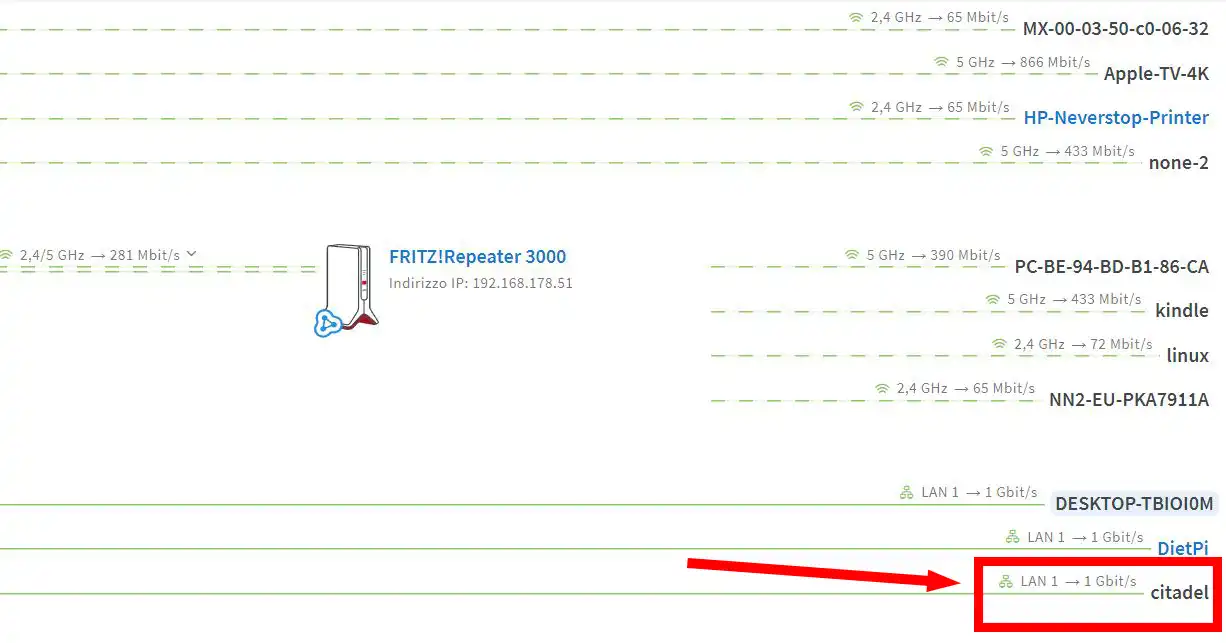
"Citadel" will be visible on your network. To access the web UI, simply enter citadel.local or use the IP address assigned to the CmRat by your router.
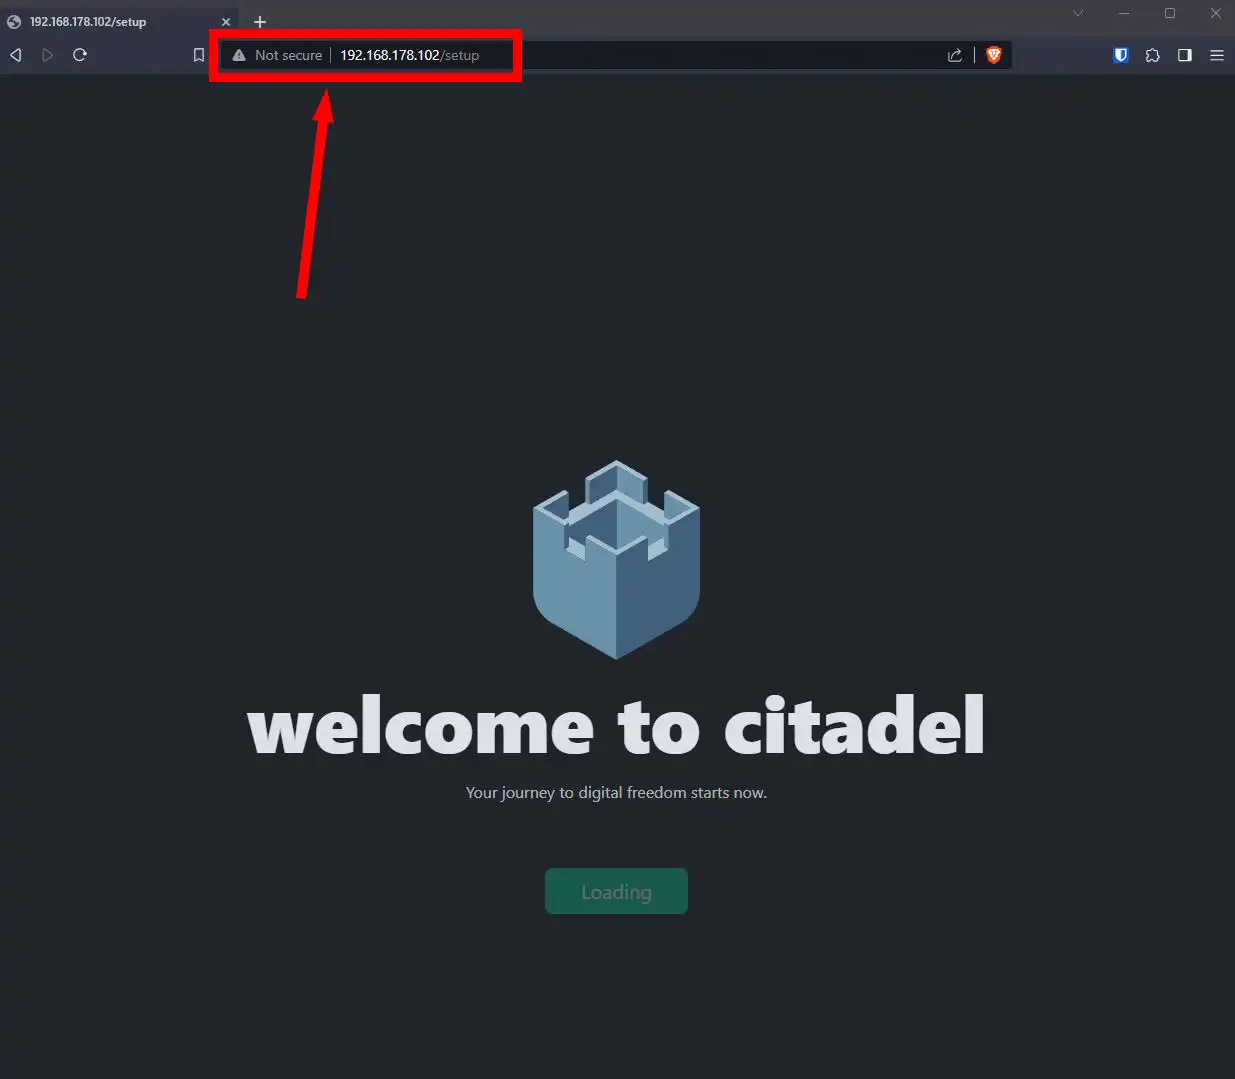
In this case, the router gave the address 192.168.178.102. If you don't want to type the full ip address, just typing citadel.local is definitely faster.
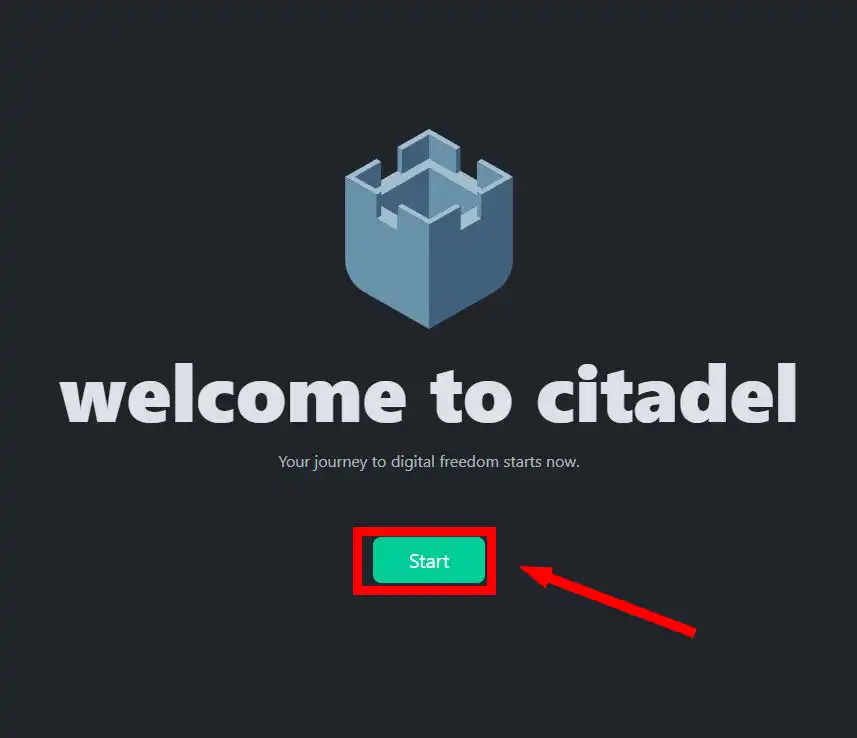
Click on the "Start" button to setup the citadel installation.
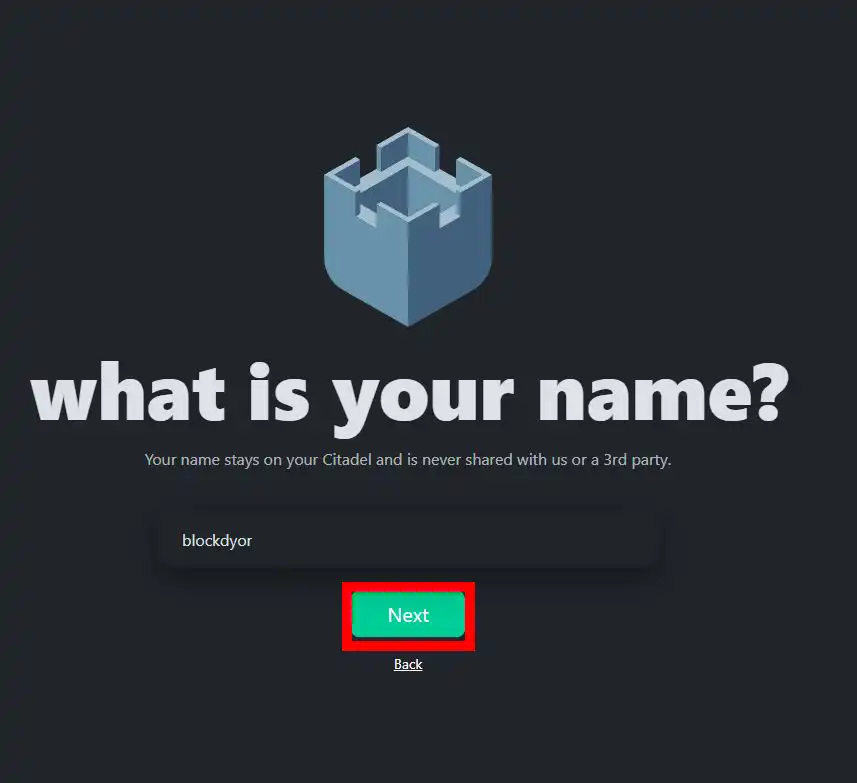
You will be asked to add your name, type it and then click on "Next".
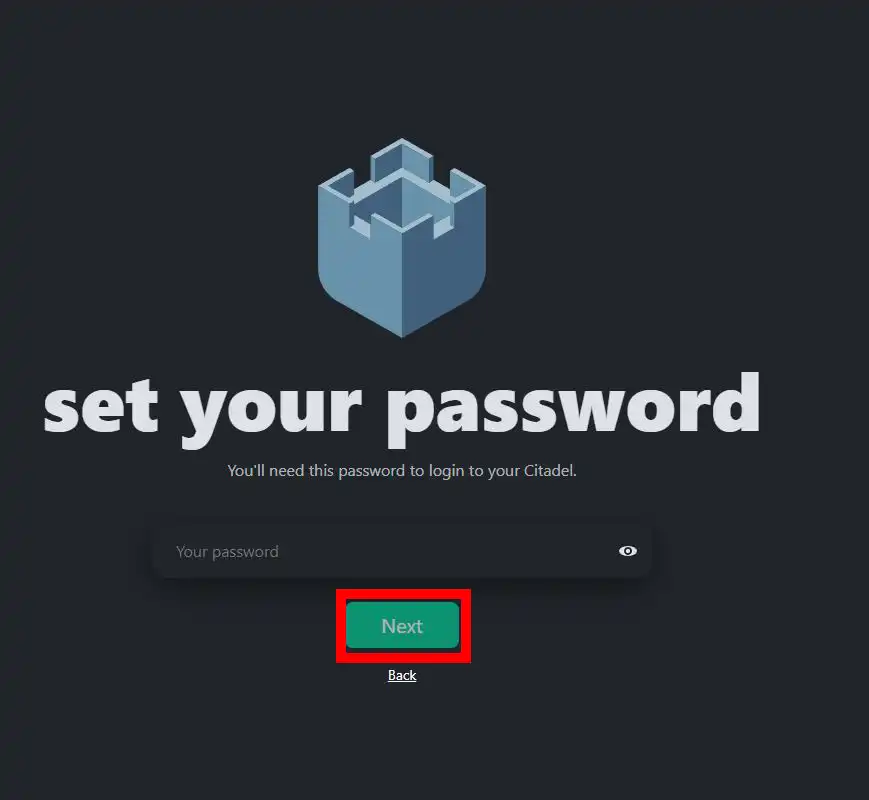
Do the same for the password and then click on "Next".
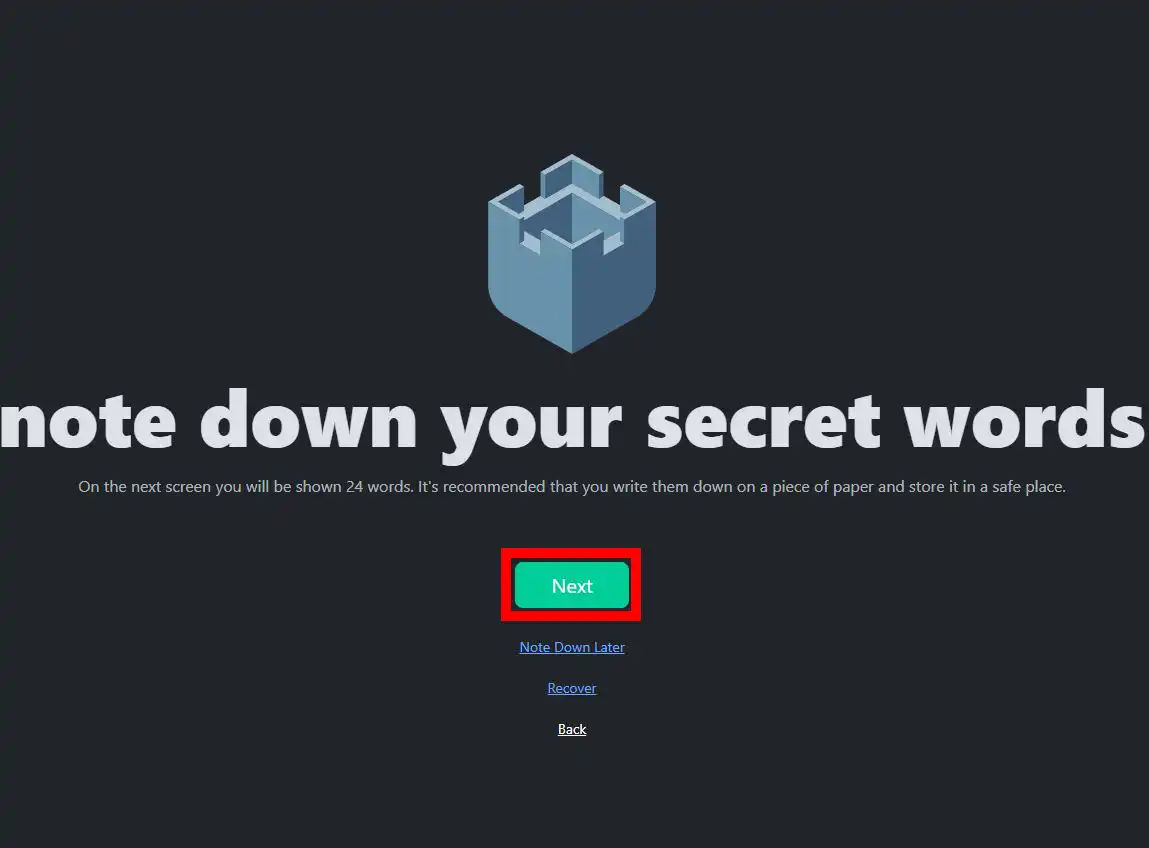
Citadel comes with a pre-installed integrated Bitcoin wallet, prompting you to record your seed phrase. You can choose to complete this step, recover an existing wallet, or skip this process altogether (with the option to address it later).

You will now receive the TOR URL for your Citadel Bitcoin Node. Copy and save it, as it remains constant and allows you to access your Citadel securely over the TOR network from any location worldwide.
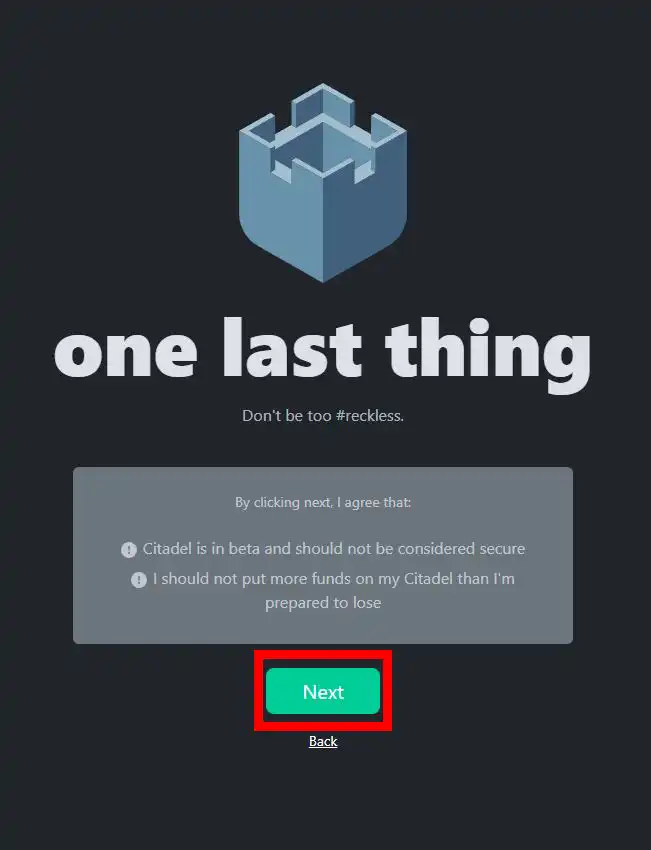
Click on "Next". You are almost there.
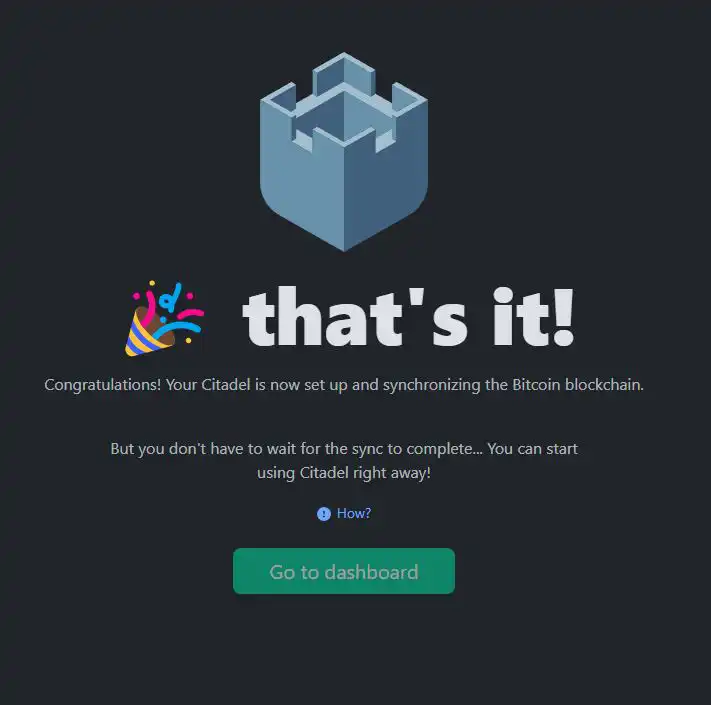
The setup is complete, and Citadel is currently in the process of downloading the blockchain. During the Initial Blockchain Download, you can also install and use other apps.
Get ready to touch grass! Let the mighty CmRat and Citadel handle the task of downloading the Bitcoin blockchain in the coming week or so. 🌿
DTV Electronics CmRat Design & Hardware

We've extensively covered the hardware, specifically the BitPiRat 2.4 version utilizing the Radxa CM3 Compute Module, now known as CmRat. This nomenclature change reflects the shift from Raspberry Pi Compute Modules to Radxa or Milk-V Mars compute modules.
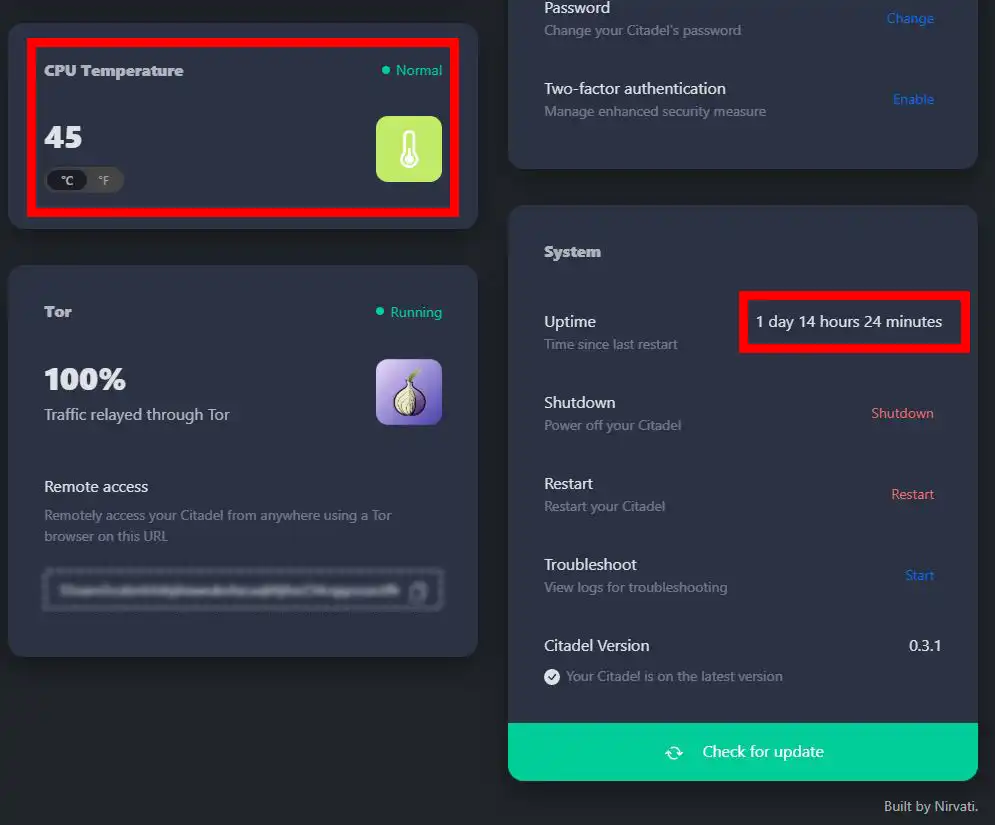
The design, however, is where the CmRat truly excels. Its compact form incorporates a consistently cool CPU, thanks to an always-on fan paired with a large heatsink. Even during demanding tasks, such as a continuous Bitcoin blockchain sync, the CPU temperature remained around 35-40 degrees with peaks of 45 degrees Celsius (112 Fahrenheit). Nevertheless, temperatures may experience a slight increase when using a 3D printed case, although it's not an official one.
Connectivity
Connectivity revolves primarily around the Ethernet port, serving both as an internet connection and a power source. However, there's also a mini HDMI port for debugging and a USB Type-C port for additional versatility.
Advanced Features
One standout feature of the CmRat is its ability to swap out the compute module. This flexibility allows users to choose modules tailored to their specific needs. Whether opting for a Raspberry Pi CM4 Compute Module to run Umbrel or selecting a Radxa version for Ubuntu Server, the possibilities are diverse.
Future collaborations between DTV Electronics developers, Citadel developers, and the open-source software community promise to unveil more options. Additionally, the impending merge of Citadel into Nirvati brings forth a broader array of apps and tailored solutions for node runners and other user types.
Warranty
As of this review, the product is in beta, and details regarding warranty information are currently unavailable.
Security & Privacy
Each time Citadel on the CmRat is accessed, a password is required, enhancing security despite occasional inconvenience.
Additionally, all traffic is routed through Tor, bolstering privacy, security, and resistance to censorship. However, note that the connection to the node lacks SSL encryption, suggesting limited security. Nevertheless, there's an indication under "Apps > HTTPS" suggesting that this feature will be available soon in Citadel. However, as of now, I haven't been able to configure it.
For optimal security, consider accessing Citadel only within your local network via citadel.local.
Code Openness & Reproducibility
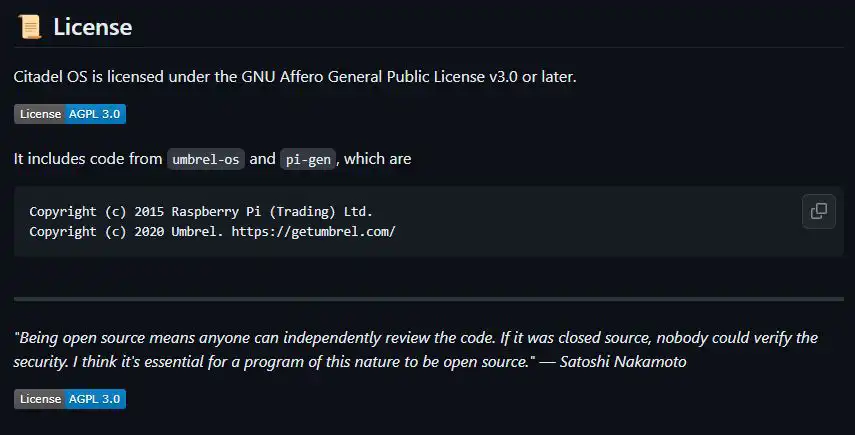
Citadel OS holds a license under the GNU Affero General Public License V3.0, signifying not only its open-source nature but more precisely, it qualifies as Free and Open Source Software (FOSS).
The main difference lies in the philosophy and emphasis. "Free software," as advocated by its inventor Richard Stallman, prioritizes user freedoms, emphasizing the users' right to run, study, modify, and share the software without paying anyone for it.
"Open source," while also providing access to source code, focuses more on practical benefits like collaboration, transparency, and code quality, often with less emphasis on users' freedoms. The Free Software Foundation and the Open Source Initiative represent these respective philosophies.
Seed Generation & Storage
Funds in the Bitcoin Wallet or Lightning Node are safeguarded by a 24-word seed phrase. So in case there is some problems on the node, you can format and reinstall and later
While the entropy of the seed phrase generation is unspecified, users can import their own. It's advisable not to store significant funds on the Citadel node, as per recommendations, given its continuous internet connectivity.
Interface & Ease Of Use
Once again, the DTV Electronics CmRat isn't limited to Citadel, supporting various configurations and avoiding OS restrictions. In this test, I use Citadel due to its full FOSS nature and official support by DTV.
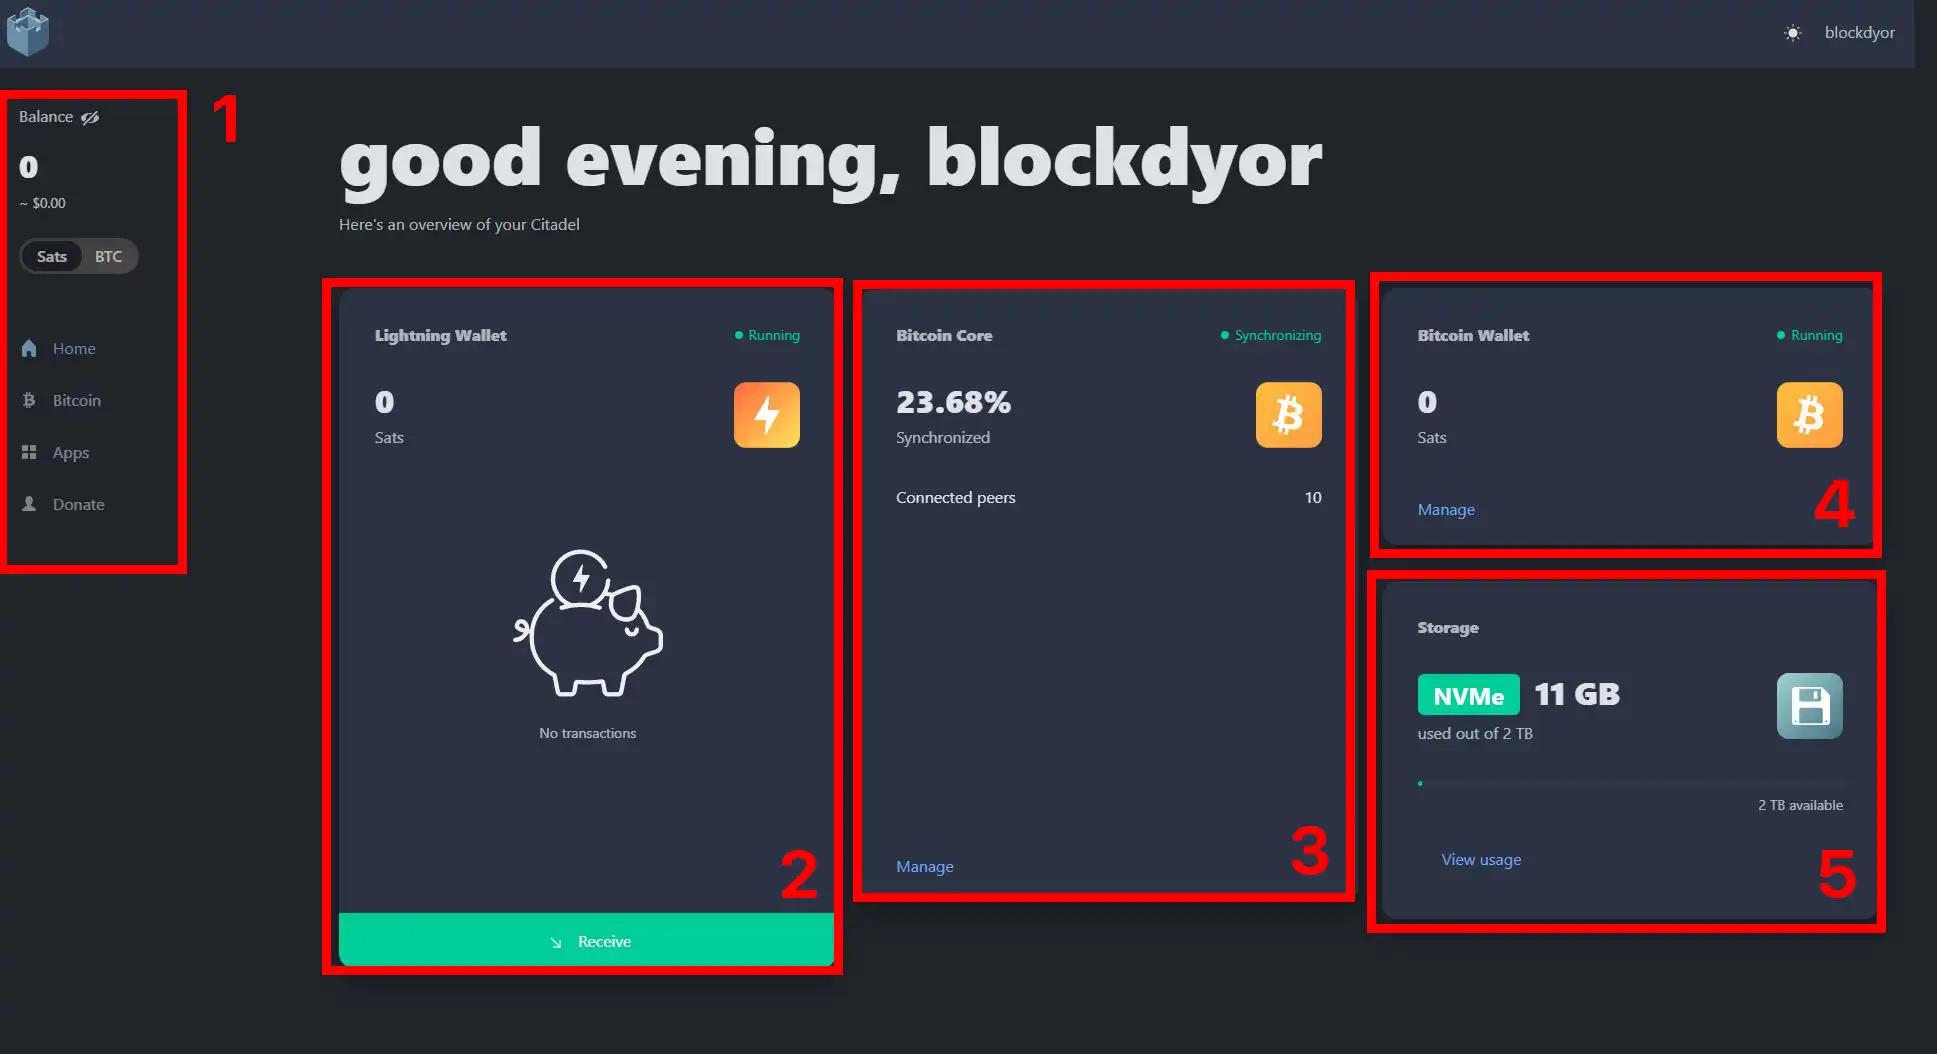
Citadel, a fork of Umbrel, differs significantly in look and feel. From the sidebar (1) you can navigate in the the Apps, Bitcoin core and have a look at your balance. It comes with preinstalled apps like Lightning Wallet (LND) which is basically the Lightning Network Daemon software and is a complete implementation of a Lightning Network node (2). There is, of course, Bitcoin Core (3), initiating blockchain download seamlessly. You have also an integrated Bitcoin Wallet (4) and some infos on the storage (5).
Despite the resource-intensive initial blockchain download, the interface remains responsive, with RAM usage staying below 30% and temperatures consistently under 46 degrees.
Compatibility & Connectivity
This Bitcoin Node is likely not only one of the most affordable on the market but also exceptionally versatile.
With the ability to swap compute modules and install various operating systems, Citadel's developers actively work on expanding compatibility solutions.
App Store
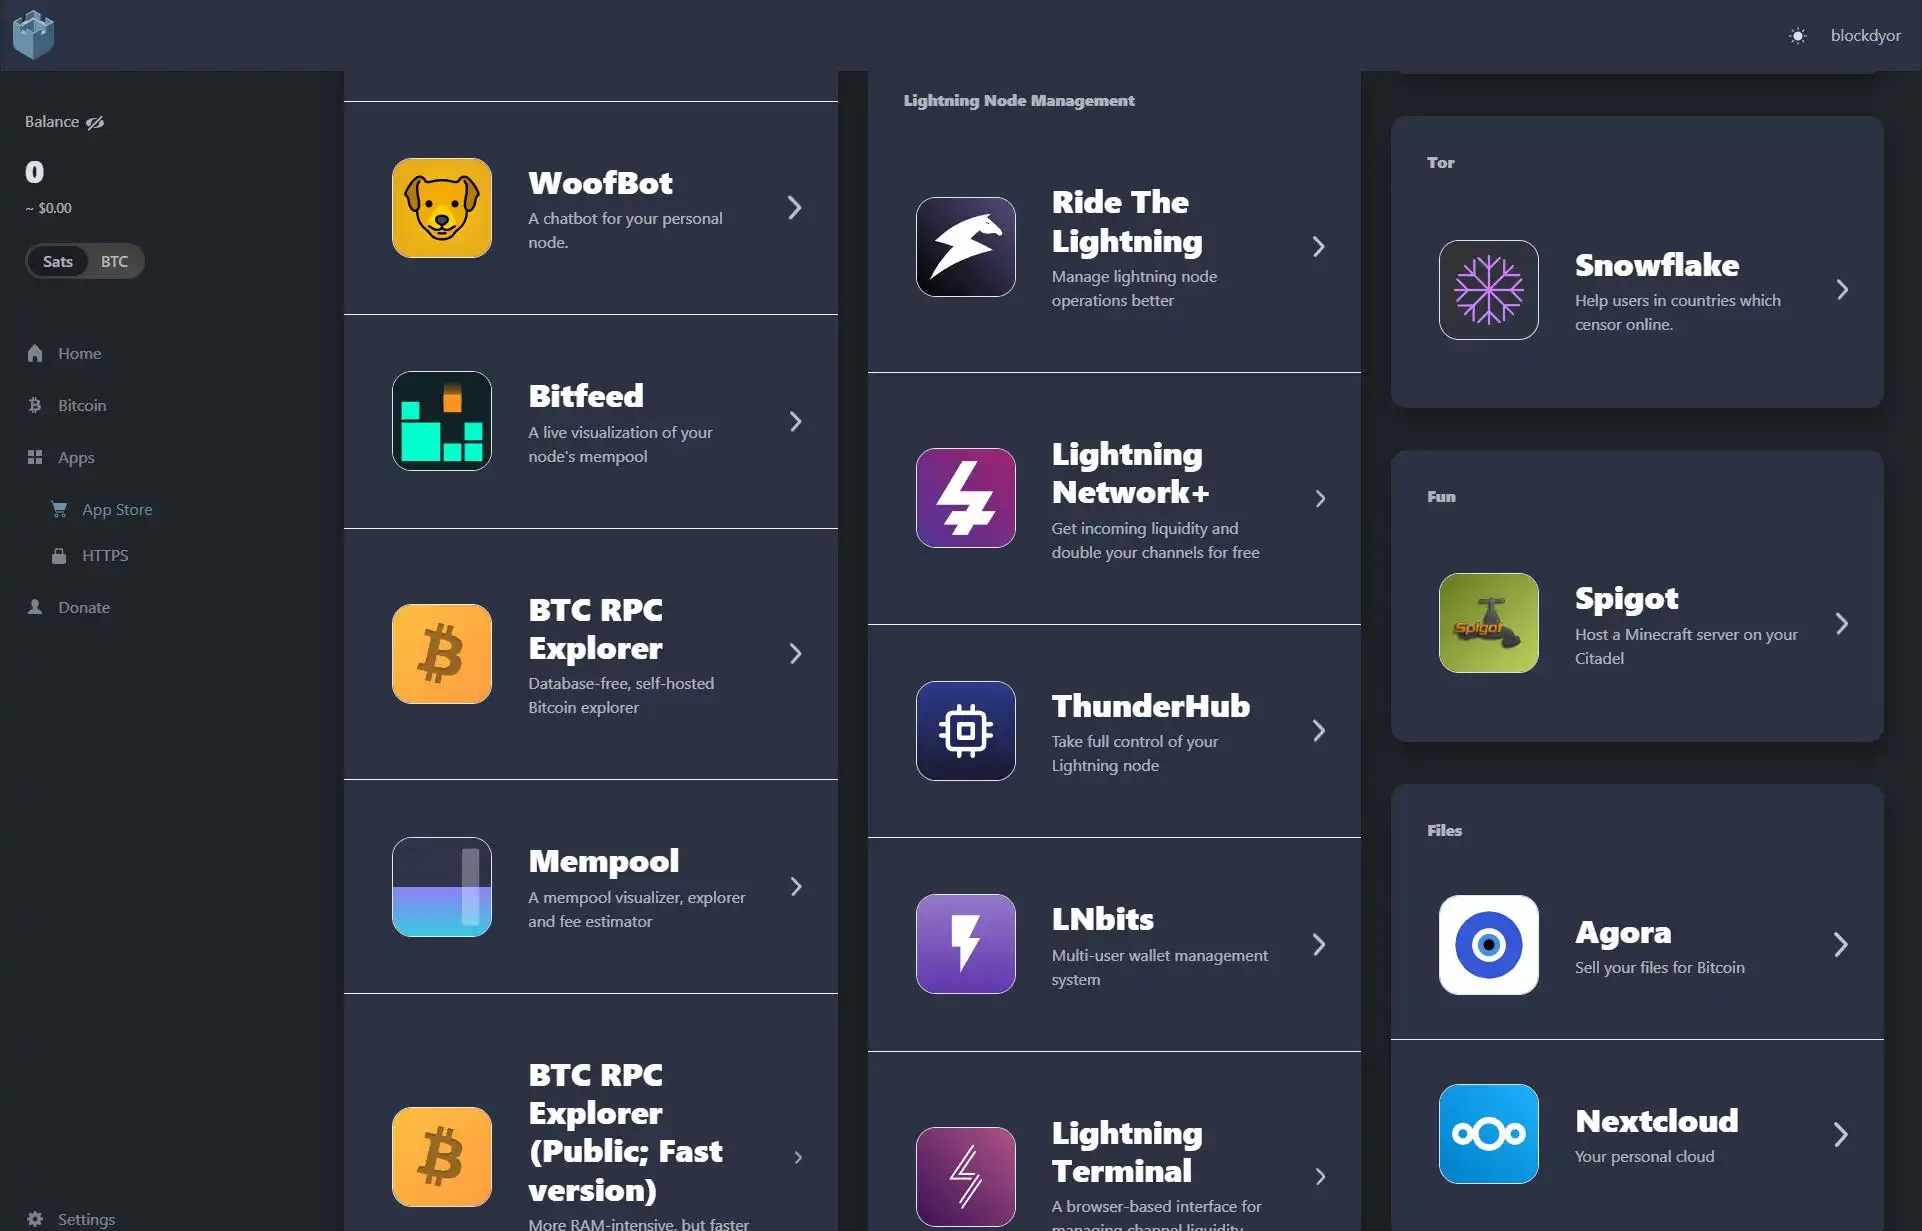
Although LND and Bitcoin Core are preinstalled, the Citadel app store isn't as comprehensive as competitors like Umbrel. This is mainly due to its focus on FOSS (Free and Open Source Software).
Despite the beta version, there are numerous apps for Bitcoin and Lightning Nodes, offering ample choices, with more likely to come in future updates.
SSH
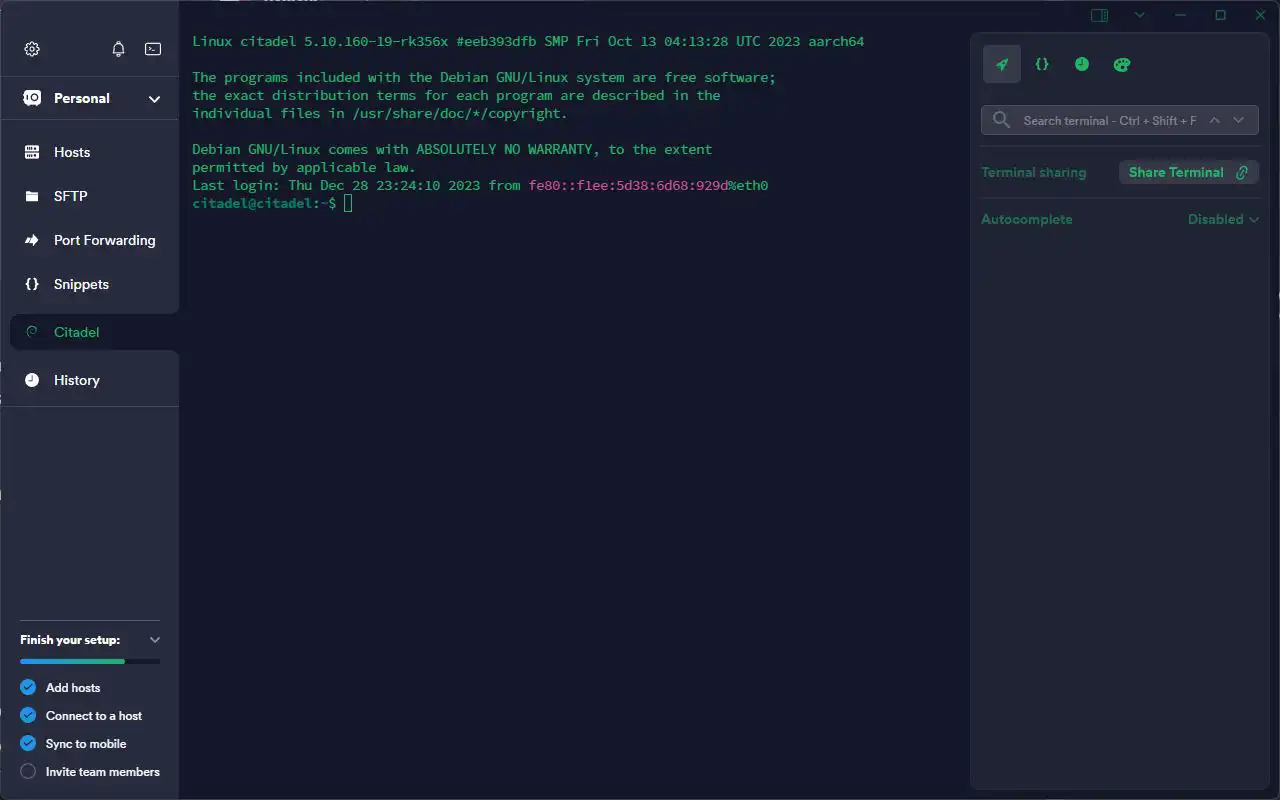
You can easily access SSH (Secure Shell) using Filezilla, Termius, or any preferred app within your network, connecting to the citadel.local hostname with the username "citadel" and password "freedom."
Once connected via SSH, you gain the ability to customize your bitcoin.conf file. This file holds crucial settings for your Bitcoin node. For instance, I configured it to filter the inscriptions bug and permit incoming connections from both clearnet and Tor peers.
In Citadel, you can modify the bitcoin-sample.conf file, located at /citadel/citadel/templates/bitcoin-sample.conf, which generates the bitcoin.conf file upon each restart. Here's how I set up my bitcoin-sample.conf file:
# SPDX-FileCopyrightText: 2020 Umbrel. https://getumbrel.com
# SPDX-FileCopyrightText: 2021-2022 Citadel and contributors
#
# SPDX-License-Identifier: GPL-3.0-or-later

# Please note: This file can't be changed, any changes will be overwritten the next time you start Citadel.

# Tor
proxy=<tor-proxy-ip>:<tor-proxy-port>
listen=1

# I2P
i2psam=<i2p-ip>:<i2p-sam-port>

# Mainnet/Testnet/Signet/regtest
<bitcoin-network>=1

# Connections
rpcallowip=<gateway-ip>/16
rpcallowip=[<gateway-ip6>]/96
rpcallowip=127.0.0.1
rpcauth=<bitcoin-rpc-auth>

# Memory
dbcache=200
maxmempool=300

# zmq
zmqpubrawblock=tcp://0.0.0.0:<bitcoin-zmq-rawblock-port>
zmqpubrawtx=tcp://0.0.0.0:<bitcoin-zmq-rawtx-port>
zmqpubhashblock=tcp://0.0.0.0:<bitcoin-zmq-hashblock-port>
zmqpubsequence=tcp://0.0.0.0:<bitcoin-zmq-sequence-port>

# Indexes
txindex=1
blockfilterindex=1

# SPV
peerbloomfilters=1
peerblockfilters=1

# Inscriptions Filter

permitbaremultisig=0
datacarrier=0

# Enable/disable incoming connections from peers.

listenonion=1
i2pacceptincoming=1

<external-ip>

# NOTE: The options addnode, connect, port, bind, rpcport, rpcbind and wallet
# only apply to mainnet unless they appear in the appropriate section below.
<network-section>
bind=<bitcoin-ip>
bind=<bitcoin-ip6>
port=<bitcoin-p2p-port>
rpcport=<bitcoin-rpc-port>
rpcbind=<bitcoin-ip>
rpcbind=<bitcoin-ip6>
rpcbind=127.0.0.1
rpcbind=[::1]
3D Printed Case
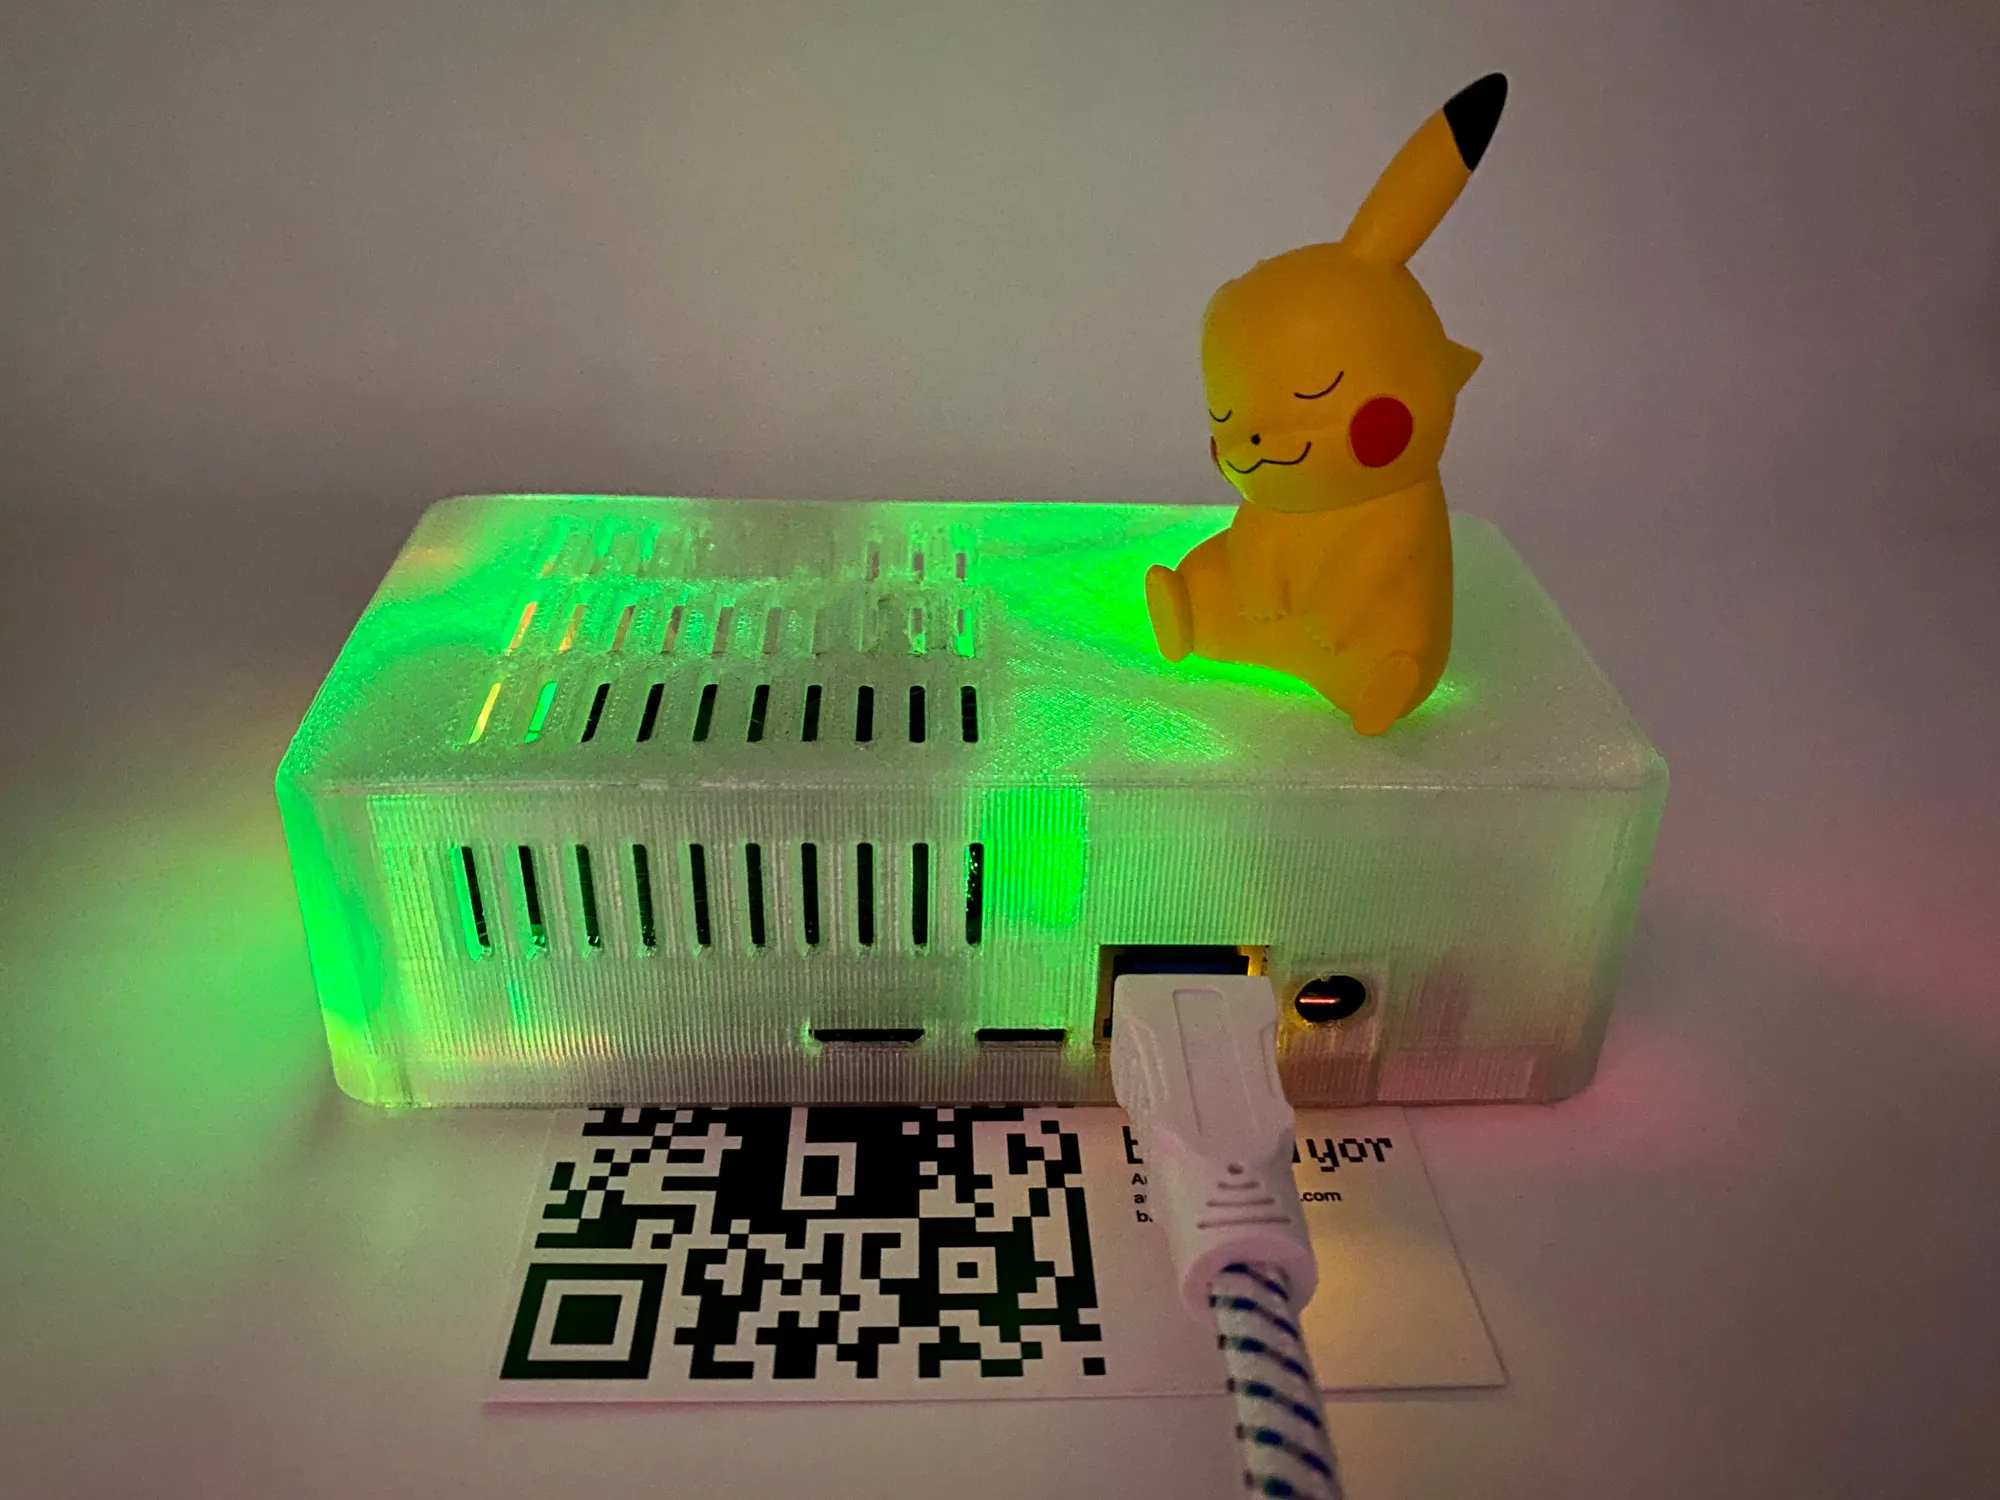
Even though plug-and-play solutions will be available on the DTV Electronics website, the CmRat, received as a barebone solution, didn't include a case. To address this, I chose to 3D print a case myself.
Thanks to @alexhack on Telegram, the .3mf files are accessible for download and self-printing using Bambu Labs 3D printers or any preferred printer. I opted for a transparent PETG material, with an approximate cost of $10.
The results are impressive, particularly in low-light conditions. You can download the 3D printing files down below.
DTV Electronics CmRat Price And Value For Money
If you're seeking an economical and efficient setup, this option stands out as both cost-effective and superior. Many competitors provide nodes with limited 1TB storage, often exceeding 500 euros/dollars and restricting you to a specific OS.
DTV Electronics takes a different approach, offering configurations at potentially lower costs than the competition. While details on their varied configurations are still forthcoming, it's anticipated they will be competitively priced.
Moreover, comparing the price to that of the Raspberry Pi 5/4 reveals a more affordable overall cost, along with a tidier setup thanks to a singular cable.
DTV Electronics CmRat Alternatives
While drawing comparisons with other solutions might seem a bit stretched, as many competitors simply rebrand existing off-the-shelf computers from China and add their logo.
Designing solutions from the ground up, as seen with the CmRat by DTV Electronics, distinguishes it from the prevalent trend of easy replication from Chinese manufacturers.
However, in the market there are several hardware and software alternatives to the DTV Electronics of CmRat. Let's see the two most well known solutions out there:
| DTV Electronics CmRat | Umbrel Home | RoninDojo Tanto | |
|---|---|---|---|
| 🧱 blockdyor Total Score | 93/100 | N/A | N/A |
| 💰 Price | From $50-60 (TBA) | $599 | $549 |
| 📅 Release Year | 2024 | 2023 | 2022 |
| 🔄 Open Source | Yes (FOSS) | No (Source Available) | Yes (FOSS) |
| 🚀 NVMe | Yes | Yes | Yes |
| 💾 Storage | N/A | 2TB | 1TB |
| 🖥️ RAM | 8GB | 16GB | 4GB |
| 🧱 IBD (Initial Blockchain Download) | 5-6 days | N/A | N/A |
| 📱 Integrated Display | Supported in the full node case | N/A | N/A |
| 🛠️ Materials | N/A | Polycarbonate | Polycarbonate |
| ⚡ TDP | 10W | 10W | 10W |
| 📶 Bluetooth | N/A | N/A | N/A |
| 📶 Wi-FI | N/A | Yes | Yes |
| 📜 Warranty | N/A | 1 Year | N/A |
Umbrel Home: it provides an all-in-one solution for your Bitcoin Node with a 2.9GHz Quad-Core CPU powered by Intel N5105. While it is more expensive, its operating system, Umbrel OS, can also run on a Raspberry Pi/4. However, it's worth noting that Umbrel Home is limited to its proprietary software and is not FOSS (Free and Open Source Software), having shifted towards a home server model.
RoninDojo Tanto: while relatively expensive, features a less powerful CPU than Umbrel Home but is still more powerful than the DTV Electronics CmRat we explored today. A notable advantage is that Tanto is FOSS, providing users with more flexibility and transparency in its software. They provide an economical alternative to the Tanto known as Bokuto, incorporating the same Pine64 RockPro64 4GB board. It requires self-assembly with guidance available on the official RoninDojo website, along with a parts list.
DTV Electronics CmRat Pros & Cons
It seems premature to form definitive conclusions about a beta version of an unreleased product that hasn't reached the market. This marks the first time on blockdyor that we're reviewing a product not yet available to the general public, necessitating caution.
However, despite the anticipated bug fixes in future updates, the product demonstrates functionality. It presents a promising addition to the Bitcoin node market, offering affordability and significant freedom in choosing both what to run and how to execute it.
| Pros | Cons |
|---|---|
| ✅ FOSS | ❌ Citadel, in the Radxa version, has still some bugs |
| ✅ Complete Freedom over the hardware and software installed | |
| ✅ It promises to become the most affordable Bitcoin Node on the market | |
| ✅ Great community | |
| ✅ Very low temps | |
| ✅ Small form factor |
Is The CmRat Right For You?
The CmRat caters to a diverse audience, addressing both beginners and those seeking a more hands-on approach to their Bitcoin node setup. For beginners, DTV Electronics offers full nodes that integrate the CmRat, providing a streamlined experience.
On the other hand, if you prefer a more customizable and do-it-yourself approach, the barebones configurations with just the boards are available. This allows you to personally add components like NVMe, SD Card, and even craft your own 3D-printed case, giving you a unique, tailored setup.
The key factor uniting both options is a shared commitment to Free and Open Source Software (FOSS). Whether you opt for the pre-configured full node or choose to assemble your components, the emphasis on FOSS ensures transparency, user freedom, and community-driven development. Additionally, the CmRat is positioned as a cost-effective solution, providing significant value for your investment.
Bottom Line
The CmRat by DTV Electronics emerges as a compelling contender in the Bitcoin node market, offering a versatile range of options.
While in its beta stage, the CmRat exhibits promise with its affordability, adaptability, and potential to inject fresh dynamics into the Bitcoin node landscape.
Thanks to its FOSS approach, the CmRat aligns seamlessly with the principles of Bitcoin. With its affordable price and low maintenance costs, it aims to be the ideal solution for the widespread adoption of Bitcoin and Bitcoin nodes.
Keep an eye on this innovative solution as it evolves and makes its mark in the Bitcoin ecosystem.
DTV Electronics CmRat Evaluation
The CmRat by DTV Electronics got a quite positive blockdyor Score of 93 out out of 100.
Security: The CmRat primarily supports Citadel, ensuring secure traffic relayed over TOR. It incorporates password protection, 2FA backup mnemonic, and HTTPS options, making it a comprehensive privacy node solution. Running your node allows transaction verification without exposing addresses/xpubs.
User-friendliness: Citadel is user-friendly, and the CmRat simplifies the setup with a single cable, thanks to PoE. It offers a more straightforward experience compared to assembling a Raspberry Pi and managing multiple cables.
Compatibility: The flexibility to switch compute modules enhances user options. Embracing FOSS encourages innovation within the community.
Reputation: While DTV Electronics is emerging, it shows potential to bring innovation to the Bitcoin node market.
Cost: Although specific prices are undisclosed, the prospect of board configurations starting at $50-60 is enticing.